Django2FPGAdemo
Demonstration how to build a Management Web interface to interact with the FPGA fabric and change the FPGA configuration with the Django Framework
Install / Use
/learn @robseb/Django2FPGAdemoREADME
Demonstration how to build with the Django Framework a Management Web interface to interact with the FPGA fabric and change the FPGA configuration

This step by step guide shows how to log Sensor Data from a Soft-IP ADC interface within a SQLite-Database and how to plot these data on a web interface. In addition, it is demonstrated how to manage and change the FPGA Configuration with just a web browser.
Complex web interfaces for controlling and monitoring on embedded systems are standard today. Especially for low quantity FPGA applications, the development of these web applications is often time-consuming. To accelerate this process, it is important to use powerful web development frameworks with simple to use IDEs such as Django. A huge community on desktop site uses that and if the same version of Django runs on the embedded Linux, it is possible to benefit from their knowledge. Django has a comprehensive documentation with many demos. However, these demos are for typical Desktop- and Cloud- applications and not for embedded ones. The important part of embedded management web applications is the interaction between the web interface and Sensor- or FPGA-data.
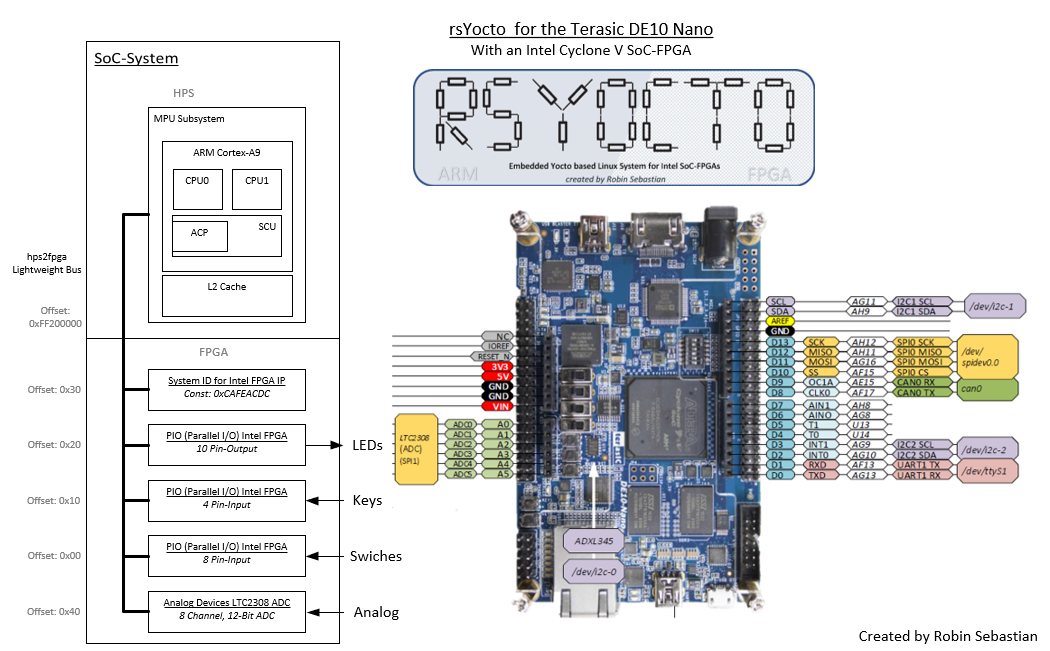
To demonstrate this, the ADC converter (Analog Devices LTC2308) of a Terasic DE10-Nano- or DE10-Standard Board (Intel Cyclon V SoC-FPGA) with a Soft-IP interface is connected via the Lightweight HPS to FPGA Bridge to the Hard Processor System (HPS). On the ARM Cortex-A9 of the HPS my embedded Linux, called rsYocto, customized for Intel SoC-FPGA is running.
On rsYocto the Django Framework (Version 3.0.2) with all necessary components, like the Apache Webserver and the SQLite database, is pre-installed.
This approach is the monitoring and management of embedded FPGA systems with a web interface. This cannot be consider for low latency real-time applications. The advantage of the usage of SQLite and HTTP with Linux is that these are standard in the desktop world. It allows for example to connect the data with a cloud service by adding a few extensions.
<br>Screenshot of the Web interface
 <br>
<br>
- Features
- Plotting the ADC convention voltage from a Soft-IP ADC
- Uploading and managing of FPGA configuration files
- Configuration of the FPGA fabric
- Controlling a FPGA LED
Reading a Sensor Value with the Django web framework - Sequence Diagram
The following sequence Diagram shows all involved actors and the data flow by reading an ADC Value to a SQLite Database. If an user opens the web page, Django plots the complete data into the web interface as shown below.

A HTTP GET-command (here by calling the URL http://127.0.1:8181/ADCtrigger) triggers the Django web application. It calls the “read Sensor” application. This is a python script, which reads the Soft-IP ADC Interface and returns the ADC convention. Then Django adds the value with a time stamp to the SQLite database.
To repeat and time sync the readout of the ADC a Shell script or the tool crontab can be considered.
In case an user is going to open the web application, Django loads the complete data of the ADC from the database and plots them graphically into the webpage.
This is one part of the final application. The interface for managing FPGA Configurations works similarly.
Table of Content
- Project Preparations
- Installing the finshed Web interface
- Creating a new Django Project on the SoC-FPGA
- Creating a new Django App to interact with the FPGA fabric
- Testing the Web Appilcation
- Reading of a Soft-IP ADC interface and writing the data into a SQLite datbase
- Configuring the plotting of an ADC Channel
- Reading and plotting the data time triggered
<br>
Project Preparations
- Boot up rsYocto on your Intel SoC-FPGA Board by following the getting started Guide
- Setup Visual Studio Code Insider with this instruction guide
- On rsYocto (Version. 1.031+) are following compunets for this project pre-installed:
Installing the finshed Web interface
For installing and testing the final project do the following steps:
- Clone this repository by executing the following Linux Terminal command on rsYocto
git clone https://github.com/robseb/Django2FPGAdemo.git - Navigate inside the project folder
cd DjangoFPGA/DjangoFPGA - Generate an administration interface with your login information
python3 manage.py createsuperuser - Please follow: Testing the Web Appilcation
<h3><u> Or build it by your own with this step by step guide: </u> </h3> <br>
Creating a new Django Project on the SoC-FPGA
-
Use the Linux Terminal, which is reachable inside Visual Studio Code Insider to create a new Django project with the name "DjangoFPGA" by executing the following command:
django-admin startproject DjangoFPGA
-
Note: Use in the drop-down menu (blue arrow) the point "sh" to access the Linux Terminal. In case the point is not there, press the “+”-icon to add it.
-
Navigate with the Linux Terminal inside Visual Studio code to this project
cd DjangoFPGA
Testing the empty Django Project by accessing it with a web browser
-
By default the Django web server is only reachable internally by the embedded Linux
-
To access Django applications within your network do the following steps:
- Open the Django project settings file (settings.py) with Visual Studio Code (as shown above) and allow everybody to connect with the following lines:
ALLOWED_HOSTS = [ '*' ] - After some change of the settings file a migration of the project is necessary:
python3 manage.py migrate
- The output of this command should look like this:
root@cyclone5:~/DjangoFPGA# python3 manage.py migrate
Operations to perform:
Apply all migrations: admin, auth, contenttypes, sessions
Running migrations:
Applying contenttypes.0001_initial... OK
Applying auth.0001_initial... OK
Applying admin.0001_initial... OK
Applying admin.0002_logentry_remove_auto_add... OK
Applying admin.0003_logentry_add_action_flag_choices... OK
Applying contenttypes.0002_remove_content_type_name... OK
Applying auth.0002_alter_permission_name_max_length... OK
Applying auth.0003_alter_user_email_max_length... OK
Applying auth.0004_alter_user_username_opts... OK
Applying auth.0005_alter_user_last_login_null... OK
Applying auth.0006_require_contenttypes_0002... OK
Applying auth.0007_alter_validators_add_error_messages... OK
Applying auth.0008_alter_user_username_max_length... OK
Applying auth.0009_alter_user_last_name_max_length... OK
Applying auth.0010_alter_group_name_max_length... OK
Applying auth.0011_update_proxy_permissions... OK
Applying sessions.0001_initial... OK
- Use the next command to start the web server (here on Port 8181)
python3 manage.py runserver 0:8181
- The output of this command should look like this:
root@cyclone5:~/DjangoFPGA# python3 manage.py runserver 0:8181 Watching for file changes with StatReloader Performing system checks... System check identified no issues (0 silenced). January 18, 2020 - 15:35:44 Django version 3.0.2, using settings 'DjangoFPGA.settings' Starting development server at http://0:8181/ Quit the server with CONTROL-C. - Note: The default port 8080 is used by the Apache web server
- Open the Django project settings file (settings.py) with Visual Studio Code (as shown above) and allow everybody to connect with the following lines:
-
Go with a web browser on a device inside this network (computer, tablet, smart-phone) to the URL:
http://<iPv4-Address of the Board>:8181/ -
If you see a rocket lunch your Django project works properly

-
All HTTP-attaches are listed on the t
Related Skills
node-connect
335.8kDiagnose OpenClaw node connection and pairing failures for Android, iOS, and macOS companion apps
frontend-design
82.7kCreate distinctive, production-grade frontend interfaces with high design quality. Use this skill when the user asks to build web components, pages, or applications. Generates creative, polished code that avoids generic AI aesthetics.
openai-whisper-api
335.8kTranscribe audio via OpenAI Audio Transcriptions API (Whisper).
commit-push-pr
82.7kCommit, push, and open a PR
