ImageUploadApiDemo
ImageUploadApiDemo是一个Asp.Net Core Web Api图片上传Demo,并且继承了IdentityServer验证!以及使用SwaggerUI生成接口文档
Install / Use
/learn @yilezhu/ImageUploadApiDemoREADME
Asp.Net Core Web Api图片上传接口集成Identity Server 4安全认证
写在前面
上一篇关于Asp.Net Core Web Api图片上传的文章使用的是mongoDB进行图片的存储,文章发布后,张队就来了一句,说没有使用GridFS。的确博主只是进行了简单的图片上传以及mongoDB存储操作,目的是提供思路。具体的图片存储,有条件的还是基于阿里云OSS或者七牛吧,如果实在想用MongDB进行存储的话,建议采用GridFS的方式! 又有人说,GridFS大于16M的时候才适合使用,图片上传已经控制小于1M了,就没必要使用GridFS了吧。这里可以指定chunksize的大小。这样性能上就没有什么问题了。而且在性能差不多的时候使用GridFS可以更方便的管理。因此建议如果采用MongDB进行文件存储的话,建议采用GridFS的方式。 这里特别感谢张队的耐心指导!
为什么使用IdentityServer4?
上一篇文章中,给大家讲解了如何通过 Asp.Net Core Web Api实现图片上传的接口,具体的可以[点这里查看][https://www.cnblogs.com/yilezhu/p/9297009.html] 。这个接口是一个公开的接口,如何发布的话,任何知道调用方法的"任何人"都能任意的调用这个接口,俗称“裸奔”。这时候我们就应该给接口加入认证以及访问控制机制,来加强安全性!那么我们怎么来实现接口的认证以及访问控制呢?这时候部分人就会很懵逼了,还有一部分人就会联想到 OpenID Connect 和 OAuth 2.0了!可是怎么实现呢?从到到位搭一个这样的框架,会累死我滴,可能还要经过很长时间的测试呢!别担心,这时候就体现出Asp.Net Core社区的强大了,我们的主角IdentityServer4闪亮登场!
IdentityServer4是什么?能帮我们做什么呢?
IdentityServer4是一套为 ASP.NET Core 2.0开发的基于OpenID Connect 和 OAuth 2.0 的框架,他能让我们的系统很轻松的就能很多认证以及授权相关的功能,比如:单点登录,api访问控制等等!其他的我就不介绍了,社区里面介绍的太多太多了!如果有想了解的OAuth 2.0的可以看看阮一峰的这篇文章[理解OAuth 2.0][http://www.ruanyifeng.com/blog/2014/05/oauth_2_0.html] 。最后 IdentityServer4最最最大好处是开源的,用的人也多,而且比较成熟。想想是不是有点小激动,迫不及待的想试试了。在开始之前,附上[开原地址][https://github.com/IdentityServer/IdentityServer4] 以及[详细文档][https://identityserver4.readthedocs.io/en/release/] 。想了解更多自行阅读官方文档吧!
为了演示的方便,本文采用的是客户端认证模式,至于其他的几种验证模式,大家可以看下上面给出的阮一峰的文章。还有大家用之前要理解下身份认证服务器(IdentityServer),用户(User),客户端(Client),资源(Resources),身份令牌(Identity Token),访问令牌(Access Token)这些概念。如果不清楚的话可以参考晓晨Master的这篇“ASP.NET Core的身份认证框架IdentityServer4(3)-术语的解释”文章。
Asp.Net Core Web Api中如何使用IdentityServer4呢?
创建IdentityServer4服务端即“身份认证服务器(IdentityServer)”
-
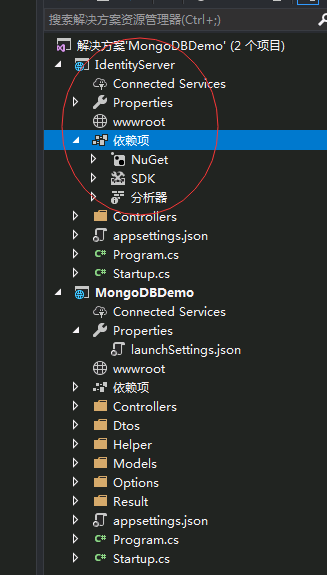
新建一个空的Asp.Net Core Web Api项目,名称为IdentityServer端口为5001,如下图所示
-
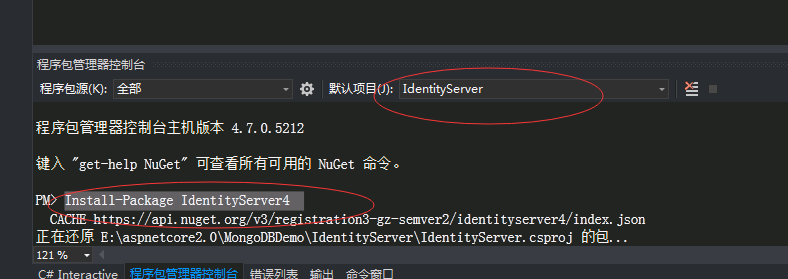
通过Nuget安装IdentityServer4命令如下,记得程序包管理控制套,上面的项目选择刚刚创建的IdentityServer项目
Install-Package IdentityServer4
- 这里因为采用OAuth 2.0的客户端模式,所以简单地使用一个类来硬编码一些资源(Resources)
以及客户端(Client),代码如下:
/// <summary>
    /// yilezhu
    /// 2018.7.15
    /// 因为此处采用in-memory,所以硬编码一些api,以及client
    /// </summary>
    public class ApiConfig
    {
        /// <summary>
        /// 定义ApiResource   这里的资源(Resources)指的就是我们的API
        /// </summary>
        /// <returns>ApiResource枚举</returns>
        public static IEnumerable<ApiResource> GetApiResources()
        {
            return new[]
            {
                new ApiResource("PictureApi", "图片上传的APi")
            };
        }

        /// <summary>
        /// 定义受信任的客户端 Client
        /// </summary>
        /// <returns></returns>
        public static IEnumerable<Client> GetClients()
        {
            return new[]
            {
                new Client
                {
                    ClientId = "MobileUploadPicture",//客户端的标识,要是惟一的
                    ClientSecrets = new [] { new Secret("yilezhu123".Sha256()) },//客户端密码,进行了加密
                    AllowedGrantTypes = GrantTypes.ClientCredentials,//授权方式,这里采用的是客户端认证模式,只要ClientId,以及ClientSecrets正确即可访问对应的AllowedScopes里面的api资源
                    AllowedScopes = new [] { "PictureApi" }//定义这个客户端可以访问的APi资源数组,上面只有一个api
                }
            };
        }
    }
-
在Startup.cs中注入IdentityServer服务并使用中间件,代码如下:
// This method gets called by the runtime. Use this method to add services to the container. public void ConfigureServices(IServiceCollection services) { //注入IdentityServer服务 services.AddIdentityServer() .AddDeveloperSigningCredential() .AddInMemoryClients(ApiConfig.GetClients()) .AddInMemoryApiResources(ApiConfig.GetApiResources()); services.AddMvc().SetCompatibilityVersion(CompatibilityVersion.Version_2_1); } // This method gets called by the runtime. Use this method to configure the HTTP request pipeline. public void Configure(IApplicationBuilder app, IHostingEnvironment env) { if (env.IsDevelopment()) { app.UseDeveloperExceptionPage(); } //添加认证中间件 app.UseIdentityServer(); app.UseMvc(); } -
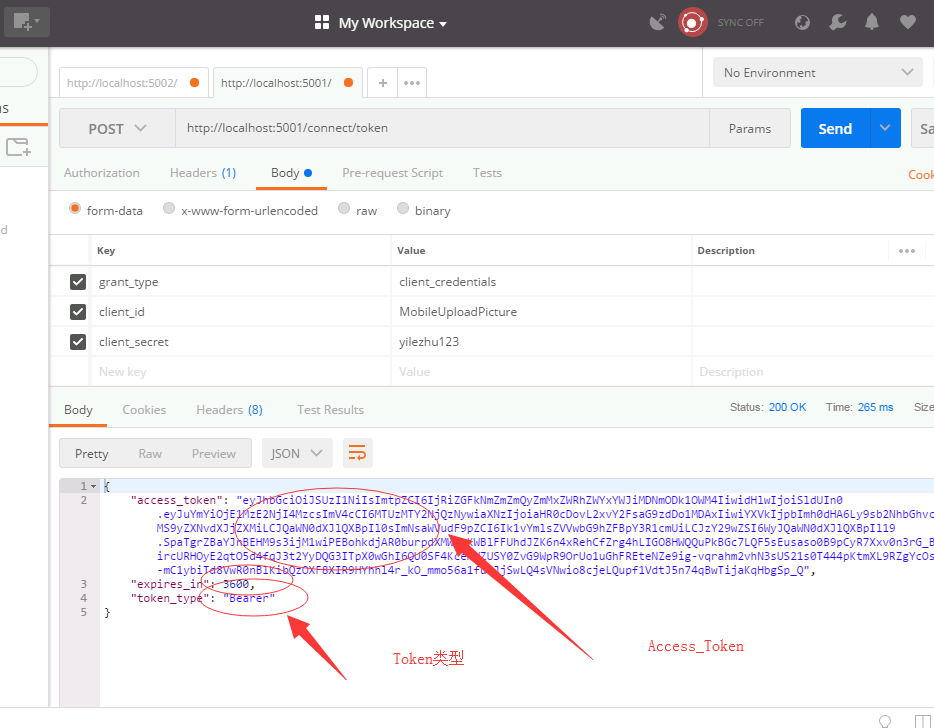
用Postman测试并获取AccessToken吧!如下图所示,在Post请求中传入,认证类型,client_id以及client_secret即可获取AccessToken:
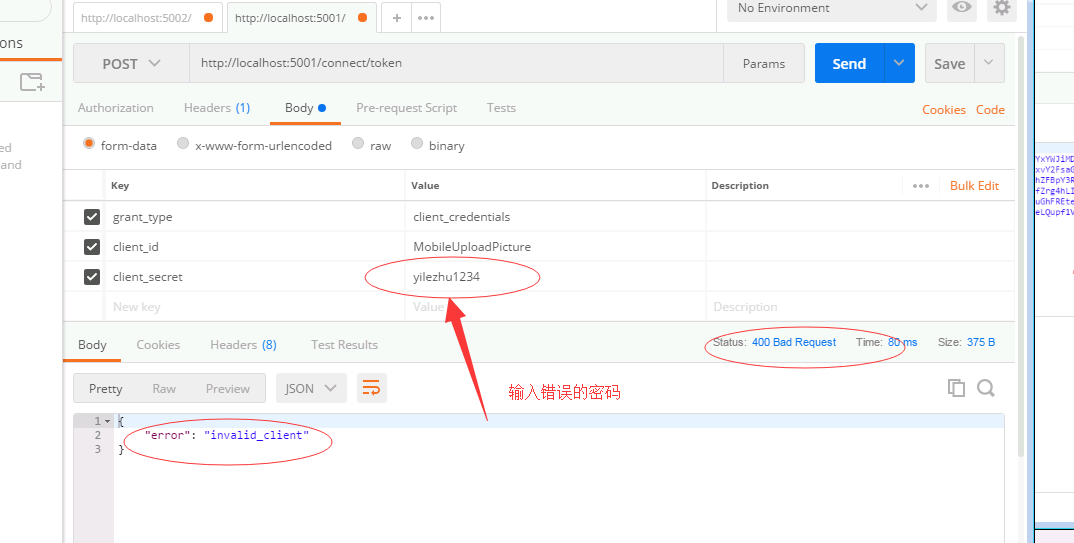
当传入错误的Client_id或者密码将出现下面的结果
- 至此IdentityServer服务已经简单地完成了!下面改造下我们的图片上传服务。
改造图片上传接口,加入授权认证
-
在图片上传api项目中添加IdentityServer nuget包,这里只需要加入AccessTokenValidation包即可,注意选择api项目:
Install-Package IdentityServer4.AccessTokenValidation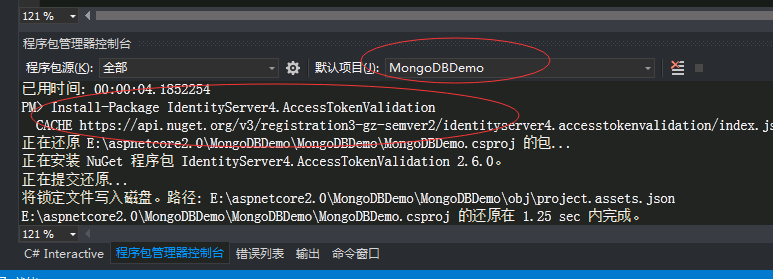
-
appsettings.json中加入IdentityServerOptions,进行IdentityServer的一些配置
"IdentityServerOptions": {

    "ServerIP": "localhost",
    "ServerPort": 5001,
    "IdentityScheme": "Bearer",
    "ResourceName": "PictureApi"
  }
-
新建一个类用来匹配这个options,这样可以爽爽的使用:
/// <summary> /// yilezhu /// 2018.7.15 /// IdentityServer的配置选项 /// </summary> public class IdentityServerOptions { /// <summary> /// 授权服务器的Ip地址 /// </summary> public string ServerIP { get; set; } /// <summary> /// 授权服务器的端口号 /// </summary> public int ServerPort { get; set; } /// <summary> /// access_token的类型,获取access_token的时候返回参数中的token_type一致 /// </summary> public string IdentityScheme { get; set; } /// <summary> /// 资源名称,认证服务注册的资源列表名称一致, /// </summary> public string ResourceName { get; set; } } -
在Startup.cs中加入identityServer验证
 // This method gets called by the runtime. Use this method to add services to the container.
        public void ConfigureServices(IServiceCollection services)
        {
            //注入Options
            OptionsConfigure(services);
            var identityServerOptions = new IdentityServerOptions();
            Configuration.Bind("IdentityServerOptions", identityServerOptions);
            services.AddAuthentication(identityServerOptions.IdentityScheme)
                .AddIdentityServerAuthentication(options =>
                    {
                        options.RequireHttpsMetadata = false; //是否启用https
                        options.Authority = $"http://{identityServerOptions.ServerIP}:{identityServerOptions.ServerPort}";//配置授权认证的地址
                        options.ApiName = identityServerOptions.ResourceName; //资源名称,跟认证服务中注册的资源列表名称中的apiResource一致
                    }
                );

            services.AddMvc().SetCompatibilityVersion(CompatibilityVersion.Version_2_1);
        }

        // This method gets called by the runtime. Use this method to configure the HTTP request pipeline.
        public void Configure(IApplicationBuilder app, IHostingEnvironment env)
        {
            if (env.IsDevelopment())
            {
                app.UseDeveloperExceptionPage();
            }
            app.UseAuthentication();

            app.UseMvc();
        }

        /// <summary>
        /// yilezhu
        /// 2018.7.10
        /// 注册Options
        /// </summary>
        /// <param name="services">服务容器</param>
        private void OptionsConfigure(IServiceCollection services)
        {
            //MongodbHost信息
            services.Configure<MongodbHostOptions>(Configuration.GetSection("MongodbHost"));
            //图片选项
            services.Configure<PictureOptions>(Configuration.GetSection("PictureOptions"));

        }
-
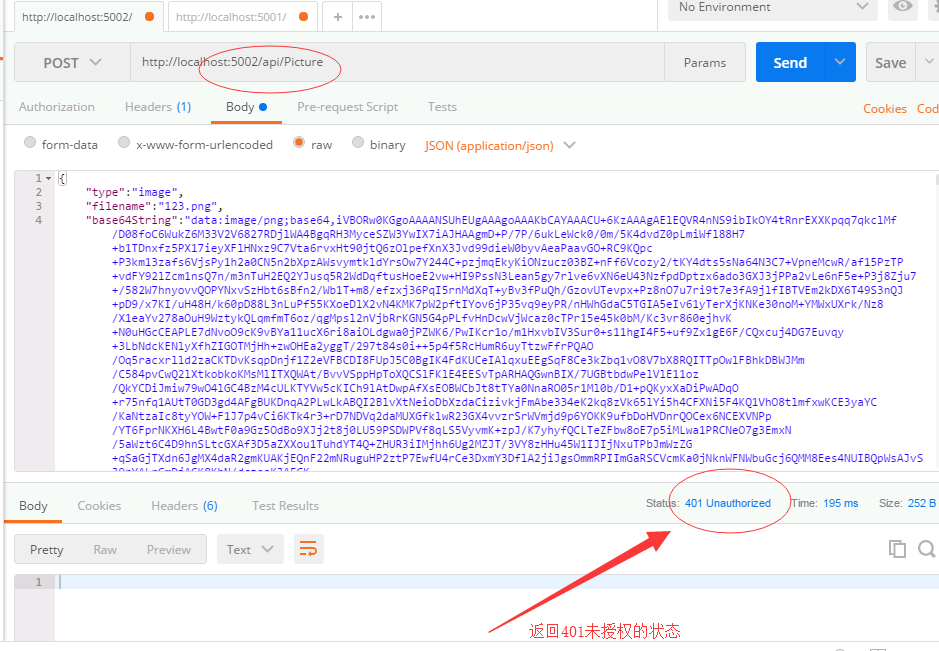
为需要说全访问的图片上传接口添加[Authorize]特性,当然要引用下命名空间:
using Microsoft.AspNetCore.Authorization;/// <summary> /// 接口上传图片方法 /// </summary> /// <param name="fileDtos">文件传输对象,传过来的json数据</param> /// <returns>上传结果</returns> [HttpPost] [Authorize] public async Task<UploadResult> Post([FromBody] FileDtos fileDtos) { ………… } -
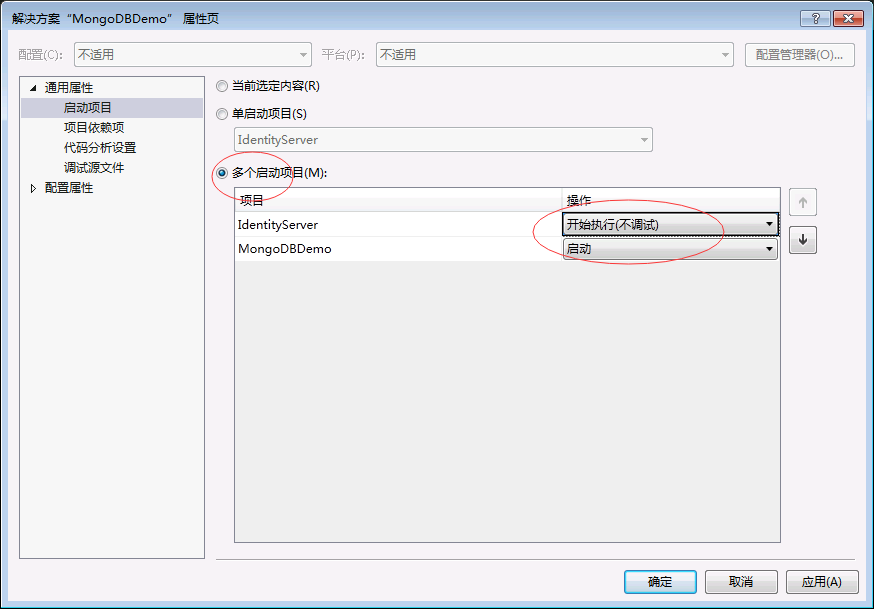
把授权服务以及图片上传接口同时启动下,然后Postman再次进行下图片上传的测试:
-
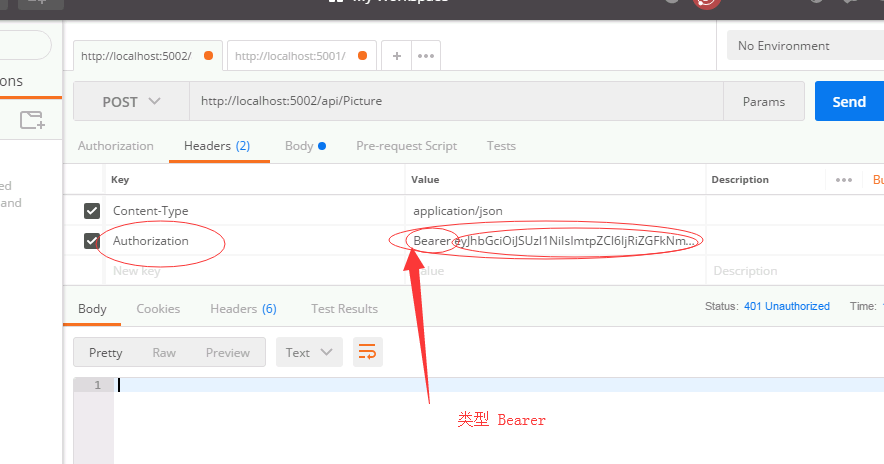
在请求头上加入我们获取的token信息,来再次访问下:
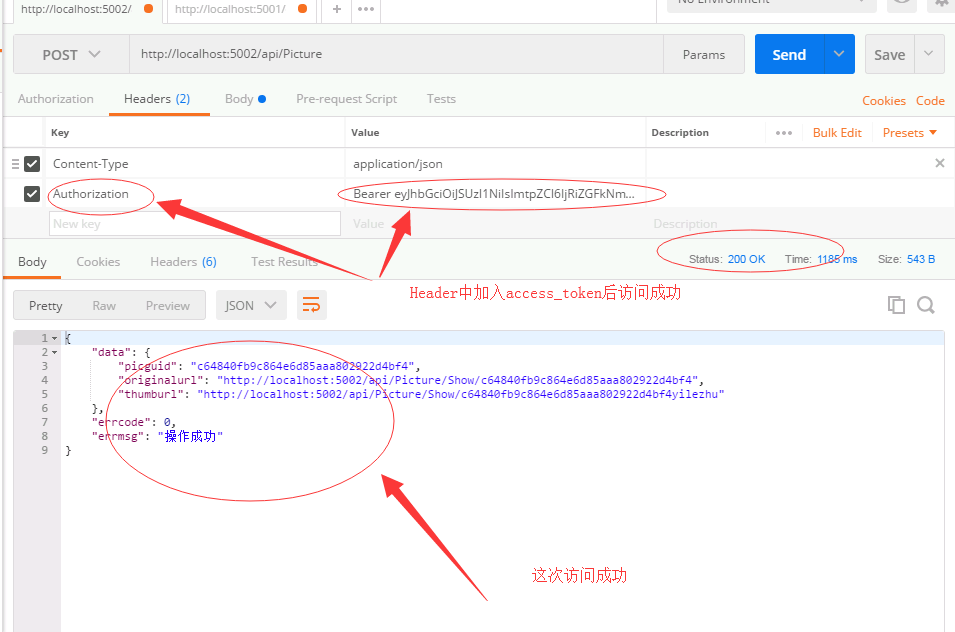
-
Asp.Net Core Web Api图片上传接口集成Identity Server 4安全认证实例教程到此结束了。
总结
本文通过图片上传这个Asp.Net Core Web Api做引子,然后引入Identity Server 4。然后通过一个简单地实例教程阐述了如何创建Identity Server 以及接口中如何进行授权认证访问。博主尽量采用通俗易懂的语言进行阐述,步骤也尽量详细,目的就是为了让初学者也能按照步骤一步一步的实现Identity Server 4的认证。下一篇我会加入SwaggerUI生成接口文档,当然大家也可以看下我的这篇关于SwaggerUI的文章[ASP.NET Core WebApi使用Swagger生成api说明文档看这篇就够了][https://www.cnblogs.com/yilezhu/p/9241261.html] 。这个系列的教程源码,我已经放在github上了,大家可以点这里进行访问源代码。https://github.com/yilezhu/ImageUploadApiDemo
Related Skills
node-connect
353.3kDiagnose OpenClaw node connection and pairing failures for Android, iOS, and macOS companion apps
frontend-design
111.7kCreate distinctive, production-grade frontend interfaces with high design quality. Use this skill when the user asks to build web components, pages, or applications. Generates creative, polished code that avoids generic AI aesthetics.
openai-whisper-api
353.3kTranscribe audio via OpenAI Audio Transcriptions API (Whisper).
qqbot-media
353.3kQQBot 富媒体收发能力。使用 <qqmedia> 标签,系统根据文件扩展名自动识别类型(图片/语音/视频/文件)。
