GitHubPoster
Make everything a GitHub svg poster and Skyline!
Install / Use
/learn @yihong0618/GitHubPosterREADME
GitHubPoster
Make everything a GitHub svg poster and skyline!
简体中文 | English
直接引入 svg 在 README 中的例子

Summary

Skyline

Circular

支持
- Strava
- 开心词场
- 扇贝
- 不背单词
- Nintendo Switch
- GPX
- 多邻国
- Issue
- YouTube
- Bilibili
- GitHub
- GitLab
- Kindle
- WakaTime
- Dota2
- Nike
- Notion
- Garmin
- Forest
- Json
- Multiple
- 即刻
- 微信读书
- 总结
- Covid
- Todoist
- 开言英语
- Apple Health
- ChatGPT
- NeoDB
- AutoSleep
下载
git clone https://github.com/yihong0618/GitHubPoster.git
pip 安装
pip3 install -U 'github_poster[all]'
安装(Python3.6+)
pip3 install -r requirements.txt
使用
生成的 svg 在 OUT_FOLDER 内, 用 type 命名(暂时)
不同类型按下方指定的使用方式:
--year 2022: 可以指定年份(默认)或年份区间--year 2012-2022--track-color=#f4cccc: 指定基础颜色--special-number1 10 -- special_number2 20: 可以指定特殊颜色,默认自动生成不同颜色需要的 number(特殊颜色)--special-color1 pink --special-color2 '#33C6A4': 指定特殊颜色--with-animation: 可以增加动画 (加入 GOGOGO 动画)--animation-time 14: 可以控制动画时间(默认是 10s), 配合--with-animation使用--with-skyline: 可以增加 Skyline (默认生成的为 to_year)--skyline-with-name: 将用户名打印在 Skyline 上, 配合--with-skyline使用--is-circular: 支持 circular svg 配合动画--without-type-name: 支持隐藏标题中生成类型的名称
其它参数可以见 python3 -m github_poster <type> --help
GPX
<details> <summary>Make your <code>GPX</code> GitHub poster</summary> <br>把其它软件生成的(like running_page) gpx files 拷贝到 GPX_FOLDER 之后运行,或指定文件夹如我的文件夹是 ~/blog/GPX_OUT/
python3 -m github_poster gpx --gpx_dir ~/blog/GPX_OUT/ --year 2013-2021
or pip
github_poster gpx --gpx_dir ~/blog/GPX_OUT/ --year 2013-2021
Strava
<details> <summary>Make your <code>Strava</code> GitHub poster</summary>-
注册/登陆 Strava 账号
-
登陆成功后打开 Strava Developers -> Create & Manage Your App
-
创建
My API Application输入下列信息: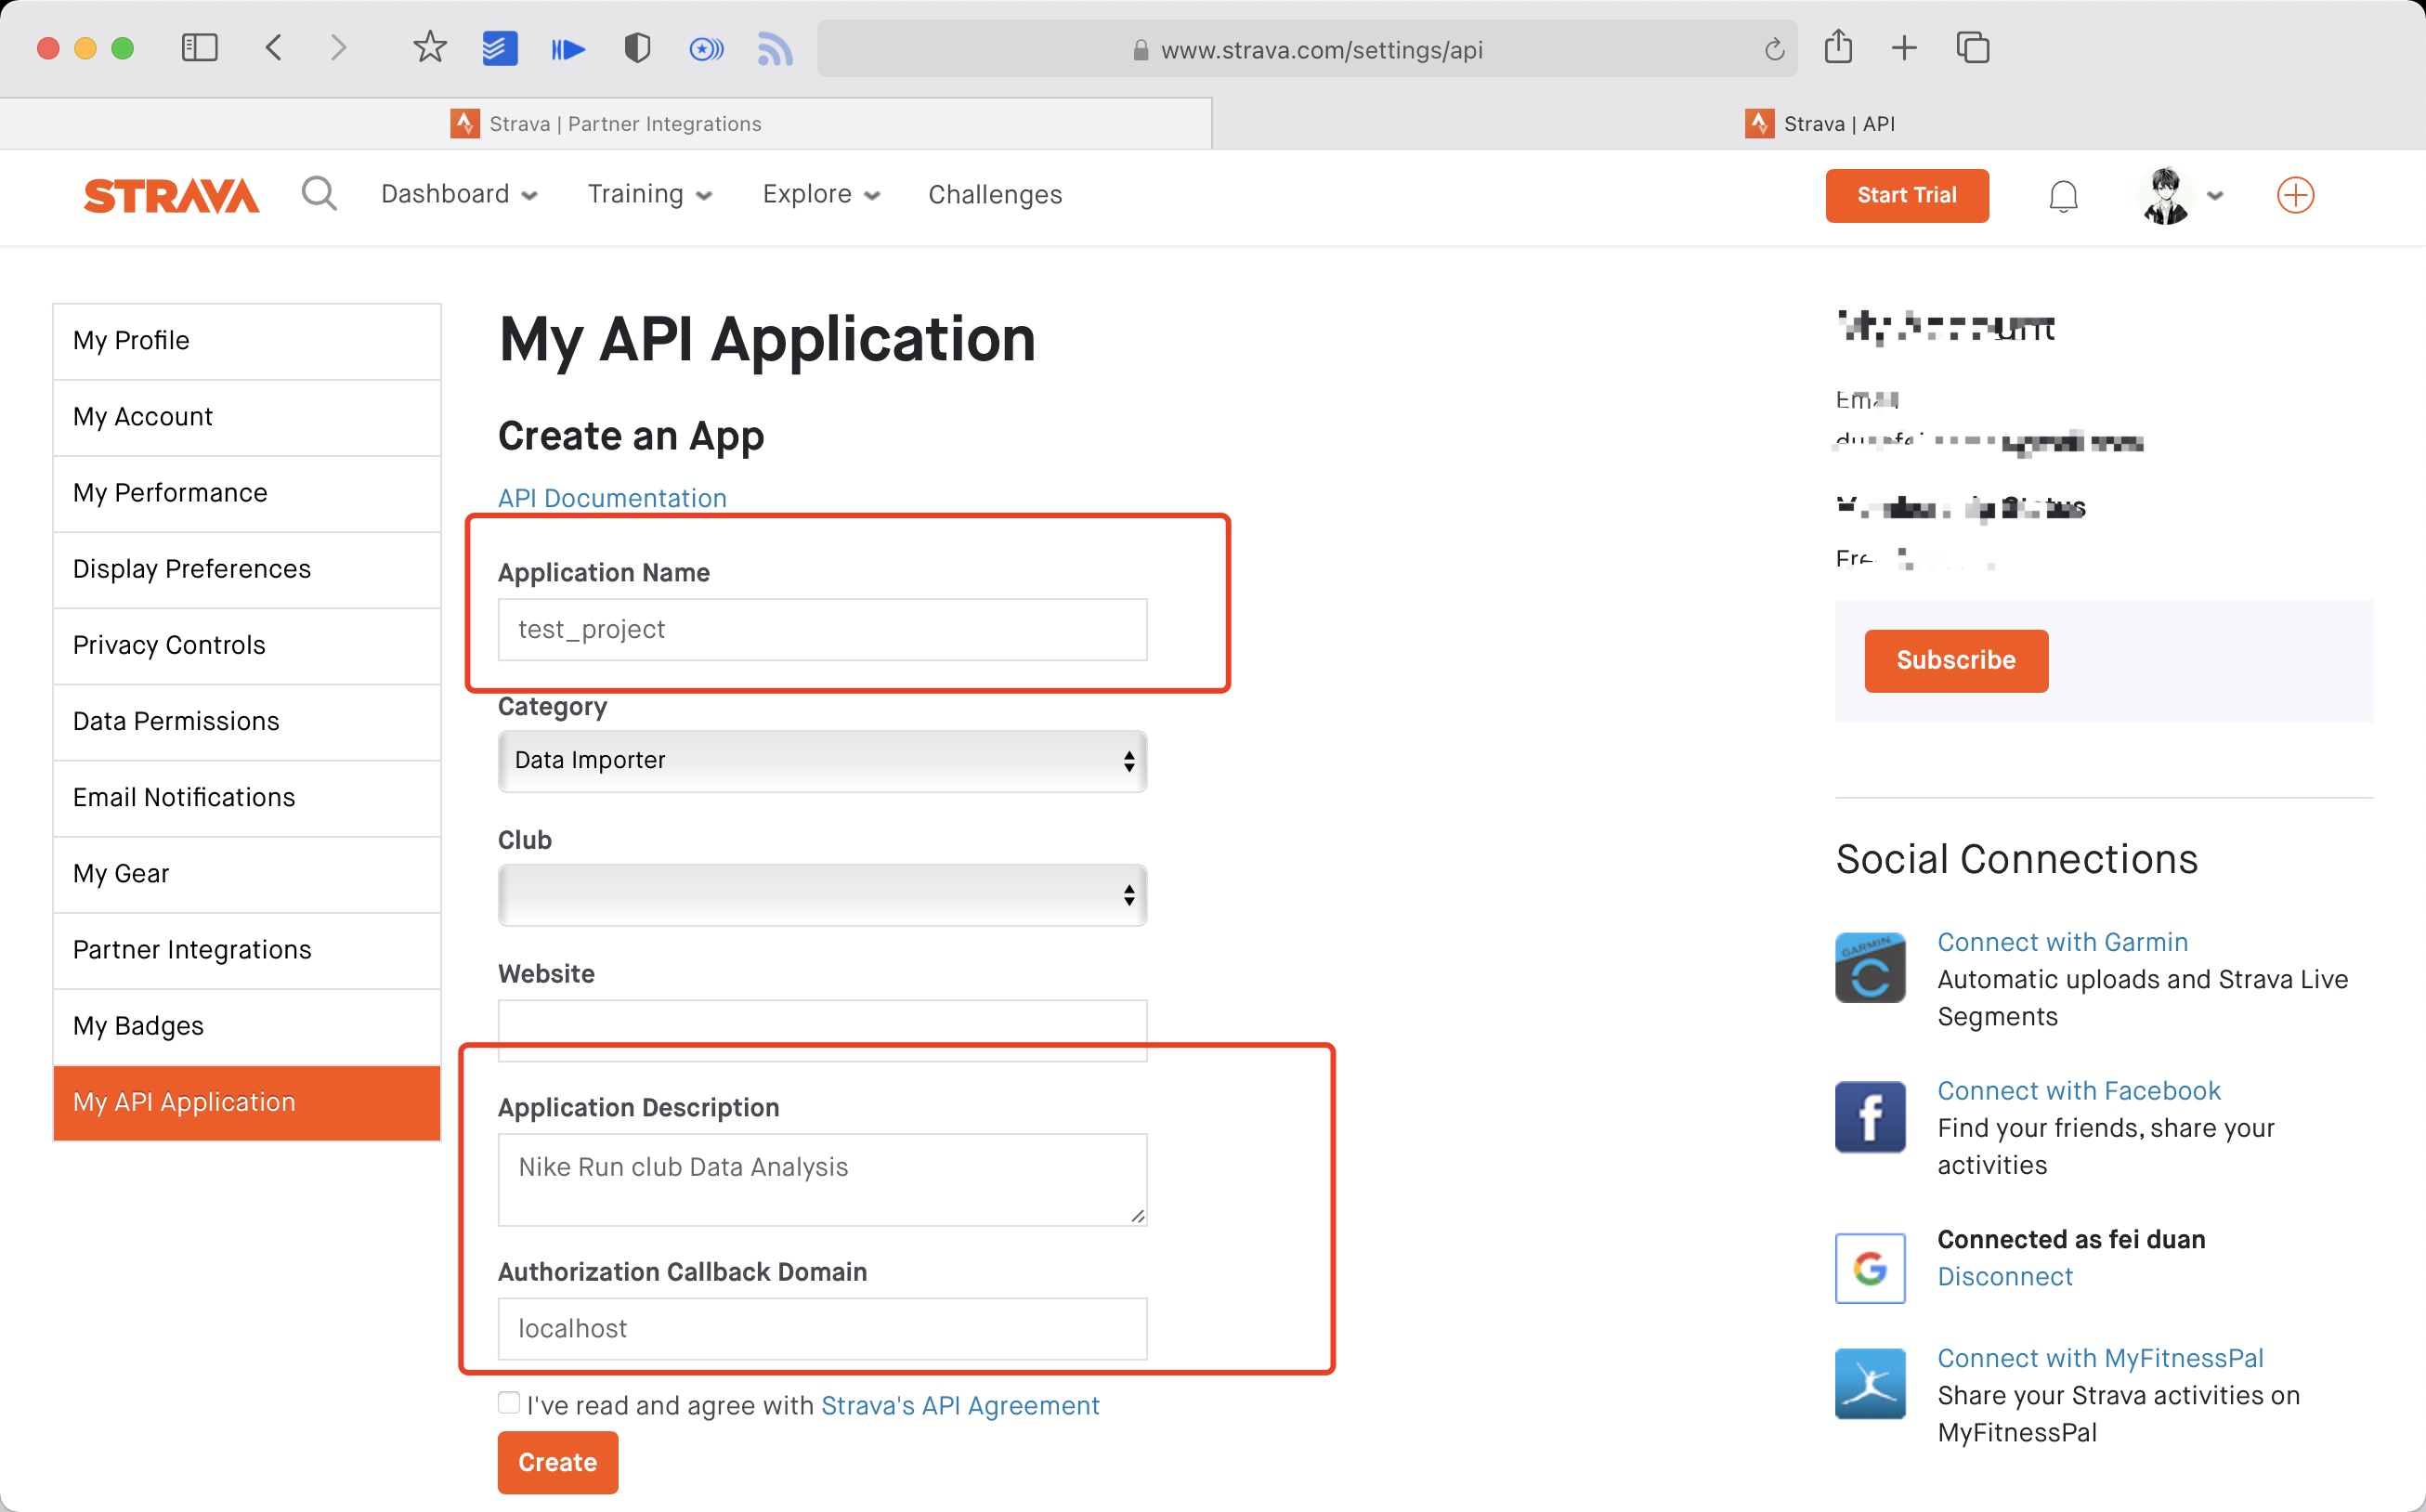 创建成功:
创建成功:

-
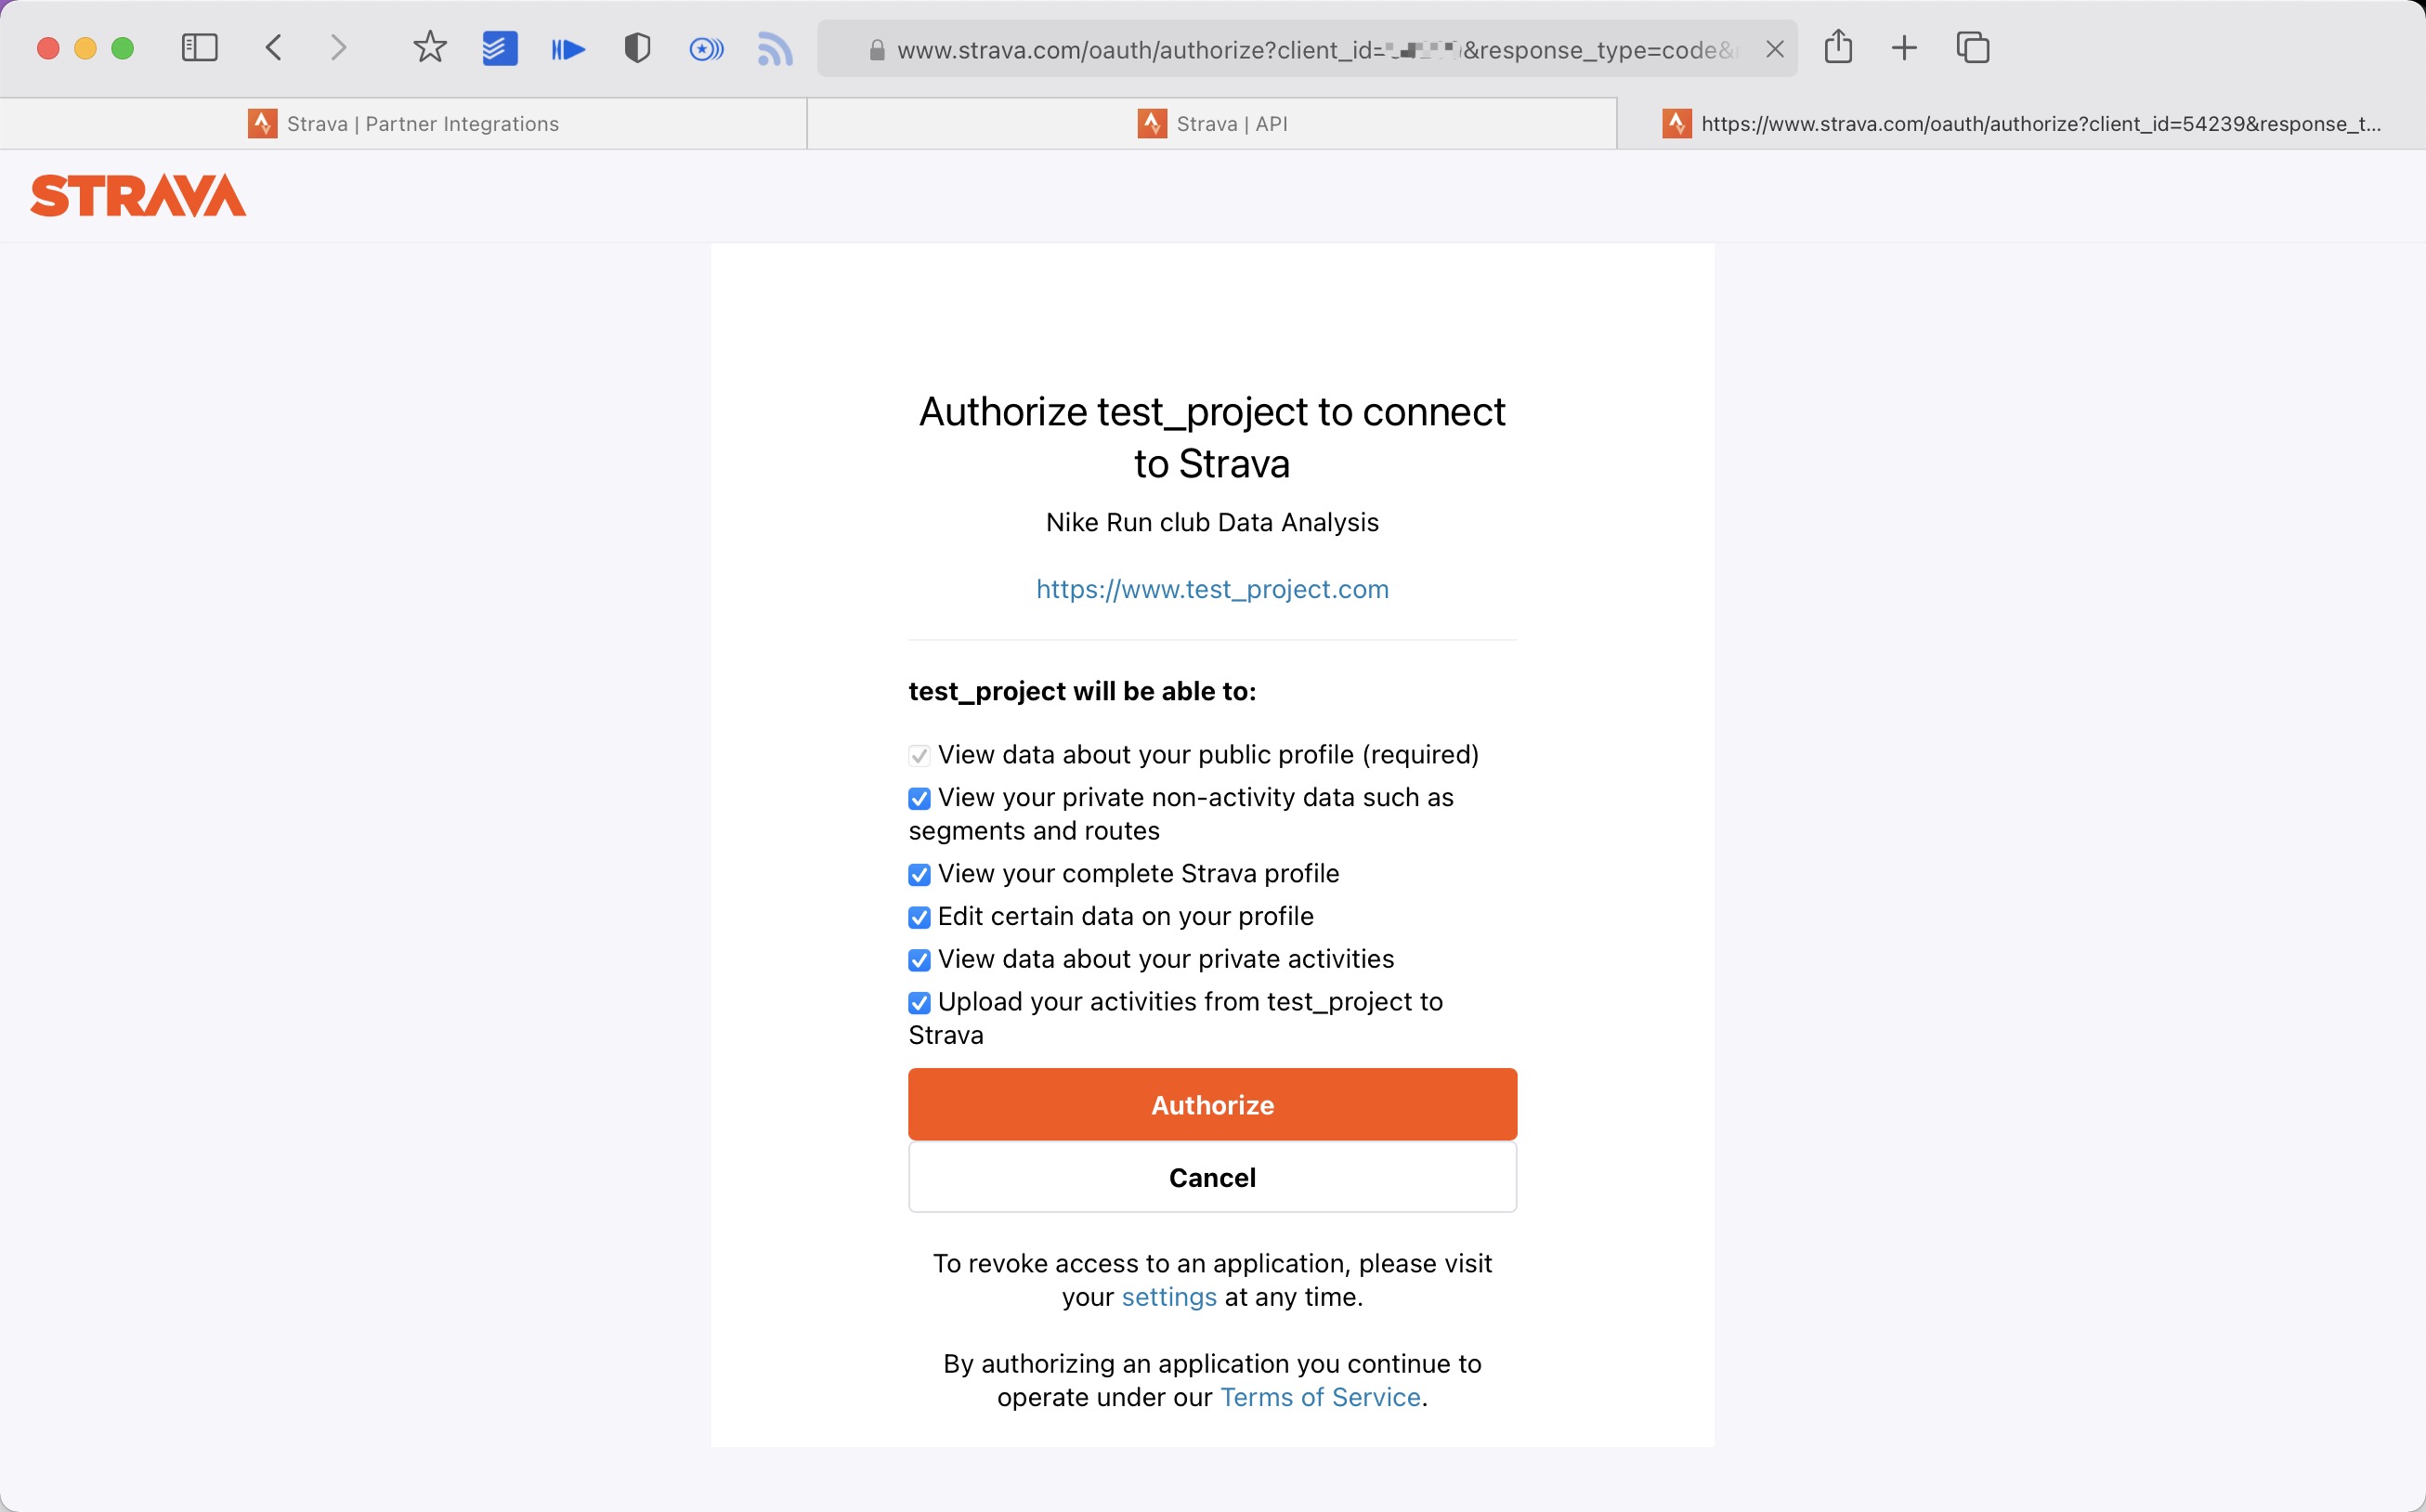
使用以下链接请求所有权限 将 ${your_id} 替换为 My API Application 中的 Client ID 后访问完整链接
https://www.strava.com/oauth/authorize?client_id=${your_id}&response_type=code&redirect_uri=http://localhost/exchange_token&approval_prompt=force&scope=read_all,profile:read_all,activity:read_all,profile:write,activity:write
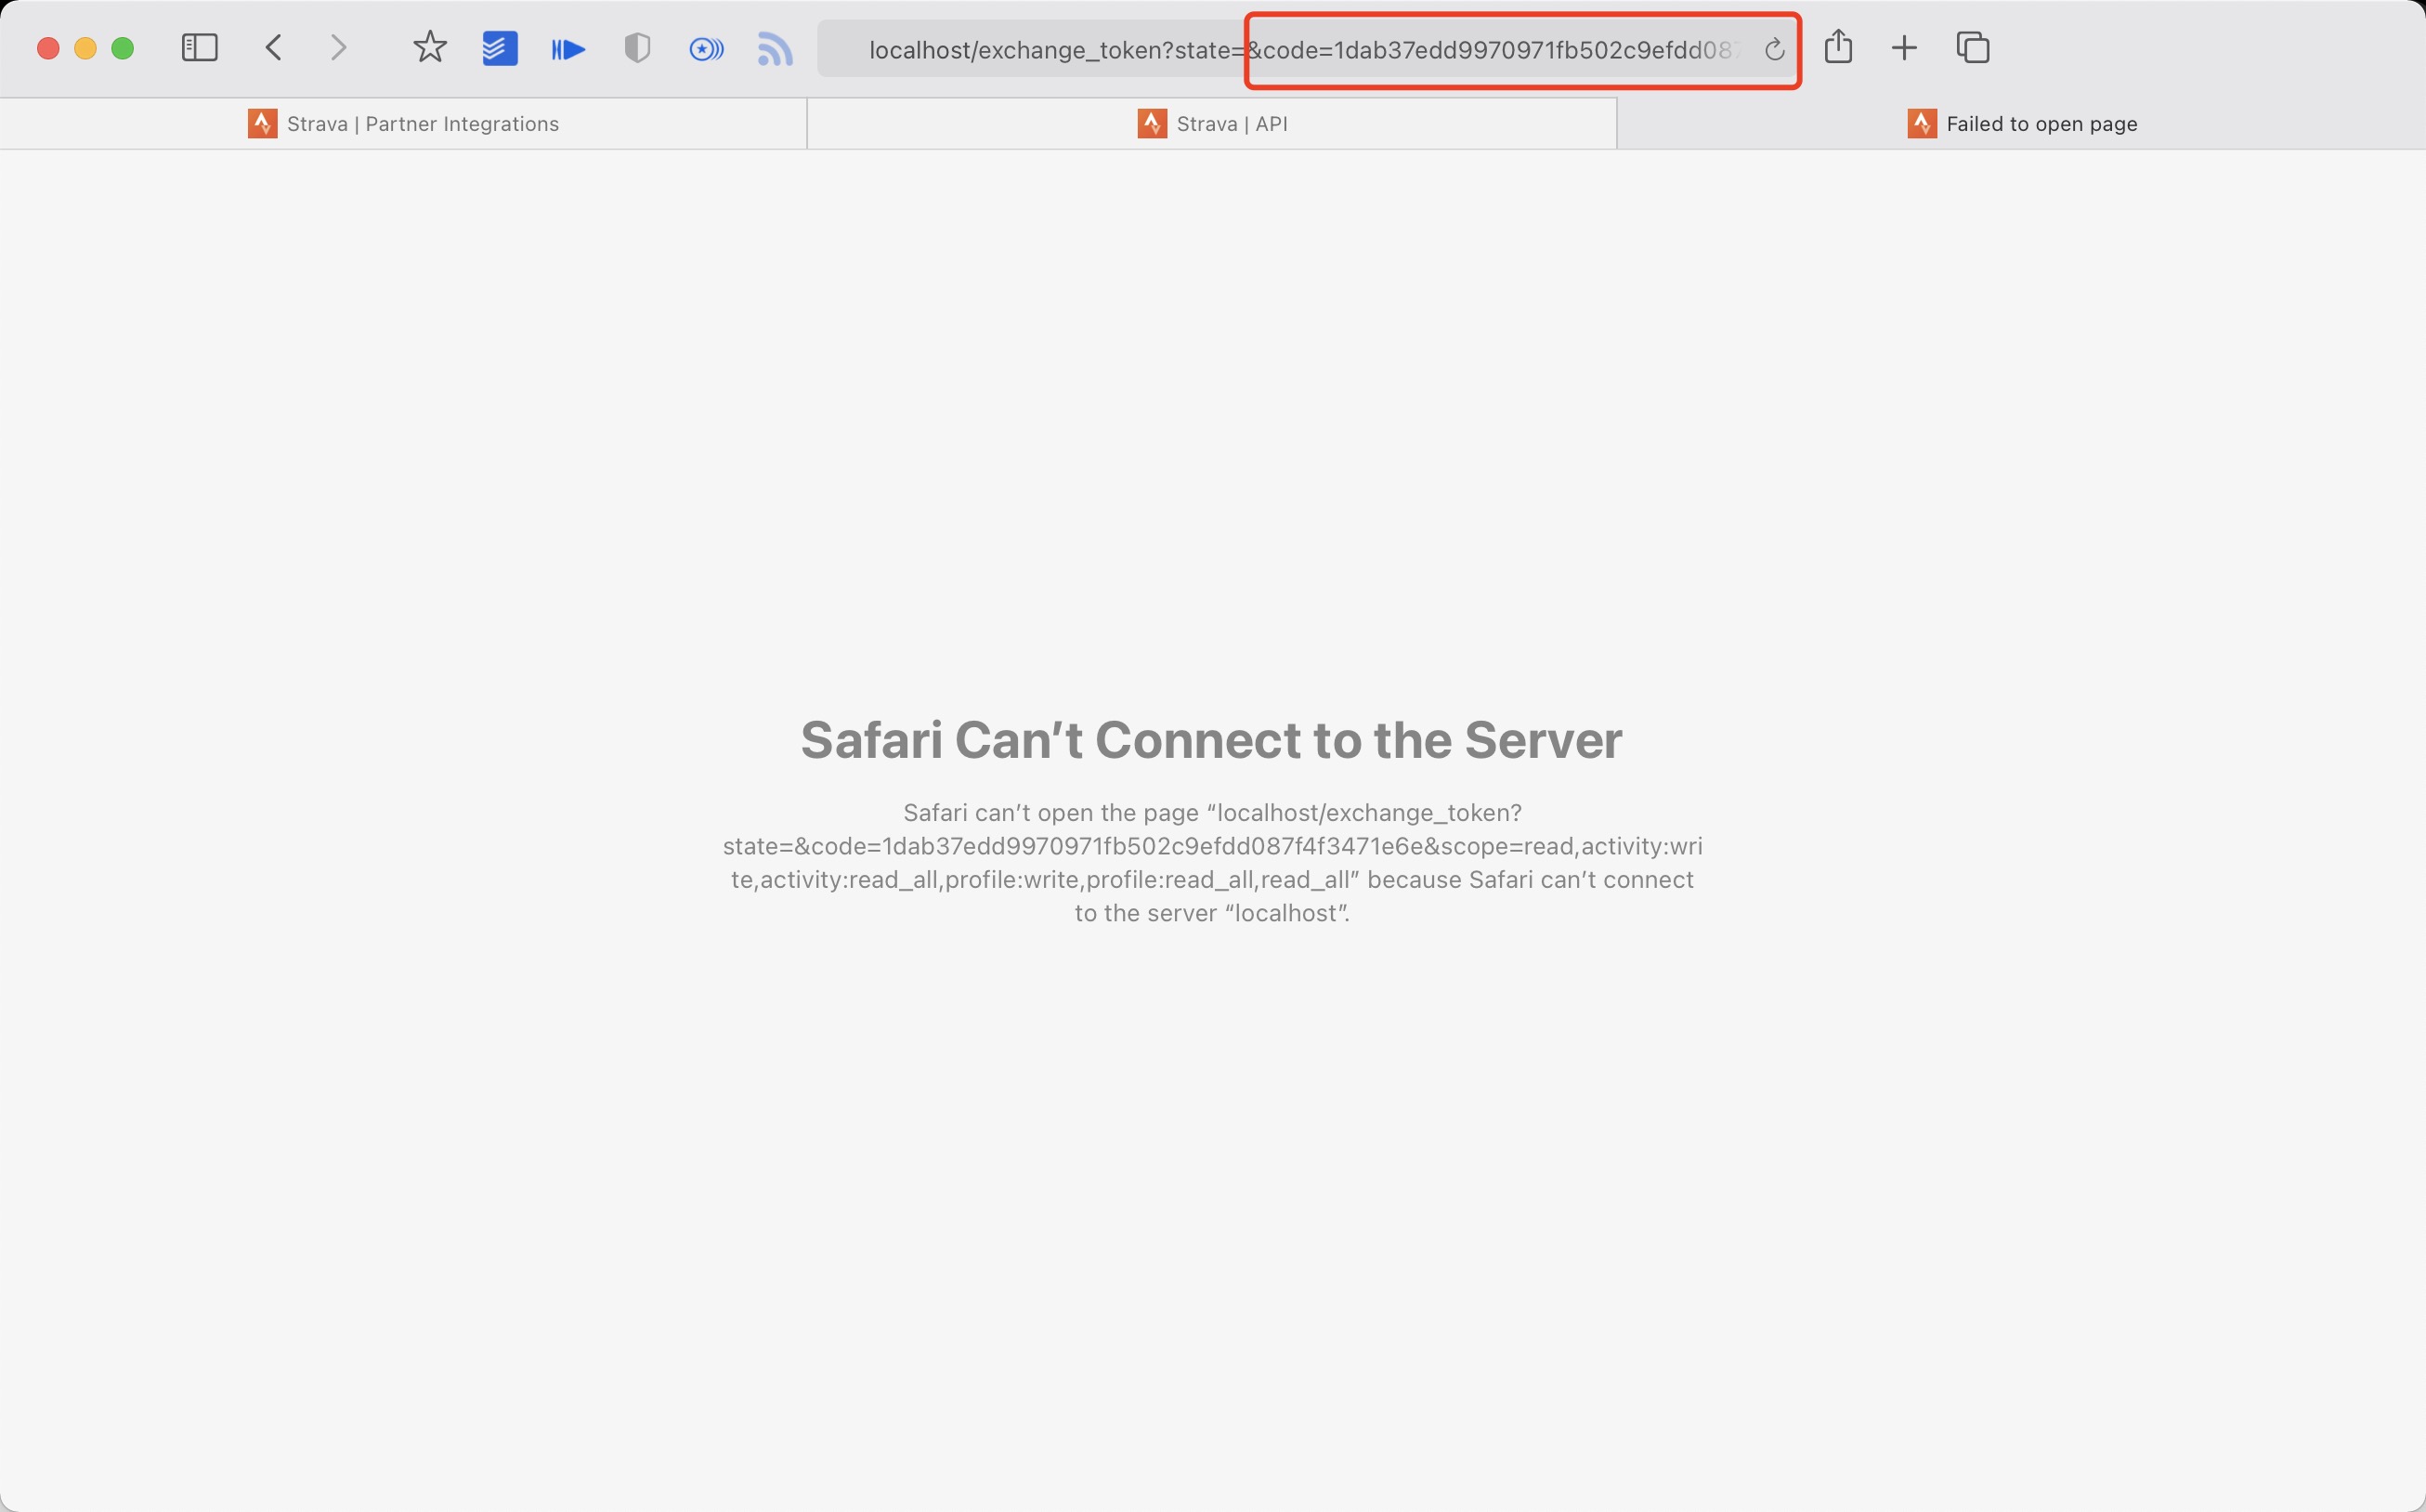
 5. 提取授权后返回链接中的 code 值
例如:
5. 提取授权后返回链接中的 code 值
例如:
http://localhost/exchange_token?state=&code=1dab37edd9970971fb502c9efdd087f4f3471e6e&scope=read,activity:write,activity:read_all,profile:write,profile:read_all,read_all
code 数值为:
1dab37edd9970971fb502c9efdd087f4f3471e6
 6. 使用
6. 使用 Client_id、Client_secret、Code 请求 refresch_token
在 终端/iTerm 中执行:
curl -X POST https://www.strava.com/oauth/token \
-F client_id=${Your Client ID} \
-F client_secret=${Your Client Secret} \
-F code=${Your Code} \
-F grant_type=authorization_code
示例:
curl -X POST https://www.strava.com/oauth/token \
-F client_id=12345 \
-F client_secret=b21******d0bfb377998ed1ac3b0 \
-F code=d09******b58abface48003 \
-F grant_type=authorization_code

- 同步数据至
Strava在项目根目录执行:
python3 -m github_poster strava --strava_client_id  ${client_id} --strava_client_secret ${client_secret} --strava_refresh_token ${refresh_token} --year 2012-2021
or pip
github_poster strava --strava_client_id  ${client_id} --strava_client_secret ${client_secret} --strava_refresh_token ${refresh_token} --year 2012-2021
NS
<details> <summary>Make your <code>Nintendo Switch</code> GitHub poster</summary> <br>需要下载 家长控制那个 APP(Nintendo Switch Parent Controls) 进行抓包(可以使用 mitmproxy 等抓包软件)
python3 -m github_poster ns --ns_session_token ${session_token} --ns_device_id ${device_id} --year 2020-2021
or pip
github_poster ns --ns_session_token ${session_token} --ns_device_id ${device_id} --year 2020-2021
开心词场
<details> <summary>Make your <code>开心词场</code> GitHub poster</summary> <br>需要填写开心词场的账号和密码
python3 -m github_poster cichang --cichang_user_name ${user_name} --cichang_password ${pass_word} --year 2016-2021 --special-color1 blue --special-color2 pink --me yihong0618
or
github_poster cichang --cichang_user_name ${user_name} --cichang_password ${pass_word} --year 2016-2021 --special-color1 blue --special-color2 pink --me yihong0618
多邻国
<details> <summary>Make your <code>多邻国(duolingo)</code> GitHub poster</summary> <br>-
在网页登录多邻国
-
按
F12在控制台(console)使用document.cookie.match(new RegExp('(^| )jwt_token=([^;]+)'))[0].slice(11)获取 duolingo_jwt -
在多邻国用户主页或 通过地址栏
https://www.duolingo.cn/profile/{duolingo id}获取 duolingo id
python3 -m github_poster duolingo --duolingo_user_name ${duolingo_user_name} --duolingo_jwt ${duolingo_jwt} --year 2015-2021
or
github_poster duolingo --duolingo_user_name ${duolingo_user_name} --duolingo_jwt ${duolingo_jwt} --year 2015-2021
扇贝
<details> <summary>Make your <code>扇贝(shanbay)</code> GitHub poster</summary> <br> 需要找到你的扇贝 user_id, 从网页抓 xhr 就可以获得如下图 python3 -m github_poster shanbay --shanbay_user_name ${user_name} --year 2012-2021 --special-color1 '#009688' --special-color2 '#007BFF' --track-color '#ADD8E6'
or
github_poster shanbay --shanbay_user_name ${user_name} --year 2012-2021 --special-color1 '#009688' --special-color2 '#007BFF' --track-color '#ADD8E6'
不背单词
<details> <summary>Make your <code>不背单词(bbdc)</code> GitHub poster</summary> <br>在设置最下方可以获得 user_id

python3 -m github_poster bbdc --bbdc_user_id ${user_id} --bbdc_type ${time/word}
or
github_poster bbdc --bbdc_user_id ${user_id} --bbdc_type ${time/word}
Issue
<details> <summary>Make your <code>Issue</code> GitHub poster</summary> <br>可以参考我的 issue
- 确保issue中是有内容的
- 内容的第一行必须是数字,因为是取的第一行的数字来进行计数的
python3 -m github_poster issue --issue_number ${issue_number} --repo_name ${repo_name} --github_token ${github_token}
or
github_poster issue --issue_number ${issue_number} --repo_name ${repo_name} --github_token ${github_token}
LeetCode
<details> <summary>Make your <code>LeetCode </code> GitHub poster</summary> <br>需要找到你 LeetCode 的 cookie
python3 -m github_poster leetcode --leetcode_cookie ${leetcode_cookie} --year 2019-2021
or
github_poster leetcode --leetcode_cookie ${leetcode_cookie} --year 2019-2021
如果使用的是 leetcode-cn(leetcode 中国需要加上参数)--cn
python3 -m github_poster leetcode --leetcode_cookie ${leetcode_cookie} --year 2019-2021 --cn
or
github_poster leetcode --leetcode_cookie ${leetcode_cookie} --year 2019-2021 --cn
Youtube
<details> <summary>Make your <code>YouTube </code> GitHub poster</summary> <br>利用 Google 的历史下载下载 YouTube 的历史数据,选择 json 格式,将 watch-history.json 拷贝到 IN-FOLDER 然后运行
python3 -m github_poster youtube --year 2015-2021
or
github_poster youtube --year 2015-2021
Bilibili
<details> <summary>Make your <code>Bilibili </code> GitHub poster</summary> <br>需要找到你 Bilibili (XHR) 的 cookie
python3 -m github_poster bilibili --bilibili_cookie "${bilibili-cookie}"
or
github_poster bilibili --bilibili_cookie "${bilibili-cookie}"
GitHub
<details> <summary>Make your <code>GitHub </code> GitHub poster</summary> <br>需要找到你 GitHub Name (url 后面那个)
python3 -m github_poster github --github_user_name "${github_user_name}" --with-skyline
or
github_poster github --github_user_name "${github_user_name}" --with-skyline
GitLab
<details> <summary>Make your <code>GitLab </code> GitLab poster</summary> <br>需要找到你 GitLab Name (url 后面那个)
python3 -m github_poster gitlab --gitlab_user_name "${gitlab_user_name}"
or
github_poster gitlab --gitlab_user_name "${gitlab_user_name}"
如果是自己搭建的 GitLab,可以指定 GitLab 的 URL,以及登录 GitLab 后得到的 _gitlab_session 这个 cookie(如果需要登录的话)
python3 -m github_poster gitlab --gitlab_user_name "${gitlab_user_name}" --base_url "https://your-gitlab.com" --session "${gitlab_session}"
or
github_poster gitlab --gitlab_user_name "${gitlab_user_name}" --base_url "https://your-gitlab.com" --session "${gitlab_session}"
Kindle
<details> <summary>Make your <code>Kindle</code> GitHub poster</summary> <br>在亚马逊网站上需要找到你 [Amazon-CN](https://www.amazon.
