Pyxopto
PyXOpto is a collection of python tools for performing Monte Carlo simulations of light propagation in turbid media.
Install / Use
/learn @xopto/PyxoptoREADME
PyXOpto
PyXOpto is a collection of Python tools for performing Monte Carlo simulations of light propagation in turbid media using massively parallel processing on a wide range of OpenCL-enabled devices. The tools allow steady-state and time-resolved simulations of light propagation, deposition and fluence simulations, tracing and filtering of photon packet paths, computation of sampling volumes for a number of source-detector configurations, support arbitrary scattering phase functions and are easy to customize or extend.
 <br>Energy deposit simulations for a voxelized volume with a laterally moving Gaussian beam.
 <br>Transmittance trajectories of photon packets on the way from the source to the laterally displaced detector optical fiber.
 <br>Sampling volume in transmittance configuration as a function of the lateral displacement between the source and detector optical fiber.
 <br>Sampling volume in reflectance configuration as a function of the distance between the source and detector optical fiber.
 <br>Sampling volume in reflectance configuration as a function of the incidence angle of the source optical fiber.
 <br>
A sequence of voxelized simulations of energy deposition in a 2-layer skin
model with an embedded blood vessel.
<br>
A sequence of voxelized simulations of energy deposition in a 2-layer skin
model with an embedded blood vessel.
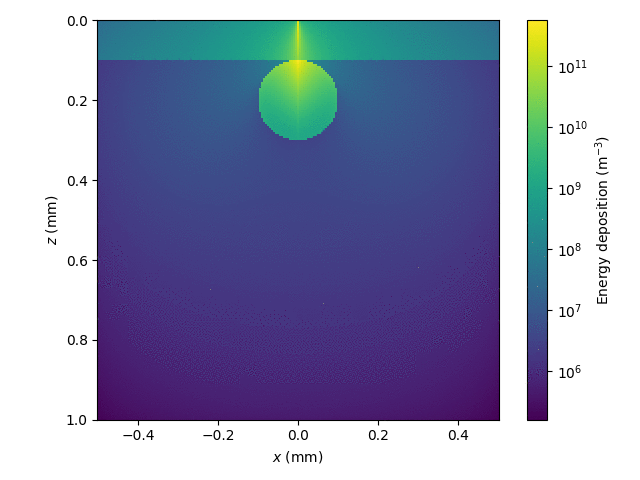
 <br>Time-resolved energy deposition simulation for a voxelized medium with an absorbing cylindrical inclusion that has a lower refractive index than the surrounding medium.
Documentation
Full documentation of PyXOpto is available here.
Installation
Detailed instructions are available here.
Python
PyXOpto requires a Python 3 installation. Most of the Linux OS distributions will come with a preinstalled Python 3. On Windows OS, the easiest way to install the Python 3 programming language is to use the WinPython or Anaconda distributions. There are numerous integrated development environments that work with Python, among these Visual Studio Code and PyCharm are two popular cross-platform options. The WinPython distributions can be downloaded with an embedded and preconfigured Visual Studio Code (e.g. Winpython64-3.9.4.0cod.exe).
PyXOpto
First, download or clone the PyXOpto source repository to a local directory. The source code can be installed as a Python package or used independently from the downloaded source.
As a Python package
PyXOpto can be installed as a package using the setup.py file. Run the following command from the root directory of PyXOpto (the one with the setup.py file).
python setup.py install
This will also install the dependencies that include several popular Python packages (SciPy, Matplotlib, NumPy, PyOpenCL, Shapely, Numba, and Jinja2).
Using from source
To use the PyXOpto package from source, you will have to manually install all the Python dependencies listed in the setup.py file (SciPy, Matplotlib,
NumPy, PyOpenCL, Shapely,
Numba, and
Jinja2, ...). The easiest way to install the dependencies is to use the Python package installer pip. Note that the WinPython distribution will likely come with many if not all the dependencies already installed. Also note that on some Linux distributions, the Python 3 executable is named python3 and python is used for the deprecated Python 2.
You will also have to manually include the root directory of the PyXOpto package into the Python search path. This can be conveniently
accomplished through setting the PYTHONPATH environment variable.
On Linux operating system use:
export PTYTHONPATH=path/to/pyxopto:$PYTHONPATH
On Windows operating systems use:
set PTYTHONPATH=path\to\pyxopto;%PYTHONPATH%
After installing the dependencies and setting the environment variable
PYTHONPATH, you should be able to import PyXOpto.
Docker image
Docker images for NVIDIA CUDA 11 and Intel OpenCL with preinstalled PyXOpto and Jupyter Notebook environment are available from public repositories on the Docker Hub:
-
These images include all the required Python dependencies and Intel OpenCL.
-
These images include all the required Python dependencies and NVIDIA CUDA 11 and related OpenCL.
-
xopto/pyxopto-nvidia-jupyter-dl
In addition to to the previous
xopto/pyxopto-nvidia-jupyterimage, this image also includes the Tensorflow and PyTorch deep learning libraries.
All the images include many of the popular Python libraries for scientific computing, data management and visualization (SciPy, NumPy, Matplotlib, Pandas, etc.).
Summary of the latest PyXOpto Docker images. | Image | Tag | PyXOpto | OS | CUDA | CUDNN | |------------------------------------------------------------------------------------------------------------|--------|---------|--------------|-------|-------| | xopto/pyxopto-intel-jupyter | v0.2.2 | 0.2.2 | Ubuntu 20.04 | - | - | | xopto/pyxopto-nvidia-jupyter | v0.2.2 | 0.2.2 | Ubuntu 20.04 | 11.03 | 8 | | xopto/pyxopto-nvidia-jupyter-dl | v0.2.2 | 0.2.2 | Ubuntu 20.04 | 11.03 | 8 |
The xopto/pyxopto-nvidia-jupyter, and xopto/pyxopto-nvidia-jupyter-dl Docker images can be run by executing the following command:
sudo docker run --rm --runtime nvidia -p 8888:8888 -it xopto/pyxopto-nvidia-jupyter:v0.2.2
or
sudo docker run --rm --runtime nvidia -p 8888:8888 -it xopto/pyxopto-nvidia-jupyter-dl:v0.2.2
The Intel OpenCL images xopto/pyxopto-intel-jupyter can be run as:
sudo docker run --rm --device /dev/dri:/dev/dri -u 0 -p 8888:8888 -it xopto/pyxopto-intel-jupyter:v0.2.2
This will produce output in the terminal that should be similar to:
[I 2021-11-18 22:53:55.782 LabApp] JupyterLab extension loaded from /usr/local/lib/python3.8/dist-packages/jupyterlab
[I 2021-11-18 22:53:55.782 LabApp] JupyterLab application directory is /usr/local/share/jupyter/lab
[I 22:53:55.788 NotebookApp] Serving notebooks from local directory: /home/jovyan
[I 22:53:55.788 NotebookApp] Jupyter Notebook 6.4.6 is running at:
[I 22:53:55.788 NotebookApp] http://5a29ef955782:8888/?token=7e1168ae3711761bad536257a28745a02020c1fc9db6fe7a
[I 22:53:55.788 NotebookApp] or http://127.0.0.1:8888/?token=7e1168ae3711761bad536257a28745a02020c1fc9db6fe7a
[I 22:53:55.788 NotebookApp] Use Control-C to stop this server and shut down all kernels (twice to skip confirmation).
The Jupyter Notebook can be accessed in the host browser
through the displayed link, which is in this example
http://127.0.0.1:8888/?token=7e1168ae3711761bad536257a28745a02020c1fc9db6fe7a.
Persisting data
PyXopto and user data can be persisted by mounting a Docker Volume or a local
directory to /home/jovyan/work. In the following example the
/home/someuser/data directory of the host machine will be used to persist
the container data.
All the Python scripts, Jupyter Notebooks and other user files inside
the container should be placed into the /home/jovyan/work directory.
sudo docker run --rm --runtime nvidia -p 8888:8888 -v /home/someuser/data:/home/jovyan/work -it xopto/pyxopto-nvidia-jupyter:v0.2.2
Building the Docker images from source
The PyXOpto Docker images can be build from source by running the docker/build_intel_jupyter.sh, [docker/build_nvidia_jupyter.sh](/blob/master/doc
