Nui
Style iOS apps with a stylesheet, similar to CSS
Install / Use
/learn @tombenner/NuiREADME
NUI


Style iOS apps with a stylesheet, similar to CSS
Description
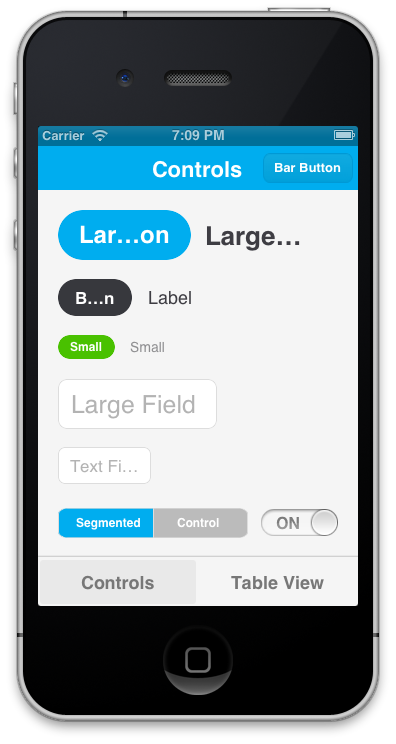
NUI is a drop-in UI kit for iOS that lets you style UI elements using a stylesheet, similar to CSS. It lets you style an entire app in minutes.
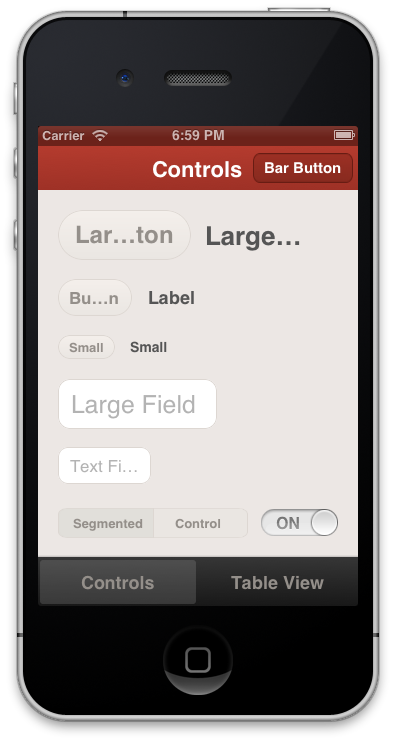
Out of the box, the styling looks like this:

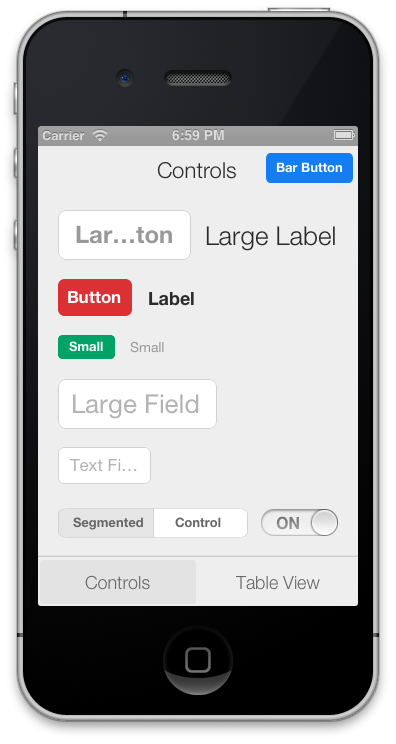
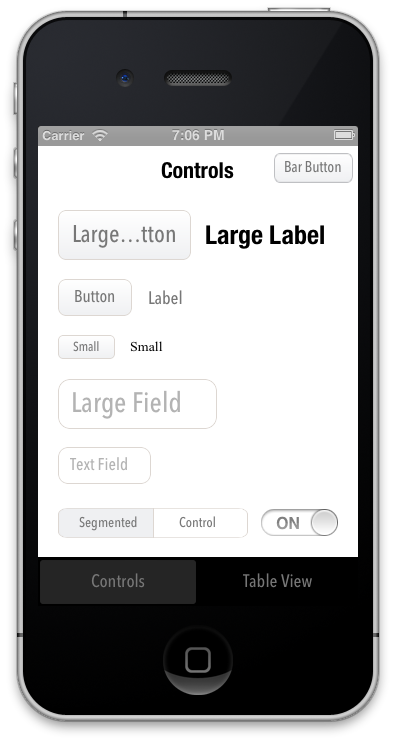
It's easily modified, though. The styling above, for example, is declared like this. Here are examples of other themes that are defined here:
<img src="https://raw.github.com/tombenner/nui/master/Screenshots/UIScreenshot.Route.png" width="120" /> <img src="https://raw.github.com/tombenner/nui/master/Screenshots/UIScreenshot.Googolplex.png" width="120" /> <img src="https://raw.github.com/tombenner/nui/master/Screenshots/UIScreenshot.Switchboard.png" width="120" /> <img src="https://raw.github.com/tombenner/nui/master/Screenshots/UIScreenshot.SkyBlue.png" width="120" />
The styling is declared using a CSS-like syntax that supports variables:
@primaryFontName: HelveticaNeue;
@secondaryFontName: HelveticaNeue-Light;
@primaryFontColor: #333333;
@primaryBackgroundColor: #E6E6E6;

Button {
    background-color: @primaryBackgroundColor;
    border-color: #A2A2A2;
    border-width: @primaryBorderWidth;
    font-color: @primaryFontColor;
    font-color-highlighted: #999999;
    font-name: @primaryFontName;
    font-size: 18;
    corner-radius: 7;
}
NavigationBar {
    background-tint-color: @primaryBackgroundColor;
    font-name: @secondaryFontName;
    font-size: 20;
    font-color: @primaryFontColor;
    text-shadow-color: #666666;
    text-shadow-offset: 1,1;
}
NUI lets you:
- Update the visual appearance of an entire application in minutes
- Save themes for use in multiple applications
- Set the styles of UI elements using simple rules, like setting
Button { border-color: #CCCCCC; } - Define variables like
@primaryFontNameor@myBackgroundColor(a la Sass/LESS) - Avoid digging through documentation to find how to change specific UI elements' styling
- Quickly create custom style classes
- Modify an application's styling while it is running
Some exciting features are on the horizon, and contributions are very encouraged. Please see the FAQ.
Installation
CocoaPods
NUI is most easily installed using CocoaPods. Its pod name is "NUI". After installing it, add [NUISettings init]; to application:didFinishLaunchingWithOptions in AppDelegate.m (like this).
When installed as a framework, NUI can be natively imported in Swift. Just add
import NUI to the top of your file.
Without CocoaPods
If you choose not to use CocoaPods, you can install NUI with these steps:
- Copy the NUI directory into your application
- Add the CoreImage and QuartzCore frameworks to your application if you haven't already (like this)
- Add NUIParse as a subproject, set its iOSNUIParse target as a dependency of your target, and add libNUIParse.a to your linked libraries.
- Add
[NUISettings init];toapplication:didFinishLaunchingWithOptionsin AppDelegate.m (like this) - To use NUI in Swift add
#import <NUI/NUISettings.h>to your bridging header.
The Demo uses CocoaPods, so you'll want to install CocoaPods, run pod install in the Demo directory, and then open the .xcworkspace to open the project.
Usage
Here's a walkthrough on how to get up and running with NUI.
After dropping in NUI, you can modify your app's styling by simply editing NUIStyle.nss. If you want to avoid modifying NUI's files, you can copy NUIStyle.nss into your app, rename it (e.g. MyTheme.nss), then replace [NUISettings init] with [NUISettings initWithStylesheet:@"MyTheme"]; (step 4 in Installation).
Due to the nature of UIKit's usage of simple UI components within more complex UI components, NUI doesn't style some UIKit components in some very rare cases. If you ever need to apply styling for these cases, you can simply use NUIRenderer:
[NUIRenderer renderButton:myButton];
This will use the 'Button' style. You can also specify a custom class:
[NUIRenderer renderButton:myButton withClass:@"LargeButton"]
N.B. NUI used to require that you make your elements inherit from a NUI class, but this is no longer the case. See "Migrating From Subclasses To Categories" below for details.
Editing The Style Rules
NUIStyle.nss contains all of the style rules. A rule like Button { font-name: Helvetica; } modifies the font name of every UIButton, for example.
The format should be self-explanatory, but here are some notes:
- Styling variables are defined at the top, but they can be added/modified/removed as you see fit.
- You can make an element inherit from multiple style classes (see Creating Custom Style Classes below).
To see all of the available properties and values, see the Style Classes and Style Value Types lists below.
Creating Custom Style Classes
You can give elements custom style classes (e.g. LargeButton), and make those classes inherit from one or more other style classes by using the form Button:LargeButton. To bypass NUI's styling for a particular element, set the class to none. You can set an element's style class either in Interface Builder or programmatically:
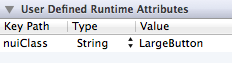
Setting an Element's Style Class in Interface Builder
To do this, you'll set a runtime attribute for the element (in Identity Inspector > User Defined Runtime Attributes, click +). Set the Key Path to nuiClass, Type to String, and Value to LargeButton (or Button:MyButton:
Setting an Element's Style Class Programmatically
To do this, you'll want to import the NUI category for the element. If you're styling a UIButton, you'd import:
#import "UIButton+NUI.h"
You can then set nuiClass on your element:
myButton.nuiClass = @"LargeButton";
N.B. A style class can inherit from an indefinite number of style rules, so if you want to create groups of style rules, you can set nuiClass to something like @"MyStyleGroup1:MyStyleGroup2:MyButton".
Excluding Views from NUI's Styling
If you want to prevent specific view classes from being styled (e.g. third party UI elements that are already styled), you can specify these in NSS:
Button {
    exclude-views: UIAlertButton;
    exclude-subviews: UITableViewCell,TDBadgedCell,UITextField;
}
exclude-viewswill prevent NUI from applying theButtonstyle to views of the specified classesexclude-subviewswill prevent NUI from applying the `Button style to subviews of views of the specified classes
If you want to globally prevent specific view classes from being styled (regardless of style class), you can do this using +[NUISettings setGlobalExclusions:]:
int main(int argc, char *argv[])
{
    @autoreleasepool {
        [NUISettings init];
        [NUISettings setGlobalExclusions:@[@"ABMemberCell", @"ABMultiCell"]];
        return UIApplicationMain(argc, argv, nil, NSStringFromClass([MyAppDelegate class]));
    }
}
Styles specific to a device or orientation
You can have styles or variable definitions only be applied for a particular device and/or orientation by using a @media query:
@media (device:ipad) {
    /* styles or definitions for iPad */
}

@media (device:iphone) {
    /* styles or definitions for iPhone */
}

@media (orientation:landscape) {
    /* styles or definitions for landscape orientation */
}

@media (orientation:portrait) {
    /* styles or definitions for portrait orientation  */
}

@media (orientation:portrait) and (device:ipad) {
    /* styles or definitions for portrait orientation on iPad */
}
Modifying Styling While The Application Is Running
To do this, add the following line after [NUISettings init]; in main.m, replacing @"/path/to/Style.nss" with the absolute file path of your .nss file (e.g. /Users/myusername/projects/ios/MyApp/Style.nss):
[NUISettings setAutoUpdatePath:@"/path/to/Style.nss"];
Now, whenever you modify and save your .nss file while the app is running, the new changes will be applied instantaneously, without any need to rebuild the app. This can drastically speed up the process of styling. You'll want to remove this line when you create a release build.
Creating Custom Themes
Because all of the style rules
Related Skills
node-connect
351.2kDiagnose OpenClaw node connection and pairing failures for Android, iOS, and macOS companion apps
frontend-design
110.6kCreate distinctive, production-grade frontend interfaces with high design quality. Use this skill when the user asks to build web components, pages, or applications. Generates creative, polished code that avoids generic AI aesthetics.
openai-whisper-api
351.2kTranscribe audio via OpenAI Audio Transcriptions API (Whisper).
qqbot-media
351.2kQQBot 富媒体收发能力。使用 <qqmedia> 标签,系统根据文件扩展名自动识别类型(图片/语音/视频/文件)。
