FreeSimpleGUI
The free-forever GUI library
Install / Use
/learn @spyoungtech/FreeSimpleGUIREADME
FreeSimpleGUI
The free-forever Python Simple GUI software.
<p align="center"> <img src="https://raw.githubusercontent.com/spyoungtech/FreeSimpleGUI/main/images/for_readme/freesimplegui.png"> </p>pip install FreeSimpleGUI
To migrate from PySimpleGUI:
- import PySimpleGUI as sg
+ import FreeSimpleGUI as sg
Support
If you encounter any issues or have any questions, please feel welcome to open an issue.
Documentation for FreeSimpleGUI is available at: https://freesimplegui.readthedocs.io/en/latest/. FreeSimpleGUI.org is still in progress.
Contributions
Contributions are welcome! Contributions can be made via pull request. Ideally, please try to make sure there is an open issue associated with your pull request first or create one if necessary.
What Is FreeSimpleGUI ❓
FreeSimpleGUI is a Python package that enables Python programmers of all levels to create GUIs. You specify your GUI window using a "layout" which contains widgets (they're called "Elements" in FreeSimpleGUI). Your layout is used to create a window using one of the 4 supported frameworks to display and interact with your window. Supported frameworks include tkinter, Qt, WxPython, or Remi. The term "wrapper" is sometimes used for these kinds of packages.
Your FreeSimpleGUI code is simpler and shorter than writing directly using the underlying framework because FreeSimpleGUI implements much of the "boilerplate code" for you. Additionally, interfaces are simplified to require as little code as possible to get the desired result. Depending on the program and framework used, a FreeSimpleGUI program may require 1/2 to 1/10th amount of code to create an identical window using one of the frameworks directly.
While the goal is to encapsulate/hide the specific objects and code used by the GUI framework you are running on top of, if needed you can access the frameworks' dependent widgets and windows directly. If a setting or feature is not yet exposed or accessible using the FreeSimpleGUI APIs, you are not walled off from the framework. You can expand capabilities without directly modifying the FreeSimpleGUI package itself.
Example 1 - The One-Shot Window
This type of program is called a "one-shot" window because the window is displayed one time, the values collected, and then it is closed. It doesn't remain open for a long time like you would in a Word Processor.
Anatomy of a Simple FreeSimpleGUI Program
There are 5 sections to a FreeSimpleGUI program
import FreeSimpleGUI as sg                        # Part 1 - The import

# Define the window's contents
layout = [  [sg.Text("What's your name?")],     # Part 2 - The Layout
            [sg.Input()],
            [sg.Button('Ok')] ]

# Create the window
window = sg.Window('Window Title', layout)      # Part 3 - Window Defintion

# Display and interact with the Window
event, values = window.read()                   # Part 4 - Event loop or Window.read call

# Do something with the information gathered
print('Hello', values[0], "! Thanks for trying FreeSimpleGUI")

# Finish up by removing from the screen
window.close()                                  # Part 5 - Close the Window
The code produces this window
<p align="center"> <img src="https://raw.githubusercontent.com/spyoungtech/FreeSimpleGUI/main/images/for_readme/ex1-tkinter.jpg"> </p> <hr>Example 2 - Interactive Window
In this example, our window will remain on the screen until the user closes the window or clicks the Quit button. The main difference between the one-shot window you saw earlier and an interactive window is the addition of an "Event Loop". The Event Loop reads events and inputs from your window. The heart of your application lives in the event loop.
import FreeSimpleGUI as sg

# Define the window's contents
layout = [[sg.Text("What's your name?")],
          [sg.Input(key='-INPUT-')],
          [sg.Text(size=(40,1), key='-OUTPUT-')],
          [sg.Button('Ok'), sg.Button('Quit')]]

# Create the window
window = sg.Window('Window Title', layout)

# Display and interact with the Window using an Event Loop
while True:
    event, values = window.read()
    # See if user wants to quit or window was closed
    if event == sg.WINDOW_CLOSED or event == 'Quit':
        break
    # Output a message to the window
    window['-OUTPUT-'].update('Hello ' + values['-INPUT-'] + "! Thanks for trying FreeSimpleGUI")

# Finish up by removing from the screen
window.close()
This is the window that Example 2 produces.
<p align="center"> <img src="https://raw.githubusercontent.com/spyoungtech/FreeSimpleGUI/main/images/for_readme/Example2-1.jpg"> </p>And here's what it looks like after you enter a value into the Input field and click the Ok button.
<p align="center"> <img src="https://raw.githubusercontent.com/spyoungtech/FreeSimpleGUI/main/images/for_readme/Example2-2.jpg"> </p>Let's take a quick look at some of the differences between this example and the one-shot window.
First, you'll notice differences in the layout. Two changes in particular are important. One is the addition of the key parameter to the Input element and one of the Text elements. A key is like a name for an element. Or, in Python terms, it's like a dictionary key. The Input element's key will be used as a dictionary key later in the code.
Another difference is the addition of this Text element:
[sg.Text(size=(40,1), key='-OUTPUT-')],
There are 2 parameters, the key we already covered. The size parameter defines the size of the element in characters. In this case, we're indicating that this Text element is 40 characters wide, by 1 character high. Notice that there is no text string specified which means it'll be blank. You can easily see this blank row in the window that's created.
We also added a button, "Quit".
The Event Loop has our familiar window.read() call.
Following the read is this if statement:
    if event == sg.WINDOW_CLOSED or event == 'Quit':
        break
This code is checking to see if the user closed the window by clicking the "X" or if they clicked the "Quit" button. If either of these happens, then the code will break out of the event loop.
If the window wasn't closed nor the Quit button clicked, then execution continues. The only thing that could have happened is the user clicked the "Ok" button. The last statement in the Event Loop is this one:
window['-OUTPUT-'].update('Hello ' + values['-INPUT-'] + "! Thanks for trying FreeSimpleGUI")
This statement updates the Text element that has the key -OUTPUT- with a string. window['-OUTPUT-'] finds the element with the key -OUTPUT-. That key belongs to our blank Text element. Once that element is returned from the lookup, then its update method is called. Nearly all elements have an update method. This method is used to change the value of the element or to change some configuration of the element.
If we wanted the text to be yellow, then that can be accomplished by adding a text_color parameter to the update method so that it reads:
    window['-OUTPUT-'].update('Hello ' + values['-INPUT-'] + "! Thanks for trying FreeSimpleGUI",
                              text_color='yellow')
After adding the text_color parameter, this is our new resulting window:
The parameters available for each element are documented in both the call reference documentation as well as the docstrings. FreeSimpleGUI has extensive documentation to help you understand all of the options available to you. If you lookup the update method for the Text element, you'll find this definition for the call:
As you can see several things can be changed for a Text element. The call reference documentation is a valuable resource that will make programming in FreeSimpleGUI, uhm, simple.
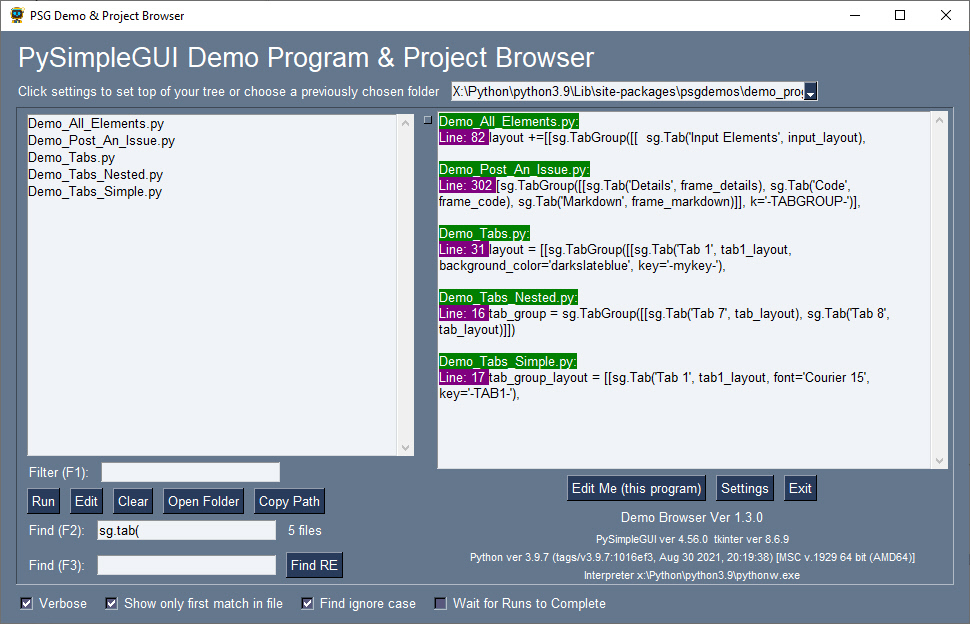
Jump Start! Get the Demo Programs & Demo Browser 🔎
The over 300 Demo Programs will give you a jump-start and provide many design patterns for you to learn how to use FreeSimpleGUI and how to integrate FreeSimpleGUI with other packages. By far the best way to experience these demos is using the Demo Browser. This tool enables you to search, edit and run the Demo Programs.
To get them installed quickly along with the Demo Browser, use pip to install psgdemos:
python -m pip install psgdemos
or if you're in Linux, Mac, etc, that uses python3 instead of python to launch Python:
python3 -m pip install psgdemos
Once installed, launch the demo browser by typing psgdemos from the command line"
psgdemos
Layouts Are Funny LOL! 😆
Your window's layout is a "list of lists" (LOL). Windows are broken down into "rows". Each row in your window becomes a list in your layout. Concatenate together all of the lists and you've got a layout...a list of lists.
Here is the same layout as before with an extra Text element added to each row so that you can more easily see how rows are defined:
layout = [  [sg.Text('Row 1'), sg.Text("What's your name?")],
            [sg.Text('Row 2'), sg.Input()],
            [sg.Text('Row 3'), sg.Button('Ok')] ]
Each row of this layout is a list of elements that will be displayed on that row in your window.
<p align="center"> <img src="https://raw.githubuserc