Ctxmenu
Tiny and customizable context menu generator for the web
Install / Use
/learn @nkappler/CtxmenuREADME
ctxmenu.js 


Tiny* and customizable context menu generator.
<sup>* <3kB minified and gzipped</sup>
Table of contents
Features
Installation
Menu Definition
Item Types
API
Custom Events
Customize
Contributing
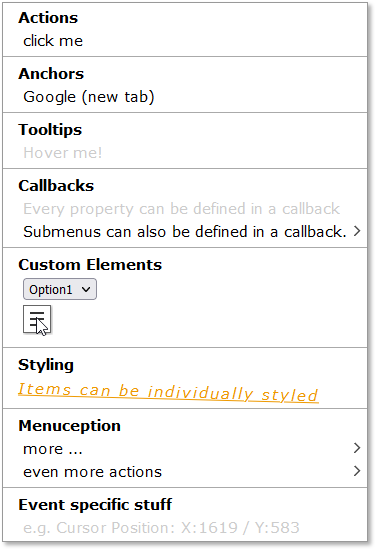
Screenshot
Features
- Create custom context menus for every browser.
- Style the context menu with css.
- No dependencies.
- Callback to customize based on event properties (Cursor position, etc.)
- Different menu items: headings, anchors, action items, dividers and submenus
- Interactive menu items can be disabled
Installation
with npm:
Install ctxmenu
your_project> npm install -s ctxmenu
Import ctxmenu:
import { ctxmenu } from "ctxmenu";
without npm
ctxmenu.js is also available as a standalone version. to use it, just download and link ctxmenu.js or ctxmenu.min.js in your websites header.
<head>
    <!-- ... -->

    <script src="../ctxmenu.js"></script>

</head>
Menu Definition
Menu definitions are used to describe the content of a context menu. A menu definition is an array of objects, where each object defines a single item in the menu.
Example:

var menuDefinition = [
    { text: "Heading" },
    {
        text: "Action Item",
        action: () => alert("Hello World!")
    },
    { isDivider: true },
    {
        text: "Anchor Item",
        href: "",
        disabled: true
    }
]
Item Types
Heading
Anchor
Action Item
Submenu
Divider
Heading Item
This is a heading item which displays a text and optionally shows a tooltip when hovering over it. If you need finer control over the content of the menu item, you can supply your own HTML string by using the html property instead of text. Alternatively you can also supply an HTMLElement JavaScript Object. For all properties you can supply the value directly or a factory function which will be called just before the menu is opened (i.e. on right click). You can also supply a URL or Data URL to an image used as icon for the menu item. Recommended resolution is 18×18px.
For more information about the EventRegistry, see Custom Events. With the attributes record you can define arbitrary attributes for the list item, like you can with the Element.setAttribute browser API, for example, id, class or data attributes.
[!NOTE] Keep in mind that with the
attributesrecord you can overwrite other config options likestyleortooltipfor example
{
    text?: string | () => string,
    tooltip?: string | () => string,
    html?: string | () => string,
    element?: HTMLElement | () => HTMLElement,
    icon?: string | () => string,
    style?: string | () => string,
    events?: EventRegistry | () => EventRegistry,
    attributes?: Record<string, string> | () => Record<string, string>
}
⚠ NOTE: All other menu items (except the divider item) derive from this and can have at least these properties
Anchor Item
This is an interactive item which implements an anchor tag (<a>) and will redirect to a given URL (href).
{
    /*...Standard Props */

    /** URL */
    href: string | () => string,

    /** https://www.w3schools.com/tags/att_a_target.asp */
    target?: string | () => string,

    /** defaults to false */
    disabled?: boolean | () => boolean
}
Action Item
This is an interactive item which will execute a given callback function when clicked.
The callback receives the event as parameter, so you can access the Action Item List Element via e.currentTarget.
{
    /*...Standard Props */

    /** callback fired when the item is clicked */
    action: (event: MouseEvent) => void,

    /** defaults to false */
    disabled?: boolean | () => boolean
}
Submenu Item
This is an interactive item which holds another menu definition. You can create infinitely deep nested submenus.
With subMenuAttributes you define HTML attributes for the submenu container (the UL element), with attributes you can define those for the list item itself.
{
    /*...Standard Props */

    /** Submenu Definition, */
    subMenu: Array | () => Array,       // A menu definition

    /** Attribute record for the submenu container */
    subMenuAttributes: Record<string, string> | () => Record<string, string>

    /** defaults to false */
    disabled?: boolean | () => boolean  // default false
}
Divider Item
This is a divider item which draws a horizontal line.
{ isDivider: true }
API
This library exports a singleton object ctxmenu.
In the standalone version the singleton is a global variable (window.ctxmenu).
It has the following six APIs:
attach
update
delete
show
hide
setNonce
Interfaces
ctxmenu.attach
ctxmenu.attach(target: string, ctxmenu: Array, config?: CTXConfig)
The attach method is used to bind a context menu to any DOM Node and takes the following arguments:
target- A selector string to define the target node (eg'body', or'#someID')ctxmenu- An Array of objects defining the menu layout. See Menu Definition.config?- A config object, See CTXConfig.
ctxmenu.update
ctxmenu.update(target: string, ctxmenu?: Array, config?: CTXConfig)
The update method is used to update an existing context menu. You can pass undefined for each optional parameter in order to not change it. If you pass a partial CTXConfig object, only the specified members will be overwritten.
update takes two or three arguments:
target- the selector string to define the target elementctxmenu- the updated menu definition. (may be undefined when only updating the config)config?- A config object, See CTXConfig.
[!NOTE] If you try to update a menu which does not exist, it will silently be attached instead.
ctxmenu.delete
ctxmenu.delete(target: string)
The delete method is used to delete a context menu and only takes the target selector string.
ctxmenu.show
ctxmenu.show(ctxmenu: Array, e: MouseEvent | HTMLElement)
The show method can be used to show a context menu without using the attach method to set up a contextmenu for specific elements first. You need to pass the original event or a target element, which will be used to calculate the menu's position.
This may be useful when integrating with other libraries or frameworks that already provide a contextmenu handler or when trying to show a context menu on a different user interaction (for example showing a context menu when left-clicking a button).
⚠️Positioning of the menu: If the second parameter you pass is of type MouseEvent, the menu will appear at the cursors position, if it is of type HTMLElement it will appear next to the element. See #36
⚠️ Event propagation: When passing a target element, you will need to stop the propagation of the event to prevent the context menu from being immediately closed again:
clickHandler(e: MouseEvent) {
  e.stopPropagation();
  ctxmenu.show([ ... /* menu definition */ ], e.target);
}
ctxmenu.hide
ctxmenu.hide()
Hide any open context menu.
ctxmenu.setNonce
ctxmenu.setNonce(nonce: string)
Set a CSP (Content Security Policy) nonce to be used for ctxmenus style element. This is useful when you have a strict CSP that requires nonces for inline styles.
[!IMPORTANT]
setNoncemust be called before the first menu is shown, otherwise you have to expect rendering issues due to missing styles. If required by your CSP, make sure to call this method early in your application initialization, ideally before anyattachcalls.
Example:
// Set a nonce for all menus (must be called before showing any menu)
ctxmenu.setNonce('your-csp-nonce-here');

// Attach menus as usual
ctxmenu.attach('#myElement', menuDefinition);
CTXConfig
With this interface you can define lifecycle events and attributes for a context menu via the attach and update methods.
    onBeforeShow?: (menu: CTXMenu, event?: MouseEvent) => CTXMenu;
    onShow?: (dom: HTMLUListElement) => void;
    onBeforeHide?: (dom: Element) => void;
    onHide?: (dom: Element) => void;
    attributes?: Record<string, string>;
The onBeforeShow method can be used to change the menu definition just before it is shown. This can be useful to customize the menu based on the event properties (for example, the cursor position). The function must return a valid menu definition.
The onShow method can be used to execute code after the menu is attached to the DOM. This can be useful to execute code that depends on the menu being visible (for example, to focus an input field). Gets passed a reference to the DOM Element representing the context
