CBbot
CBbot is a new product form within the CodeBanana ecosystem, positioned as a local-first intelligent agent with full-spectrum operational capabilities. CBbot turns fragmented tools, manual operations, and scattered workflows into a unified, executable AI system.
Install / Use
/learn @mobvoi/CBbotREADME
CBbot - AI Coding Assistant 🚀
<div align="center"> <a href="https://github.com/mobvoi/CBbot/releases/latest"> <img src="https://img.shields.io/badge/🖥️_Download_CBbot-macOS_&_Windows-blue?style=for-the-badge&logo=desktop" alt="Download CBbot" height="40"> </a> </div> <div align="center"> <p><strong>🍎🪟 Native Desktop App · One-Click Setup · Ready Out of the Box</strong></p> </div>Download → Double-Click Install → Ready to Use - No Configuration Needed
💻 What is CBbot?
CBbot is an AI-native agent OS that specializes in coding and task automation with seamless integration both locally and in the cloud.
Key Features:
- ✅ SOTA AI Coding Agent: Built-in powerful AI coding capabilities supporting the best global models
- ✅ Easy Installation: Download DMG, drag to Applications - that's it!
- ✅ Auto Configuration: No manual configuration file editing required
- ✅ Safe Sandbox Environment: Docker-based isolation protects your sensitive files and main system from prompt injection and other security risks
- ✅ Extensible Skill System: Pre-loaded skills library with compatibility for open-source domain skills
💻 System Requirements
macOS
- Operating System: macOS 10.15 (Catalina) or higher
- Chip: Apple Silicon (M1/M2/M3/M4) or Intel
- Memory: 6GB or more recommended
- Disk Space: At least 10GB available
- Internet: Required for AI features
Windows
- Operating System: Windows 10 (64-bit) or Windows 11
- Architecture: x64 (Intel/AMD)
- Memory: 8GB or more recommended
- Disk Space: At least 10GB available
- Internet: Required for AI features
📦 Download CBbot
<div align="center"> <table> <tr> <td align="center"> <strong>🍎 macOS (Apple Silicon)</strong><br> <a href="https://prd-tc-intl-cdn.codebanana.com/releases/cbbot/CBbot-mac-arm64-v1.0.82.dmg">⬇️ Download CBbot.dmg</a><br> <small>M1/M2/M3/M4 chips</small> </td> <td align="center"> <strong>🍎 macOS (Intel)</strong><br> <a href="https://prd-tc-intl-cdn.codebanana.com/releases/cbbot/CBbot-mac-x64-v1.0.82.dmg">⬇️ Download CBbot.dmg</a><br> <small>Intel x86_64</small> </td> </tr> <tr> <td align="center" colspan="2"> <strong>🪟 Windows</strong><br> <a href="https://prd-tc-intl-cdn.codebanana.com/releases/cbbot/CBbot-win-x64-v1.2.30.exe">⬇️ Download CBbot-Setup.exe</a><br> <small>Windows 10/11 (x64)</small> </td> </tr> </table> </div>📦 Installation Steps
Step 1: Install Docker Desktop
Docker Desktop is essential for running CBbot. If you already have it installed, skip to Step 2.
For macOS Users:
Download and Install:
- Visit Docker website: https://www.docker.com/products/docker-desktop
- Click Download for Mac
- Choose based on your Mac chip:
- Apple Silicon (M1/M2/M3/M4) → Select ARM64 version
- Intel Chip → Select AMD64 version
- Double-click the
.dmgfile to install - Drag Docker icon to Applications folder
Start Docker:
- Open Launchpad, find Docker icon
- Click to launch (first launch requires password)
- Wait for Docker icon (whale) in menu bar
- Click whale icon, ensure it shows Docker Desktop is running
For Windows Users:
Download and Install:
- Visit Docker website: https://www.docker.com/products/docker-desktop
- Click Download for Windows
- Run the
Docker Desktop Installer.exefile - Follow the installation wizard:
- Check "Use WSL 2 instead of Hyper-V" (recommended)
- Complete the installation and restart if prompted
Start Docker:
- Open Docker Desktop from Start Menu
- Accept the service agreement if prompted
- Wait for Docker to start (you'll see a whale icon in system tray)
- Ensure the status shows Docker Desktop is running
Configure WSL Integration:
- Open Docker Desktop settings (gear icon)
- Navigate to Resources → WSL integration
- Enable the following options:
- ✅ "Enable integration with my default WSL distro"
- ✅ Toggle "Ubuntu" (or your preferred Linux distribution)
- Click "Apply & restart"
- Wait for Docker to restart
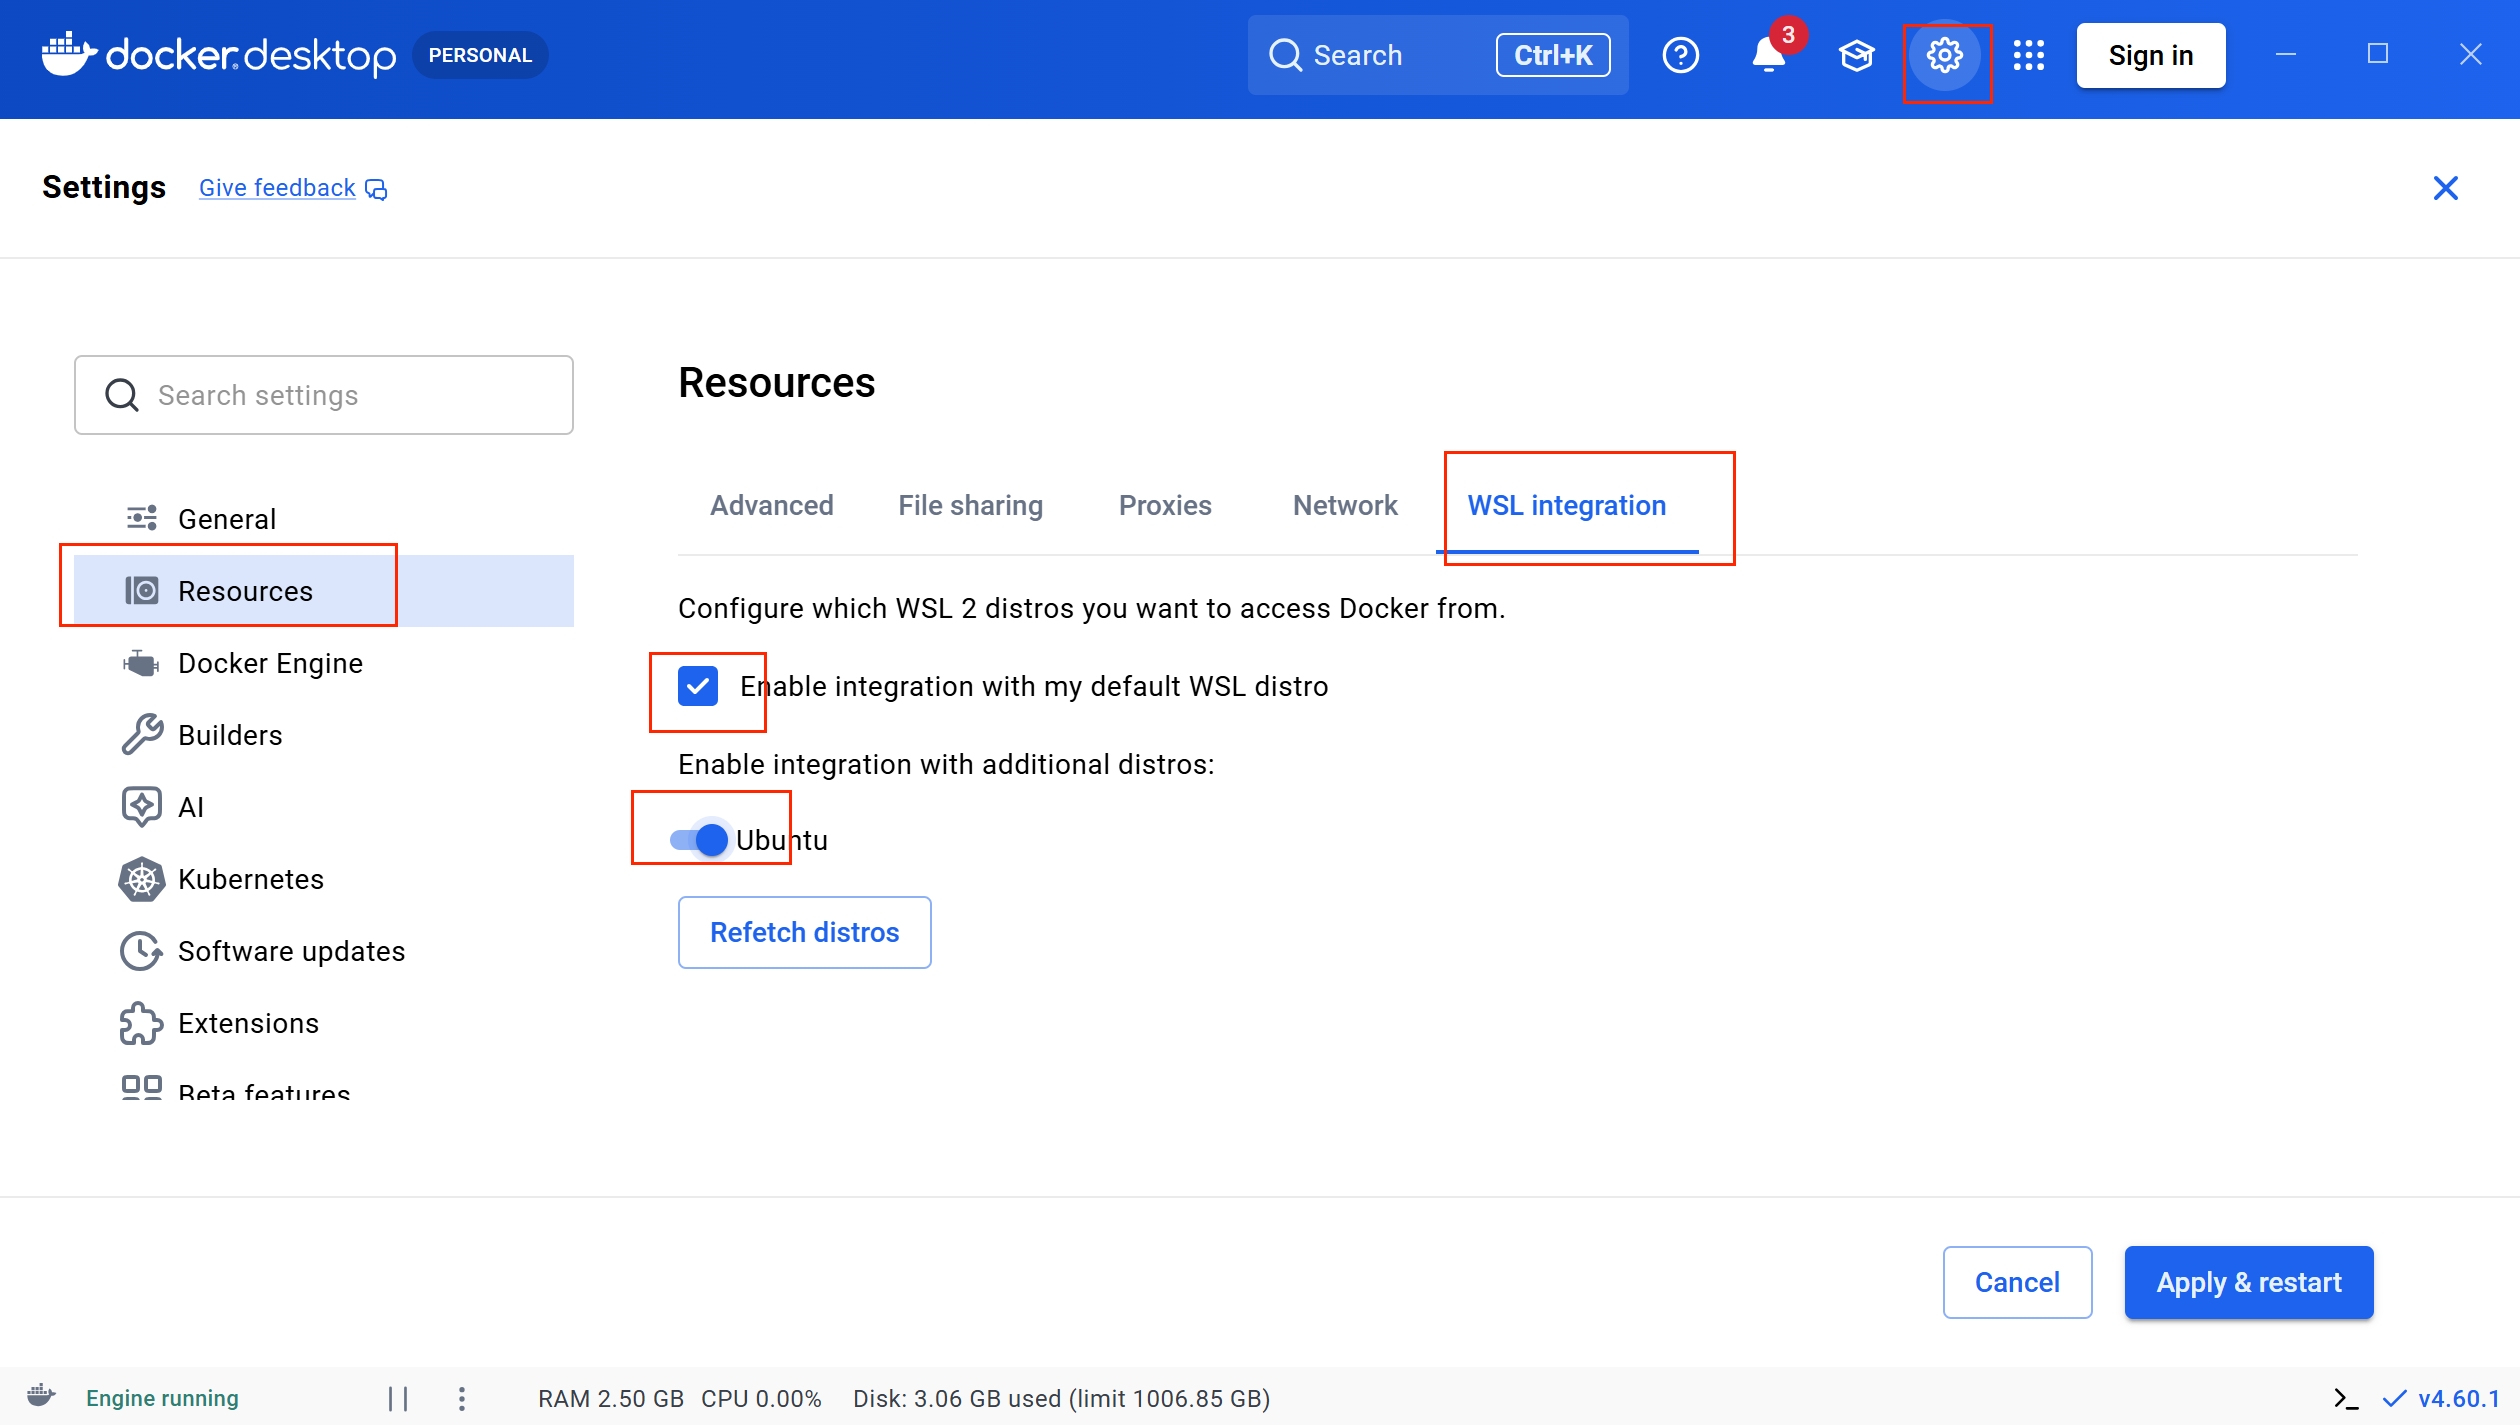
Configure WSL integration as shown in the settings panel above
Configure WSL Network Proxy (Optional but Recommended):
Step 1: Create .wslconfig file
- Open File Explorer
- Navigate to your user directory:
C:\Users\<your_username> - Create a new text file and name it
.wslconfig(note: no file extension)
Step 2: Edit .wslconfig file
- Right-click the
.wslconfigfile - Select "Open with Notepad"
- Enter the following content:
[wsl2]
memory=3GB
autoMemoryReclaim=gradual
networkingMode=mirrored
dnsTunneling=true
firewall=true
autoProxy=true
- Save the file (Ctrl+S)
- Restart WSL by running in PowerShell:
wsl --shutdown - Restart Docker Desktop
💡 Note: This configuration enables automatic proxy detection and improves network compatibility for CBbot in WSL environments.
Enable WSL 2 (if not already installed):
- Open PowerShell as Administrator
- Run:
wsl --install - Restart your computer
- Launch Docker Desktop again and configure WSL integration as above
Step 2: Install CBbot
For macOS Users:
- Download CBbot from Releases Page
- Double-click the
CBbot.dmgfile - Drag CBbot to Applications folder
- Done!
For Windows Users:
- Download CBbot from Releases Page
- Run the
CBbot-Setup.exefile - Follow the installation wizard:
- Choose installation directory (default recommended)
- Accept the license agreement
- Complete the installation
- Done!
Step 3: Launch CBbot
For macOS Users:
- Open Applications and click CBbot
- First launch: Click "Open" if asked
- Wait for services to start (30-60 seconds)
For Windows Users:
- Find CBbot in Start Menu or Desktop shortcut
- Right-click and "Run as administrator" (first launch only)
- Wait for services to start (30-60 seconds)
- CBbot will open in your default browser
Step 4: Bind Your Key
Get Your Key:
- Visit CodeBanana
- Log in → Click avatar → "CBbot Key"
- Copy your Key
Bind Key:
- Paste your Key in CBbot startup screen
- Click "Bind"
- Done! CBbot is ready to use
📑 Contents
💬 Community
Join our community for support, discussions, and updates!
🌐 International Community
<div align="center"> <a href="https://discord.com/invite/yUcCxACgh9"> <img src="https://img.shields.io/badge/Discord-Join_Community-5865F2?style=for-the-badge&logo=discord&logoColor=white" alt="Join Discord" height="40"> </a> </div>🇨🇳 中文社区
<div align="center"> <table> <tr> <td align="center"> <img src="https://oci-useast-backend-public.dupdub.com/subtitles/image/35f1e711-f7c1-4894-a1a4-e0ca133aa4cc.png" alt="飞书群" width="150"> <br> <strong>🚀 飞书群</strong> <br> <small>CBbot交流群</small> </td> <td align="center"> <img src="https://oci-useast-backend-public.dupdub.com/subtitles/image/df588231-d149-4a29-92bc-e4c6dbf5f51f.jpg" alt="微信群" width="150"> <br> <strong>💬 微信群</strong> <br> <small>CBbot 交流群</small> </td> </tr> </table> </div> <div align="center"> <p>🚀 <strong>Get help, share ideas, and connect with other developers!</strong></p> <p>💡 <strong>获得帮助、分享想法、与其他开发者交流!</strong></p> </div>💰 Billing
- Pay-as-you-go based on usage
- Linked via CBbot Key
- Costs: API calls + model usage
Monitor usage at CodeBanana dashboard
🌐 Network Tips
Using Overseas AI Models:
If you're using international AI models (OpenAI, Anthropic, etc.), we recommend enabling VPN global proxy for stable connections.
Setup:
- Enable VPN with global proxy mode
- Restart CBbot after VPN is connected
- Verify connection is stable
💡 Tip: Local models and domestic services work without VPN.
⚙️ Advanced Configuration (Optional)
Configure Feishu Bot
To enable Feishu bot functionality:
- Open CBbot application
- Go to "Settings" → "Bot Configuration" → "Feishu"
- Enter your App ID and App Secret
- Click "Save" and restart service
Configure Telegram Bot
To enable Telegram bot functionality:
- Open CBbot application
- Go to "Settings" → "Bot Configuration" → "Telegram"
- Enter your Bot Token and Username
- Click "Save" and restart service
Configure Discord Bot
To enable Discord bot functionality:
- Open CBbot application
- Go to "Settings" → "Bot Configuration" → "Discord"
- Enter your Bot Token
- Click "Save" and restart service
💡 Tip: All configurations are done through CBbot's graphical interface - no manual configuration file editing required!
🧠 Skills
CBbot automatically uses the right skill for your task:
Documents: docx, pptx, xlsx, pdf
Automation: macos-automation, custom skills
Usage Example:
- "Create presentation" → Uses pptx skill
- "Analyze Excel data" → Uses xlsx skill
- "Send email" → Uses macos-automation
No need to specify skills - CBbot picks the right one!
Add Your Own:
Contribute to skills/ directory. See codebanana-skill-guide for details.
