HistoGAN
Reference code for the paper HistoGAN: Controlling Colors of GAN-Generated and Real Images via Color Histograms (CVPR 2021).
Install / Use
/learn @mahmoudnafifi/HistoGANREADME
HistoGAN: Controlling Colors of GAN-Generated and Real Images via Color Histograms
Mahmoud Afifi, Marcus A. Brubaker, and Michael S. Brown
York University
Paper | Supplementary Materials | Video | Poster | PPT
Reference code for the paper HistoGAN: Controlling Colors of GAN-Generated and Real Images via Color Histograms. Mahmoud Afifi, Marcus A. Brubaker, and Michael S. Brown. In CVPR, 2021. If you use this code or our datasets, please cite our paper:
@inproceedings{afifi2021histogan,
  title={HistoGAN: Controlling Colors of GAN-Generated and Real Images via Color Histograms},
  author={Afifi, Mahmoud and Brubaker, Marcus A. and Brown, Michael S.},
  booktitle={Proceedings of the IEEE Conference on Computer Vision and Pattern Recognition},
  year={2021}
}
Abstract
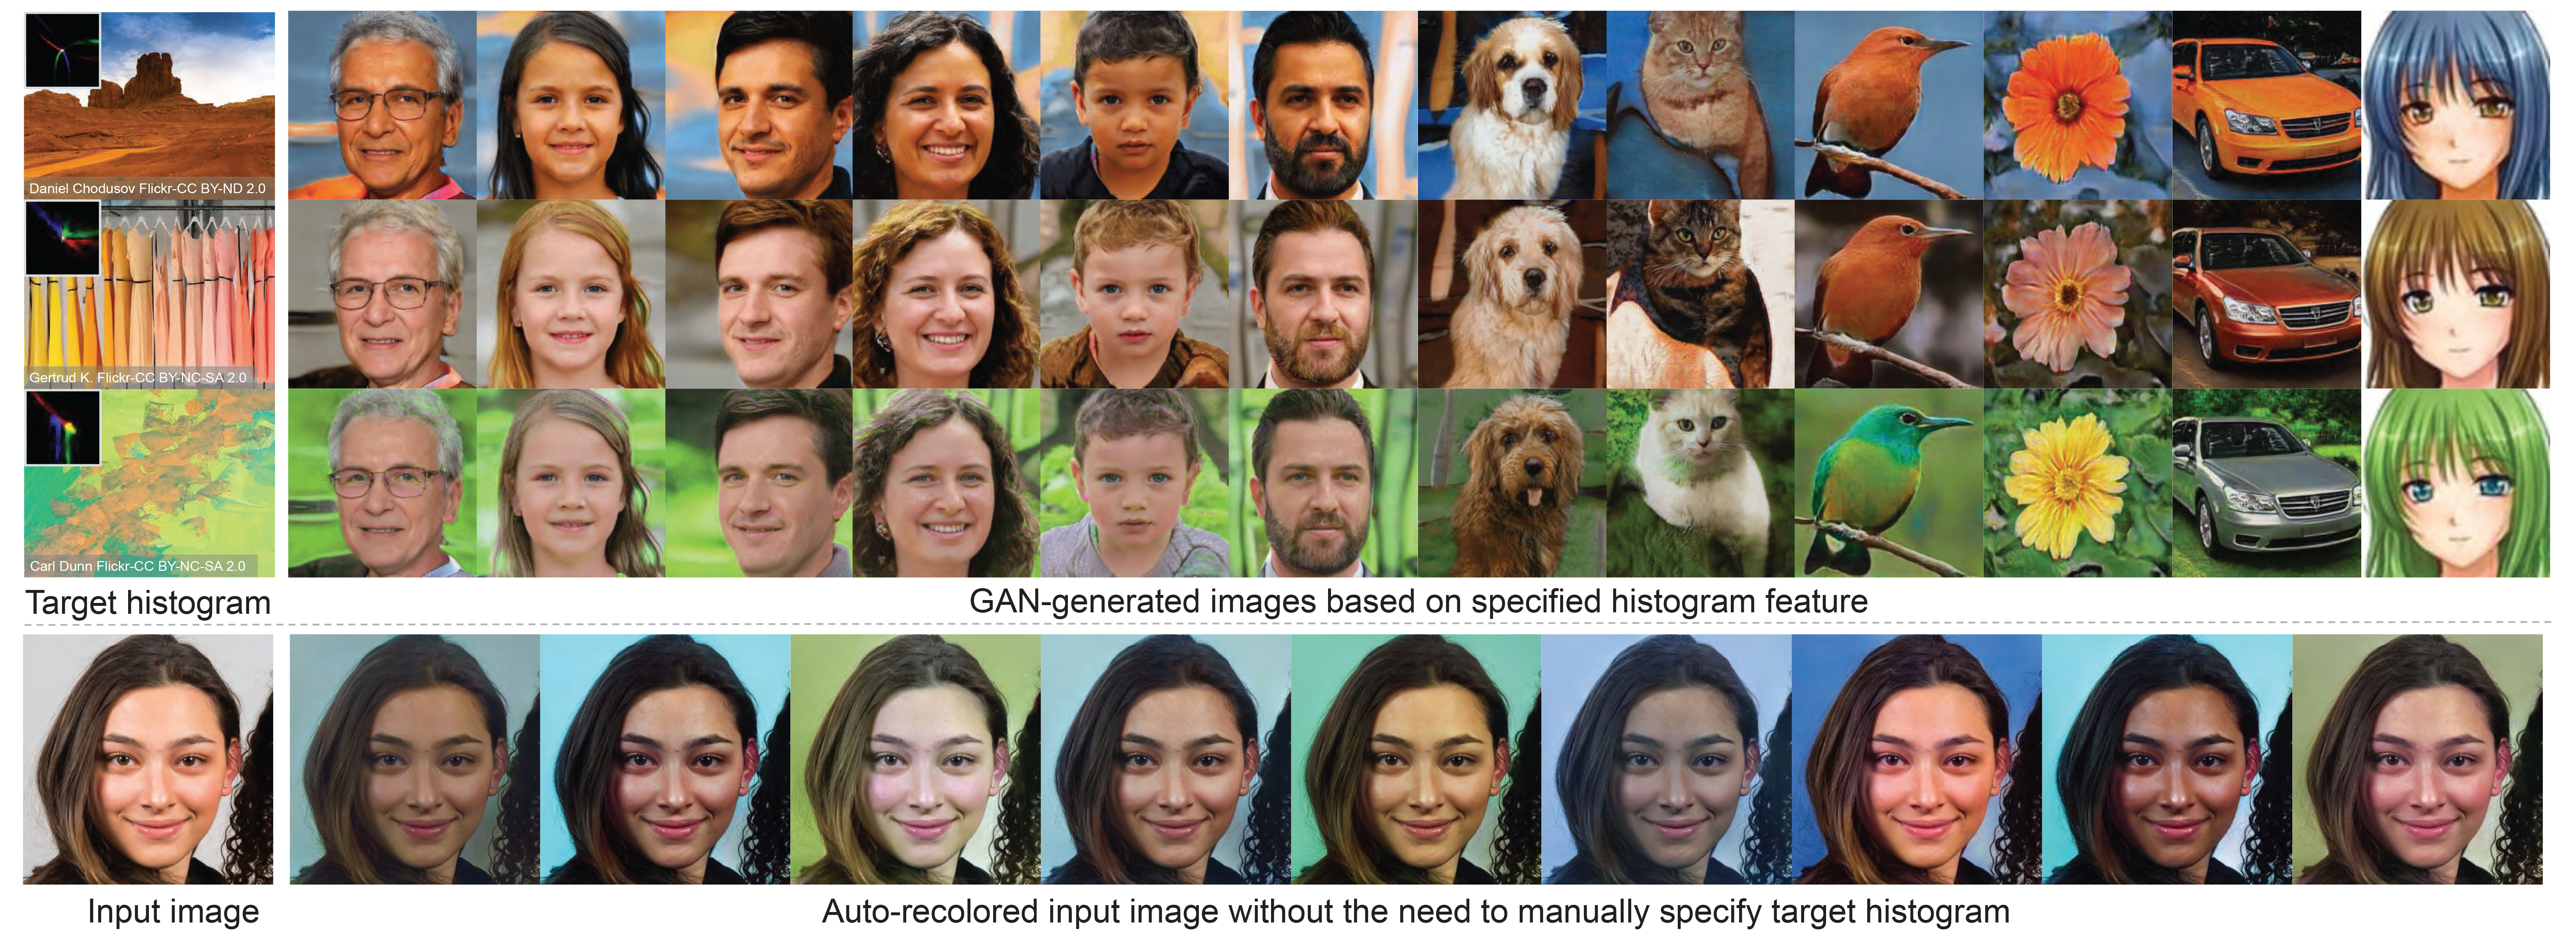
<p align="justify"> In this paper, we present HistoGAN, a color histogram-based method for controlling GAN-generated images' colors. We focus on color histograms as they provide an intuitive way to describe image color while remaining decoupled from domain-specific semantics. Specifically, we introduce an effective modification of the recent StyleGAN architecture to control the colors of GAN-generated images specified by a target color histogram feature. We then describe how to expand HistoGAN to recolor real images. For image recoloring, we jointly train an encoder network along with HistoGAN. The recoloring model, ReHistoGAN, is an unsupervised approach trained to encourage the network to keep the original image's content while changing the colors based on the given target histogram. We show that this histogram-based approach offers a better way to control GAN-generated and real images' colors while producing more compelling results compared to existing alternative strategies.</p>
<p align="center"> <img width = 95% src="https://user-images.githubusercontent.com/37669469/100063841-c500b380-2dff-11eb-8c4a-15fc57bb9caf.gif"> </p>Code
Prerequisite
- Pytorch
- numpy
- tqdm
- pillow
- linear-attention-transformer (optional)
- vector-quantize-pytorch (optional)
- openCV
- torch-optimizer
- retry
- dlib (optional)
Conda & pip commands:
conda create -n histoGAN python=3.6 numpy=1.13.3 scipy
conda activate histoGAN
conda install pytorch torchvision -c python
conda install -c conda-forge tqdm
conda install -c anaconda pillow
conda install -c conda-forge opencv
pip install CMake
pip install dlib
pip install linear-attention-transformer
pip install vector-quantize-pytorch
pip install torch-optimizer
pip install retry
You may face some problems in installing dlib on Windows via pip. It is required only for the face pre-processing option (see below for more details). In order to install dlib for Windows, please follow this link. If couldn't install dlib, you can comment this line and do not use the --face_extraction option for reHistoGAN.
Histogram loss
We provide a Colab notebook example code to compute our histogram loss. This histogram loss is differentiable and can be easily integrated into any deep learning optimization.
In the Colab tutorial, we provide different versions of the histogram class to compute the histogram loss for different color spaces: RGB-uv, rg-chroma, and CIE Lab. For CIE Lab, input images are supposed to be already in the CIE LAB space before computing the histogram loss. The code of these histogram classes is also provided in ./histogram_classes. In HistoGAN and ReHistoGAN, we trained using RGB-uv histogram features. To use rg-chroma or CIE Lab, you can simply replace from histogram_classes.RGBuvHistBlock import RGBuvHistBlock with from histogram_classes.X import X as RGBuvHistBlock, where X is the name of the histogram class (i.e., rgChromaHistBlock or LabHistBlock). This change should be applied to all source code files that use the histogram feature. Note that for the CIE LAB histograms, you need to first convert loaded images into the CIE LAB space in the Dataset class in both histoGAN and ReHistoGAN codes. That also requires converting the generated images back to sRGB space before saving them.
If you faced issues with memory, please check this issue for potential solutions.
HistoGAN
To train/test a histoGAN model, use histoGAN.py. Trained models should be located in the models directory (can be changed from --models_dir) and each trained model's name should be a subdirectory in the models directory. For example, to test a model named test_histoGAN, you should have models/test_histoGAN/model_X.pt exists (where X refers to the last epoch number).
Training
To train a histoGAN model on a dataset located at ./datasets/faces/, use the following command:
python histoGAN.py --name histoGAN_model --data ./datasets/faces/ --num_train_steps XX --gpu 0
XX should be replaced with the number of iterations. There is no ideal number of training iterations. You may need to keep training until finds the model started to generate degraded images.
During training, you can watch example samples generated by the generator network in the results directory (specified by --results_dir). Each column in the generated sample images shares the same training histogram feature. Shown below is the training progress of a HistoGAN trained on the FFHQ dataset using --network_capacity 16 and --image_size 256.
There is no clear criterion to stop training, so watching generated samples will help to detect when the generator network starts diverging. Also reporting the FID score after each checkpoint may help.
You may need to increase the number of training steps (specified by --num_train_steps), if the generator didn't diverge by the end of training. If the network starts generating degraded results after a short period of training, you may need to apply some data augmentation by using --aug_prob X and --dataset_aug_prob Y, where X is a float number representing the probability of discriminator augmentation and Y float number to set the probability of dataset augmentation.
Shown below is the training progress of HistoGAN when trained on portrait images with and without augmentation applied. As shown, the generator starts to generate degraded images after a short period of training, while it keeps generating reasonable results when data augmentation is applied (here, we use --aug_prob 0.5).
Testing
Here is an example of how to generate new samples of a trained histoGAN models named Faces_histoGAN:
python histoGAN.py --name Faces_histoGAN --generate True --target_his ./target_images/2.jpg --gpu 0
The shown figure below illustrates what this command does. First, we generate a histogram feature of this input image. Then, this feature is fed into our HistoGAN to generate face image samples.

Generated samples will be located in ./results_HistoGAN/Faces_histoGAN.
Another example is given below, where we use a fixed input noise and style vectors for the first blocks of the generator network, while we change the input histograms. In this example, we first use --save_noise_latent = True to save the noise and latent data for the first blocks. Then, we load the saved noise and latent files, using --target_noise_file and --target_latent_file, to generate the same samples but with different color histograms.
python histoGAN.py --name Faces_histoGAN --generate True --target_his ./target_images/1.jpg --save_noise_latent True --gpu 0
python histoGAN.py --name Faces_histoGAN --generate True --target_his ./target_images/ --target_noise_file ./temp/Face_histoGAN/noise.py --target_latent_file ./temp/Faces_histoGAN/latents.npy --gpu 0

Additional useful parameters are given below.
Parameters
--name: Model name.--models_dir: Models directory (to save or load models).--data: Dataset directory (for training).--new: Set toTrueto train a new model. If--new = False, it will start training/evaluation from the last saved model.--image_size: Output image size (should be a power of 2).--batch_sizeand--gradient_accumulate_every: To control the size of mini-batch and the accumulation in computing
