Datadreamer
Creation of annotated datasets from scratch using Generative AI and Foundation Computer Vision models
Install / Use
/learn @luxonis/DatadreamerREADME
DataDreamer
![]()
![]()


<a name="quickstart"></a>
🚀 Quickstart
To generate your dataset with custom classes, you need to execute only two commands:
pip install datadreamer
datadreamer --class_names person moon robot
<a name ="overview"></a>
🌟 Overview
<img src='https://raw.githubusercontent.com/luxonis/datadreamer/main/images/datadreamer_scheme.gif' align="center">DataDreamer is an advanced toolkit engineered to facilitate the development of edge AI models, irrespective of initial data availability. Distinctive features of DataDreamer include:
-
Synthetic Data Generation: Eliminate the dependency on extensive datasets for AI training. DataDreamer empowers users to generate synthetic datasets from the ground up, utilizing advanced AI algorithms capable of producing high-quality, diverse images.
-
Knowledge Extraction from Foundational Models:
DataDreamerleverages the latent knowledge embedded within sophisticated, pre-trained AI models. This capability allows for the transfer of expansive understanding from these "Foundation models" to smaller, custom-built models, enhancing their capabilities significantly. -
Efficient and Potent Models: The primary objective of
DataDreameris to enable the creation of compact models that are both size-efficient for integration into any device and robust in performance for specialized tasks.
✨ New: Pre-annotate Real Data with DataDreamer
DataDreamer helps you accelerate your annotation process by pre-annotating real data with minimal effort. Simply provide your dataset, and DataDreamer generates high-quality initial annotations for further refinement.
Available tasks: classification, object detection, and instance segmentation.
<img src='https://raw.githubusercontent.com/luxonis/datadreamer/main/images/dumplings_seg_preannotation.gif' align="center">Example
Run the following to pre-annotate images in your dataset:
datadreamer --task instance-segmentation --image_annotator owlv2-slimsam --save_dir dataset_path --class_names dumpling --annotate_only
📚 Tutorial: Training a Semantic Segmentation Model using luxonis-train and DataDreamer
📜 Table of contents
- 🚀 Quickstart
- 🌟 Overview
- 🛠️ Features
- 💻 Installation
- ⚙️ Hardware Requirements
- 📋 Usage
- ⚠️ Limitations
- 📄 License
- 🙏 Acknowledgements
<a name="features"></a>
🛠️ Features
-
Prompt Generation: Automate the creation of image prompts using powerful language models.
Provided class names: ["horse", "robot"]
Generated prompt: "A photo of a horse and a robot coexisting peacefully in the midst of a serene pasture."
-
Image Generation: Generate synthetic datasets with state-of-the-art generative models.
-
Dataset Annotation: Leverage foundation models to label datasets automatically.
-
Edge Model Training: Train efficient small-scale neural networks for edge deployment. (not part of this library)
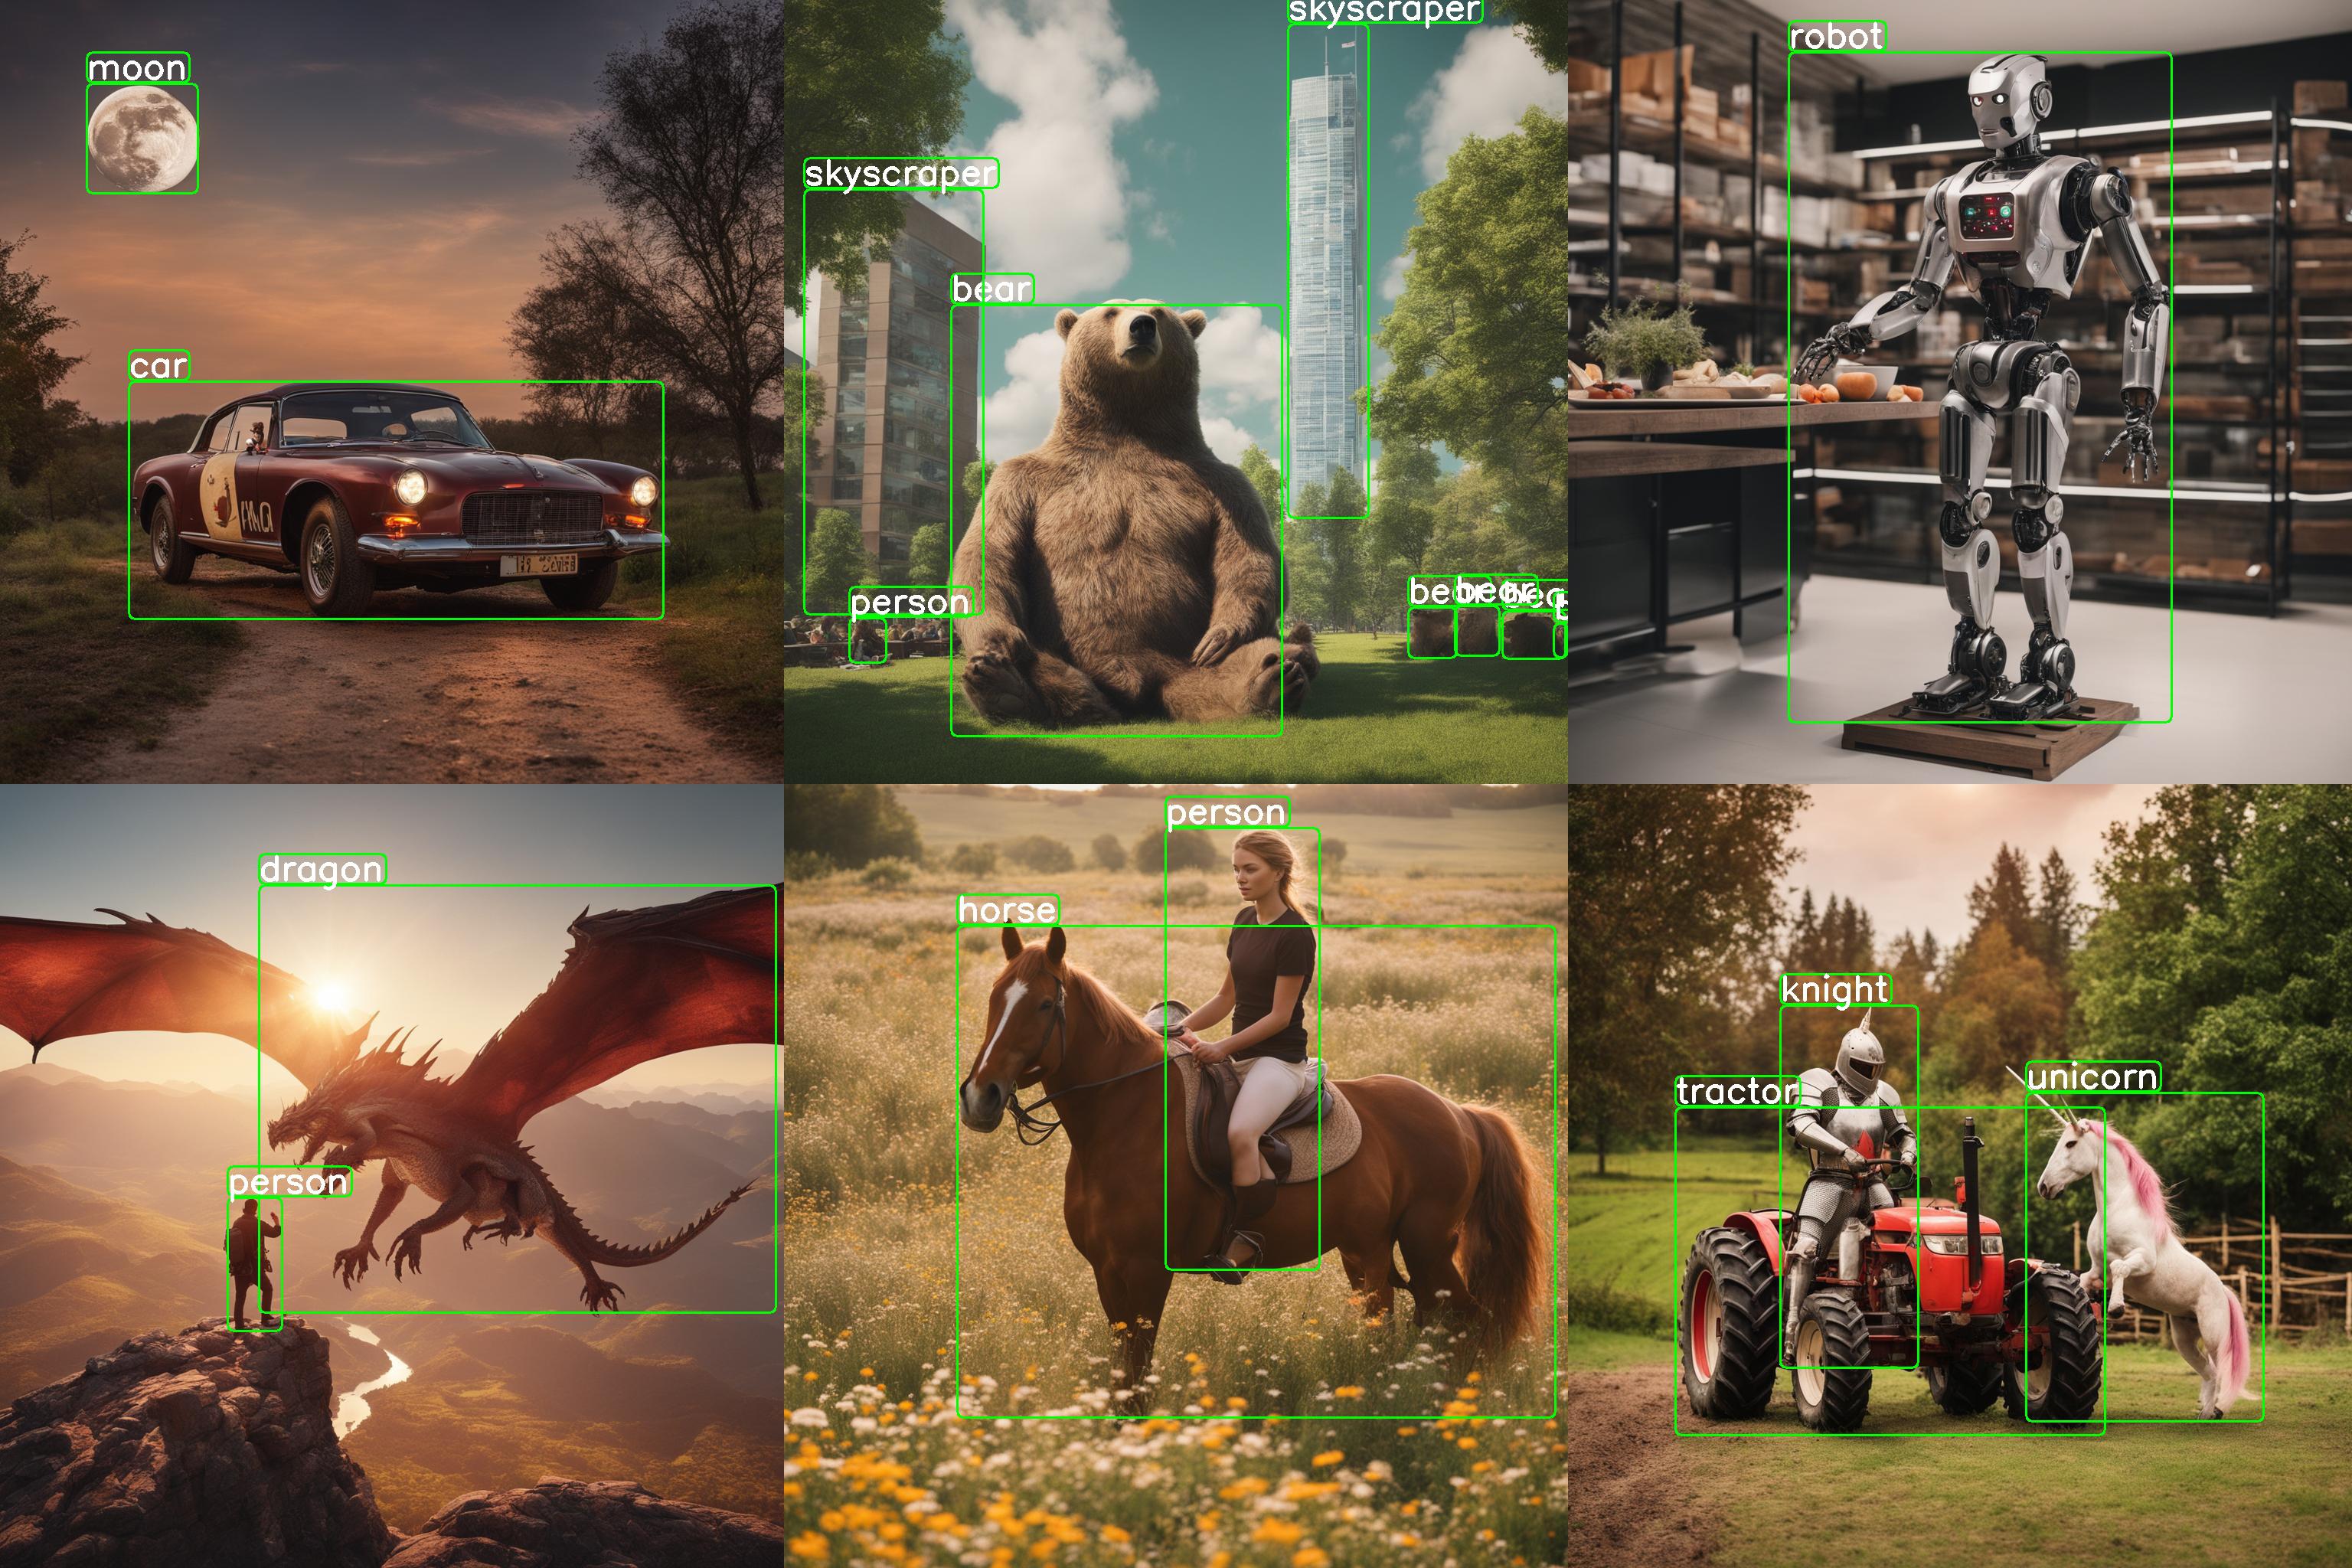
<img src="https://raw.githubusercontent.com/luxonis/datadreamer/main/images/generated_image.jpg" width="400"><img src="https://raw.githubusercontent.com/luxonis/datadreamer/main/images/annotated_image.jpg" width="400">
<a name="installation"></a>
💻 Installation
There are two ways to install the datadreamer library:
Using pip:
To install with pip:
pip install datadreamer
Using Docker (for Linux/Windows):
Pull Docker Image from GHCR:
docker pull ghcr.io/luxonis/datadreamer:latest
Or build Docker Image from source:
# Clone the repository
git clone https://github.com/luxonis/datadreamer.git
cd datadreamer

# Build Docker Image
docker build -t datadreamer .
Run Docker Container (assuming it's GHCR image, otherwise replace ghcr.io/luxonis/datadreamer:latest with datadreamer)
Run on CPU:
docker run --rm -v "$(pwd):/app" ghcr.io/luxonis/datadreamer:latest --save_dir generated_dataset --device cpu
Run on GPU, make sure to have nvidia-docker installed:
docker run --rm --gpus all -v "$(pwd):/app" ghcr.io/luxonis/datadreamer:latest --save_dir generated_dataset --device cuda
These commands mount the current directory ($(pwd)) to the /app directory inside the container, allowing you to access files from your local machine.
<a name="hardware-requirements"></a>
⚙️ Hardware Requirements
To ensure optimal performance and compatibility with the libraries used in this project, the following hardware specifications are recommended:
GPU: A CUDA-compatible GPU with a minimum of 16 GB memory. This is essential for libraries liketorch,torchvision,transformers, anddiffusers, which leverage CUDA for accelerated computing in machine learning and image processing tasks.RAM: At least 16 GB of system RAM, although more (32 GB or above) is beneficial for handling large datasets and intensive computations.
<a name="usage"></a>
📋 Usage
The datadreamer/pipelines/generate_dataset_from_scratch.py (datadreamer command) script is a powerful tool for generating and annotating images with specific objects. It uses advanced models to both create images and accurately annotate them with bounding boxes for designated objects.
Run the following command in your terminal to use the script:
datadreamer --save_dir <directory> --class_names <objects> --prompts_number <number> [additional options]
or using a .yaml config file
datadreamer --config <path-to-config>
<a name="main-parameters"></a>
🎯 Main Parameters
--save_dir(required): Path to the directory for saving generated images and annotations.--class_names(required): Space-separated list of object names for image generation and annotation. Example:person moon robot.--prompts_number(optional): Number of prompts to generate for each object. Defaults to10.--annotate_only(optional): Only annotate the images without generating new ones, prompt and image generator will be skipped. Defaults toFalse.
<a name="additional-parameters"></a>
🔧 Additional Parameters
--task: Choose betweendetection,classificationandinstance-segmentation. Default isdetection.--dataset_format: Format of the dataset. Defaults toraw. Supported values:raw,yolo,coco,voc,luxonis-dataset,cls-single.--split_ratios: Split ratios for train, validation, and test sets. Defaults to[0.8, 0.1, 0.1].--num_objects_range: Range of objects in a prompt. Default is 1 to 3.--prompt_generator: Choose betweensimple,lm(Mistral-7B),tiny(tiny LM), andqwen2(Qwen2.5 LM). Default isqwen2.--image_generator: Choose image generator, e.g.,sdxl,sdxl-turbo,sdxl-lightningorshuttle-3. Default issdxl-turbo.--image_annotator: Specify the image annotator, likeowlv2for object detection oraimv2orclipfor image classification orowlv2-slimsamandowlv2-sam2for instance segmentation. Default isowlv2.--conf_threshold: Confidence threshold for annotation. Default is0.15.--annotation_iou_threshold: Intersection over Union (IoU) threshold for annotation. Default is0.2.--prompt_prefix: Prefix to add to every image generation prompt. Default is"".--prompt_suffix: Suffix to add to every image generation prompt, e.g., for adding details like resolution. Default is", hd, 8k, highly detailed".--negative_prompt: Negative prompts to guide the generation away from certain features. Default is"cartoon, blue skin, painting, scrispture, golden, illustration, worst quality, low quality, normal quality:2, unrealistic dream, low resolution, static, sd character, low quality, low resolution, greyscale, monochrome, nose, cropped, lowres, jpeg artifacts, deformed iris, deformed pupils, bad eyes, semi-realistic worst quality, bad lips, deformed mouth, deformed face, deformed fingers, bad anatomy".--use_tta: Toggle test time augmentation for object detection. Default isFalse.--synonym_generator: Enhance class names with synonyms. Default isnone. Other options arellm,wordnet.--use_image_tester: Use image tester for image generation. Default isFalse.--image_tester_patience: Patience level for image tester. Default is1.--lm_quantization: Quantization to use for Mistral language model. Choose betweennoneand4bit. Default isnone.--annotator_size: Size of the annotator model to use. Choose betweenbaseandlarge. Default isbase.--disable_lm_filter: Use only a bad word list for profanity filtering (LM check disabled). Default isFalse.--disable_profanity_filter: Disable profanity filtering entirely. Default isFalse.- `--keep_unlabe
