UnoStick
LUFA powered Firmware to turn your Arduino UNO R3 into a plug & play arcade stick.
Install / Use
/learn @lucasgcb/UnoStickREADME
UnoStick / Stickzao
This project is intended to turn your Arduino UNO3 into a Joystick/Arcade Stick peripheral using the Arduino's USB.
- Buttons (8 inputs) and stick (4 inputs) positions are read from the Analog and Digital Ports by the ATmega328P.
- USB Driver communication is done by the ATmega16u2,
- ATmega16u2 receives information from the 328p through UART to figure out the current input.
This works for anything that accepts generic HID Joysticks; PS3, PC, etc.
As I've made this as a project for my microcontrollers class, it may have some input latency. Benchmarking still needs to be done to ensure this isn't going to get you hit by cross-ups when you freaking blocked that.
Slow Installation (no script yet)
Notice: These steps will not-permanently disable your Arduino programming funcionalities. Read on for a walkthrough on how to restore them.
0 - Plug the Board. Ensure the serial programmer is installed by uploading a random Sketch; if this fails you have other problems - you could try the Restoration steps below.
1 - Use AVRDUDES to program the 328p with the BotoesUART.hex file.
The command usually looks like this; you may retrieve a more accurate depiction of it for your environment by having activated Verbose mode on the Arduino platform and then uploading a sketch.
avrdude.exe
"-CC:\Program Files (x86)\Arduino\hardware\tools\avr/etc/avrdude.conf" -v -patmega328p -carduino -PCOM3 -b115200 -D -Uflash:w:"$(ProjectDir)Release\BotoesUART.hex":i
2 - Enable DFU mode on your Arduino.
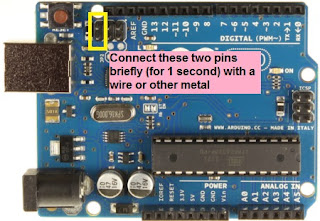
taken from: http://bartruffle.blogspot.com/2013/09/dfu-programming-atmega16u2-on-arduino.html
3 - Acquire Microchip's FLIP , or dfu-programmer for erasing and programming the ATmega16U2
4 - With your DFU programmer, Erase the memory and then Flash the ATmega16U2 with Joystickzao.hex
5 - Power Cycle the whole thing by unplugging, waiting, and replugging the USB cable.
6 - Insert button connections in Analog A5 to A0, Digital 6 and 7
7 - Insert stick connections in Digital 2 to 5.
Do not connect anything to Digital 0 or 1, these are the UART communication ports between both controllers and any extra connections here will make the controller unstable.
Restoring Arduino
0 - Yes, you'll have to go through a few extra steps to uninstall this. Plug the board.
1 - Enable DFU mode on your Arduino. This should also disable the controller.
2 - Use the DFU programmer to erase the memory and then flash Arduino-usbserial-uno.hex onto the ATmega16U2. You may also find this file in your Arduino IDE /hardware/arduino/avr/firmwares/atmegaxxu2/arduino-usbserial folder. I've added mine to the Firmware folder of this repository for convenience.
3 - Power Cycle the whole thing by unplugging, waiting, and replugging the USB cable.
4 - Make sure you've exorcised it entirely by uploading a random Sketch.
Cool Links
-
Andrew Mao's class blog post on ATmega16u2 programming + LUFA
-
LUFA's homepage. If you use Atmel Studio, download it off their extensions list!
Connector Shield coming soon!
Related Skills
node-connect
349.0kDiagnose OpenClaw node connection and pairing failures for Android, iOS, and macOS companion apps
frontend-design
109.4kCreate distinctive, production-grade frontend interfaces with high design quality. Use this skill when the user asks to build web components, pages, or applications. Generates creative, polished code that avoids generic AI aesthetics.
openai-whisper-api
349.0kTranscribe audio via OpenAI Audio Transcriptions API (Whisper).
qqbot-media
349.0kQQBot 富媒体收发能力。使用 <qqmedia> 标签,系统根据文件扩展名自动识别类型(图片/语音/视频/文件)。
