LovyanGFX
SPI LCD graphics library for ESP32 (ESP-IDF/ArduinoESP32) / ESP8266 (ArduinoESP8266) / SAMD51(Seeed ArduinoSAMD51)
Install / Use
/learn @lovyan03/LovyanGFXREADME
LovyanGFX
![]()

![]()
![]()
![]()
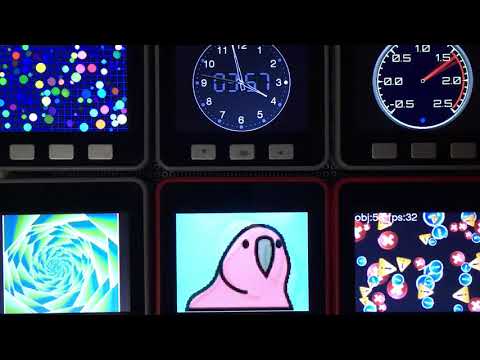
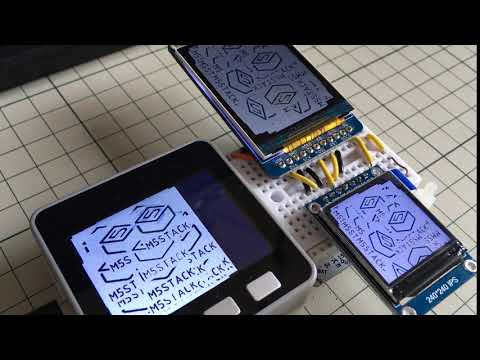
Display (LCD / OLED / EPD) graphics library (for ESP32 SPI, I2C, 8bitParallel / ESP8266 SPI, I2C / ATSAMD51 SPI).
M5Stack / M5StickC / TTGO T-Watch / ODROID-GO / ESP-WROVER-KIT / WioTerminal / and more...
概要 Overview.
ESP32とSPI, I2C, 8ビットパラレル接続のディスプレイ / ESP8266とSPI接続のディスプレイ / ATSAMD51とSPI接続のディスプレイの組み合わせで動作するグラフィックライブラリです。
This is a graphics library that works with a combination of ESP32 with SPI, I2C, 8-bit parallel / ESP8266 with SPI / ATSAMD51 with SPI to the Display. (see compatibility list below).
AdafruitGFX や TFT_eSPI と互換性をある程度持ちつつ、より高機能・高速動作を目標としています。
This library mimics AdafruitGFX and TFT_eSPI APIs while aiming for higher functional coverage and performances.
既存のライブラリに対して、以下のアドバンテージがあります。
- ArduinoESP32 / ESP-IDF 対応
- 16bit / 24bitカラーモード両対応(実際の色数はディスプレイの仕様によります)
- DMA転送を用いた通信動作中の別処理実行
- オフスクリーンバッファ(スプライト)の高速な回転/拡縮描画
- 複数ディスプレイの同時利用
- モノクロディスプレイに対する減色描画の自動処理
- OpenCV,SDL2を描画先として利用でき、PC上で動作可能
- コンポジットビデオ信号(NTSC,PAL)を出力できます (ESP32のみ)
This library has the following advantages.
- ArduinoESP32 and ESP-IDF are supported.
- Both 16bit and 24bit color modes are supported. (actual number of colors depends on display specifications)
- Execute another process during communication operation using DMA transfer.
- Fast rotation/expansion of the off-screen buffer (sprite).
- Simultaneous use of multiple displays.
- Automatic processing of color reduction drawing for monochrome displays.
- OpenCV,SDL2 can be used as a drawing destination and can run on a PC.
- Composite video signal (NTSC, PAL) output (only ESP32)
| | SPI | I2C | 8bit Para |16bit Para | RGB | CVBS | |:------:|:---:|:---:|:---------:|:---------:|:---------:|:--------:| |ESP32 | HW | HW | HW (I2S) | --- | --- |HW(I2SDAC)| |ESP32-S2| HW | HW | HW (I2S) | HW (I2S) | --- | --- | |ESP32-S3| HW | HW |HW(LCD/CAM)|HW(LCD/CAM)|HW(LCD/CAM)| --- | |ESP32-C3| HW | HW | SW | --- | --- | --- | |ESP8266 | HW | SW | --- | --- | --- | --- | |SAMD51 | HW | HW | --- | --- | --- | --- | |SAMD21 | HW | HW | --- | --- | --- | --- | |RP2040 | HW | --- | --- | --- | --- | --- |
※ HW = HardWare Peripheral / SW = SoftWare implementation
| |TouchScreens| |:------:|:----------:| |ESP32 | supported | |ESP32-S2| supported | |ESP32-S3| supported | |ESP32-C3| supported | |ESP8266 | supported | |SAMD51 | supported | |SAMD21 | supported | |RP2040 | --- |
対応環境 Supported environments
-
プラットフォーム Platform
- ESP-IDF
- Arduino ESP32
- Arduino ATSAMD51 (Seeed)
- Arduino RP2040
-
ディスプレイ Displays
-
GC9107 (M5AtomS3)
-
GC9A01
-
GDEW0154M09 (M5Stack CoreInk)
-
HX8357
-
ILI9163
-
ILI9225
-
ILI9341 (WioTerminal, ESP-WROVER-KIT, ODROID-GO, LoLin D32 Pro, WiFiBoy Pro)
-
ILI9342 (M5Stack, M5Stack Core2, ESP32-S3-BOX)
-
ILI9481
-
ILI9486
-
ILI9488 (Makerfabs Touch with Camera)
-
IT8951 (M5Paper)
-
NT35510/OTM8009A
-
R61529
-
RA8875
-
RM68120
-
SH110x (SH1106, SH1107, M5Stack Unit OLED)
-
S6D04K1
-
SSD1306 (SSD1309)
-
SSD1327
-
SSD1331
-
SSD1351 (SSD1357)
-
SSD1963
-
ST7735 (M5StickC, TTGO T-Wristband, TTGO TS, LoLin D32 Pro, WiFiBoy mini, ESPboy, PyBadge)
-
ST7789 (M5StickCPlus, TTGO T-Watch, ESP-WROVER-KIT, Makerfabs MakePython, DSTIKE D-duino-32 XS)
-
ST7796 (WT32-SC01)
-
M5Stack Unit LCD
-
M5Stack AtomDisplay
-
-
タッチスクリーン TouchScreens
- I2C CST816S
- I2C FT5x06 (FT5206, FT5306, FT5406, FT6206, FT6236, FT6336, FT6436)
- I2C GSLx680 (GSL1680)
- I2C GT911
- I2C NS2009
- I2C TT21xxx (TT21100)
- SPI XPT2046
- SPI STMPE610
設定方法のサンプルはsrc/lgfx_userにあります。
上記対応機種とコマンド体系の類似したディスプレイであれば対応可能ですが、当方で入手し動作確認が取れたもののみ正式対応としています。
対応要望を頂けた機種には優先的に対応を検討致します。
setting examples is src/lgfx_user
This library is also compatible with the above models and display panels with a similar command system,
but only those that have been obtained and confirmed to work are officially supported.
使い方 How to use
examplesに具体的なサンプルがあります。
基本的な使い方
// ※  もし対応機種を ArduinoIDE以外の環境で使用する場合や、
// 対応機種がボードマネージャに無い場合 ( TTGO T-Wristband や ESP-WROVER-KIT等 ) は、
// LovyanGFX.hppのincludeより前に、define LGFX_~ の定義を記述してください。

// #define LGFX_M5STACK                       // M5Stack M5Stack Basic / Gray / Go / Fire
// #define LGFX_M5STACK_CORE2                 // M5Stack M5Stack Core2
// #define LGFX_M5STACK_COREINK               // M5Stack M5Stack CoreInk
// #define LGFX_M5STICK_C                     // M5Stack M5Stick C / CPlus
// #define LGFX_M5PAPER                       // M5Stack M5Paper
// #define LGFX_M5TOUGH                       // M5Stack M5Tough
// #define LGFX_M5ATOMS3                      // M5Stack M5ATOMS3
// #define LGFX_ODROID_GO                     // ODROID-GO
// #define LGFX_TTGO_TS                       // TTGO TS
// #define LGFX_TTGO_TWATCH                   // TTGO T-Watch
// #define LGFX_TTGO_TWRISTBAND               // TTGO T-Wristband
// #define LGFX_TTGO_TDISPLAY                 // TTGO T-Display
// #define LGFX_DDUINO32_XS                   // DSTIKE D-duino-32 XS
// #define LGFX_LOLIN_D32_PRO                 // LoLin D32 Pro
// #define LGFX_LOLIN_S3_PRO                  // LoLin S3 Pro
// #define LGFX_ESP_WROVER_KIT                // Espressif ESP-WROVER-KIT
// #define LGFX_ESP32_S3_BOX                  // Espressif ESP32-S3-BOX
// #define LGFX_ESP32_S3_BOX_LITE             // Espressif ESP32-S3-BOX Lite
// #define LGFX_WIFIBOY_PRO                   // WiFiBoy Pro
// #define LGFX_WIFIBOY_MINI                  // WiFiBoy mini
// #define LGFX_MAKERFABS_TOUCHCAMERA         // Makerfabs Touch with Camera
// #define LGFX_MAKERFABS_MAKEPYTHON          // Makerfabs MakePython
// #define LGFX_MAKERFABS_TFT_TOUCH_SPI       // Makerfabs TFT Touch SPI
// #define LGFX_MAKERFABS_TFT_TOUCH_PARALLEL16// Makerfabs TFT Touch Parallel 16
// #define LGFX_WT32_SC01                     // Seeed WT32-SC01
// #define LGFX_WIO_TERMINAL                  // Seeed Wio Terminal
// #define LGFX_PYBADGE                       // Adafruit PyBadge
// #define LGFX_FUNHOUSE                      // Adafruit FunHouse
// #define LGFX_FEATHER_ESP32_S2_TFT          // Adafruit Feather ESP32 S2 TFT
// #define LGFX_FEATHER_ESP32_S3_TFT          // Adafruit Feather ESP32 S3 TFT
// #define LGFX_ESPBOY                        // ESPboy
// #define LGFX_WYWY_ESP32S3_HMI_DEVKIT       // wywy ESP32S3 HMI DevKit
// #define LGFX_SUNTON_ESP32_2432S028         // Sunton ESP32 2432S028

  #define LGFX_AUTODETECT // 自動認識 (D-duino-32 XS, WT32-SC01, PyBadge はパネルID読取りが出来ないため自動認識の対象から外れています)

// 複数機種の定義を行うか、LGFX_AUTODETECTを定義することで、実行時にボードを自動認識します。


// ヘッダをincludeします。
#include <LovyanGFX.hpp>

#include <LGFX_AUTODETECT.hpp>  // クラス"LGFX"を用意します
// #include <lgfx_user/LGFX_ESP32_sample.hpp> // またはユーザ自身が用意したLGFXクラスを準備します

static LGFX lcd;                 // LGFXのインスタンスを作成。
static LGFX_Sprite sprite(&lcd); // スプライトを使う場合はLGFX_Spriteのインスタンスを作成。

// もし現在 TFT_eSPI を使用中で、ソースをなるべく変更したくない場合は、こちらのヘッダを利用できます。
// #include <LGFX_TFT_eSPI.hpp>
// static TFT_eSPI lcd;               // TFT_eSPIがLGFXの別名として定義されます。
// static TFT_eSprite sprite(&lcd);   // TFT_eSpriteがLGFX_Spriteの別名として定義されます。


// 対応機種に無い構成で使う場合は、 examples/HowToUse/2_user_setting.ino を参照してください。
// また設定例はsrc/lgfx_userフォルダにもあります。


void setup(void)
{
// 最初に初期化関数を呼び出します。
  lcd.init();


// 回転方向を 0~3 の4方向から設定します。(4~7を使用すると上下反転になります。)
  lcd.setRotation(1);


// バックライトの輝度を 0~255 の範囲で設定します。
  lcd.setBrightness(128);


// 必要に応じてカラーモードを設定します。(初期値は16)
// 16の方がSPI通信量が少なく高速に動作しますが、赤と青の諧調が5bitになります。
// 24の方がSPI通信量が多くなりますが、諧調表現が綺麗になります。
//lcd.setColorDepth(16);  // RGB565の16ビットに設定
  lcd.setColorDepth(24);  // RGB888の24ビットに設定(表示される色数はパネル性能によりRGB666の18ビットになります)


// 基本的な図形の描画関数は以下の通りです。
/*
  fillScreen    (                color);  // 画面全体の塗り潰し
  drawPixel     ( x, y         , color);  // 点
  drawFastVLine ( x, y   , h   , color);  // 垂直線
  drawFastHLine ( x, y, w      , color);  // 水平線
  drawRect      ( x, y, w, h   , color);  // 矩形の外周
  fillRect      ( x, y, w, h   , color);  // 矩形の塗り
  drawRoundRect ( x, y, w, h, r, color);  // 角丸の矩形の外周
  fillRoundRect ( x, y, w, h, r, color);  // 角丸の矩形の塗り
  drawCircle    ( x, y      , r, color);  // 円の外周
  fillCircle    ( x, y      , r, color);  // 円の塗り
  drawEllipse   ( x, y, rx, ry , color);  // 楕円の外周
  fillEllipse   ( x, y, rx, ry , color);  // 楕円の塗り
  drawLine
Related Skills
node-connect
348.2kDiagnose OpenClaw node connection and pairing failures for Android, iOS, and macOS companion apps
frontend-design
108.9kCreate distinctive, production-grade frontend interfaces with high design quality. Use this skill when the user asks to build web components, pages, or applications. Generates creative, polished code that avoids generic AI aesthetics.
openai-whisper-api
348.2kTranscribe audio via OpenAI Audio Transcriptions API (Whisper).
qqbot-media
348.2kQQBot 富媒体收发能力。使用 <qqmedia> 标签,系统根据文件扩展名自动识别类型(图片/语音/视频/文件)。
