Jenetics
Jenetics - Genetic Algorithm, Genetic Programming, Grammatical Evolution, Evolutionary Algorithm, and Multi-objective Optimization
Install / Use
/learn @jenetics/JeneticsREADME
Jenetics
![]()

![]()
Jenetics is a Genetic Algorithm, Evolutionary Algorithm, Grammatical Evolution, Genetic Programming, and Multi-objective Optimization library, written in modern day Java. It is designed with a clear separation of the several concepts of the algorithm, e.g. Gene, Chromosome, Genotype, Phenotype, Population and fitness Function. Jenetics allows you to minimize and maximize the given fitness function without tweaking it. In contrast to other GA implementations, the library uses the concept of an evolution stream (EvolutionStream) for executing the evolution steps. Since the EvolutionStream implements the Java Stream interface, it works smoothly with the rest of the Java Stream API.
Other languages
- Jenetics.Net: Experimental .NET Core port in C# of the base library.
- Helisa: Scala wrapper around the Jenetics library.
Star History
Documentation
The library is fully documented (javadoc) and comes with a user manual (pdf).
Build Jenetics
Jenetics requires at least Java 25 to compile and run.
Check out the master branch from GitHub.
$ git clone https://github.com/jenetics/jenetics.git <builddir>
Jenetics uses Gradle as a build system and organizes the source into sub-projects (modules). Each subproject is located in its own subdirectory:
Published projects
The following projects/modules are also published to Maven.
- jenetics
 : This project contains the source code and tests for the Jenetics core-module.
 - jenetics.ext : This module contains additional non-standard GA operations and data types. It also contains classes for solving multi-objective problems (MOEA) and doing Grammatical Evolution (GE).
- jenetics.prog : The modules contain classes that allow to do genetic programming (GP). It seamlessly works with the existing
EvolutionStreamand evolutionEngine. - jenetics.xml : XML marshaling module for the Jenetics base data structures.
Non-published modules
- jenetics.distassert: This module allows testing whether some sample data follows a given statistical distribution. Jenetics uses this module for testing its GA operators.
- jenetics.example: This module contains example code for the core-module.
- jenetics.doc: Contains the code of the website and the manual.
- jenetics.tool: This module contains classes used for doing integration testing and algorithmic performance testing. It is also used for creating GA performance measures and creating diagrams from the performance measures.
For building the library change into the <builddir> directory (or one of the module directories) and call one of the available tasks:
- compileJava: Compiles the Jenetics sources and copies the class files to the
<builddir>/<module-dir>/build/classes/maindirectory. - jar: Compiles the sources and creates the JAR files. The artifacts are copied to the
<builddir>/<module-dir>/build/libsdirectory. - javadoc: Generates the API documentation. The Javadoc is stored in the
<builddir>/<module-dir>/build/docsdirectory - test: Compiles and executes the unit tests. The test results are printed onto the console, and a test-report, created by TestNG, is written to
<builddir>/<module-dir>directory. - clean: Deletes the
<builddir>/build/*directories and removes all generated artifacts.
For building the library jar from the source call
$ cd <build-dir>
$ ./gradlew jar
Example
Hello World (Ones counting)
The minimum evolution Engine setup needs a genotype factory, Factory<Genotype<?>>, and a fitness Function. The Genotype implements the Factory interface and can therefore be used as prototype for creating the initial Population and for creating new random Genotypes.
import io.jenetics.BitChromosome;
import io.jenetics.BitGene;
import io.jenetics.Genotype;
import io.jenetics.engine.Engine;
import io.jenetics.engine.EvolutionResult;
import io.jenetics.util.Factory;

public class HelloWorld {
    // 2.) Definition of the fitness function.
    private static Integer eval(Genotype<BitGene> gt) {
        return gt.chromosome()
            .as(BitChromosome.class)
            .bitCount();
    }

    public static void main(String[] args) {
        // 1.) Define the genotype (factory) suitable
        //     for the problem.
        Factory<Genotype<BitGene>> gtf =
            Genotype.of(BitChromosome.of(10, 0.5));

        // 3.) Create the execution environment.
        Engine<BitGene, Integer> engine = Engine
            .builder(HelloWorld::eval, gtf)
            .build();

        // 4.) Start the execution (evolution) and
        //     collect the result.
        Genotype<BitGene> result = engine.stream()
            .limit(100)
            .collect(EvolutionResult.toBestGenotype());

        System.out.println("Hello World:\n" + result);
    }
}
In contrast to other GA implementations, the library uses the concept of an evolution stream (EvolutionStream) for executing the evolution steps. Since the EvolutionStream implements the Java Stream interface, it works smoothly with the rest of the Java streaming API. Now let's have a closer look at the listing above and discuss this simple program step by step:
-
The probably most challenging part, when setting up a new evolution
Engine, is to transform the problem domain into a appropriateGenotype(factory) representation. In our example we want to count the number of ones of aBitChromosome. Since we are counting only the ones of one chromosome, we are adding only oneBitChromosometo ourGenotype. In general, theGenotypecan be created with 1 to n chromosomes. -
Once this is done, the fitness function, which should be maximized, can be defined. Utilizing the new language features introduced in Java 8, we simply write a private static method, which takes the genotype we defined and calculates its fitness value. If we want to use the optimized bit-counting method,
bitCount(), we have to cast theChromosome<BitGene>class to the actual usedBitChromosomeclass. Since we know for sure that we created the Genotype with aBitChromosome, this can be done safely. A reference to the eval method is then used as fitness function and passed to theEngine.buildmethod. -
In the third step we are creating the evolution
Engine, which is responsible for changing, respectively evolving, a given population. TheEngineis highly configurable and takes parameters for controlling the evolutionary and the computational environment. For changing the evolutionary behavior, you can set different alterers and selectors. By changing the usedExecutorservice, you control the number of threads; the Engine is allowed to use. A newEngineinstance can only be created via its builder, which is created by calling theEngine.buildermethod. -
In the last step, we can create a new
EvolutionStreamfrom ourEngine. TheEvolutionStreamis the model or view of the evolutionary process. It serves as a »process handle« and also allows you, among other things, to control the termination of the evolution. In our example, we simply truncate the stream after 100 generations. If you don't limit the stream, theEvolutionStreamwill not terminate and run forever. Since theEvolutionStreamextends thejava.util.stream.Streaminterface, it integrates smoothly with the rest of the Java Stream API. The final result, the bestGenotypein our example, is then collected with one of the predefined collectors of theEvolutionResultclass.
Evolving images
This example tries to approximate a given image by semitransparent polygons. It comes with a Swing UI, where you can immediately start your own experiments. After compiling the sources with
$ ./gradlew compileTestJava
you can start the example by calling
$ ./jrun io.jenetics.example.image.EvolvingImages
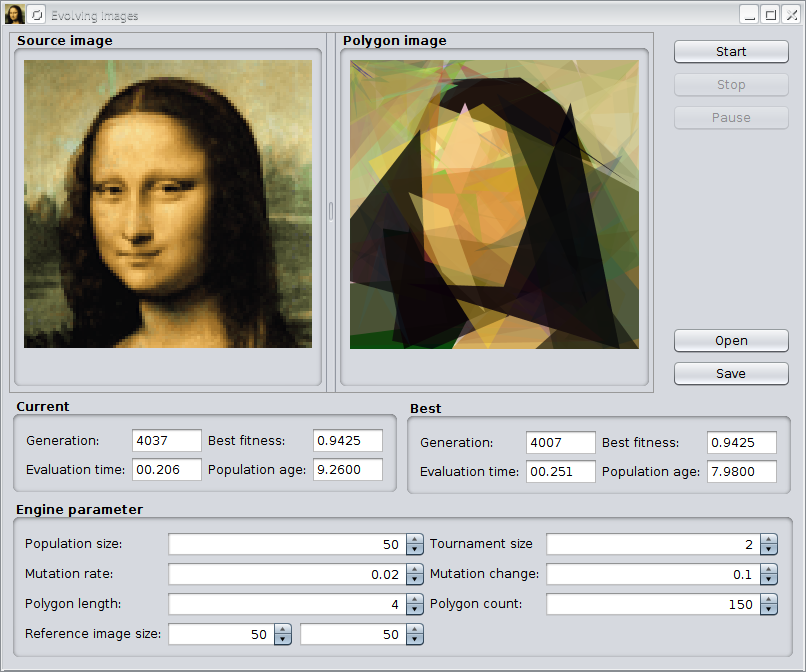
The previous image shows the GUI after evolving the default image for about 4,000 generations. With the »Open« button, it is possible to load other images for polygonization. The »Save« button allows storing polygonized images in PNG format to disk. At the button of the UI, you can change some GA parameters of the example.
Projects using Jenetics
- <a href="https://spear-project.eu/"><b>SPEAR</b>:</a> SPEAR (Smart Prognosis of Energy with
Related Skills
YC-Killer
2.7kA library of enterprise-grade AI agents designed to democratize artificial intelligence and provide free, open-source alternatives to overvalued Y Combinator startups. If you are excited about democratizing AI access & AI agents, please star ⭐️ this repository and use the link in the readme to join our open source AI research team.
best-practices-researcher
The most comprehensive Claude Code skills registry | Web Search: https://skills-registry-web.vercel.app
groundhog
399Groundhog's primary purpose is to teach people how Cursor and all these other coding agents work under the hood. If you understand how these coding assistants work from first principles, then you can drive these tools harder (or perhaps make your own!).
workshop-rules
Materials used to teach the summer camp <Data Science for Kids>
