Tinytuya
Python API and command line tool for Tuya WiFi smart devices using a direct local area network (LAN) connection or the cloud (TuyaCloud API).
Install / Use
/learn @jasonacox/TinytuyaREADME
TinyTuya

![]()
![]()
![]()

Python module to interface with Tuya WiFi smart devices
Description
This python module controls and reads state of Tuya compatible WiFi Smart Devices (Plugs, Switches, Lights, Window Covers, etc.) using the local area network (LAN) or the cloud (TuyaCloud API). This is a compatible replacement for the pytuya PyPI module and currently supports Tuya Protocols 3.1, 3.2, 3.3, 3.4 and 3.5.
Tuya devices are designed to communicate with the TuyaCloud but most also expose a local area network API. This allows us to directly control the devices without using the cloud. This python module provides a way to poll status and issue commands to these devices.
TinyTuya can also connect to the Tuya Cloud to poll status and issue commands to Tuya devices.

# Example Usage of TinyTuya
import tinytuya

d = tinytuya.Device('DEVICE_ID_HERE', 'IP_ADDRESS_HERE', 'LOCAL_KEY_HERE', version=3.3)  # Set version to match your device (3.1, 3.2, 3.3, 3.4, or 3.5)
data = d.status()
print('Device status: %r' % data)
NOTE: Devices need to be activated by Smart Life App.
TinyTuya Installation
# Install TinyTuya Library
python -m pip install tinytuya

# Optional: Install Command Line Tool
pipx install tinytuya
Pip will attempt to install cryptography, requests and colorama if not already installed.
Alternate Install on Space- or Dependency-Limited Systems
On systems with limited space (such as an OpenWRT router), or if you would like to use a different cryptography library, you can install TinyTuya without automatic dependencies and manually install them yourself.
First, install a cryptography library. TinyTuya supports:
- cryptography - Newest, requires OpenSSL -
python -m pip install cryptography - PyCryptodome - Another good alternative, does not require OpenSSL, still actively developed -
python -m pip install pycryptodomeorpython -m pip install pycryptodomex - pyaes - Pure Python, but is abandoned and does not support v3.5+ devices -
python -m pip install pyaes - PyCrypto - Predecessor to PyCryptodome, is also abandoned and does not support v3.5+ devices -
python -m pip install pycrypto
Optional: install colorama for terminal color support: python -m pip install colorama
Required for Wizard or Cloud functionality, Optional otherwise: install requests for Cloud functions to work: python -m pip install requests
Finally, install TinyTuya without dependencies: python -m pip install --no-deps tinytuya
Tuya Device Preparation
Controlling and monitoring Tuya devices on your network requires the following:
- Address - Network address (IPv4) of the device e.g. 10.0.1.100
- Device ID - Unique identifier for the Tuya device
- Version - Tuya protocol version used (3.1, 3.2, 3.3, 3.4 or 3.5)
- Local_Key - Security key needed to access the Tuya device. See Setup Wizard to get these keys.
Network Scanner
TinyTuya has a built in network scanner that can be used to find Tuya Devices on your local network. It will show Address, Device ID and Version for each device. Your LAN and firewall will need to allow UDP (6666, 6667 and 7000) and TCP (6668) traffic.
python -m tinytuya scan
Setup Wizard - Getting Local Keys
TinyTuya has a built-in setup Wizard that uses the Tuya IoT Cloud Platform to generate a JSON list (devices.json) of all your registered devices, including secret Local_Key and Name of your devices. Follow the steps below:
-
PAIR - Download the Smart Life App or Tuya Smart App, available for iPhone or Android. Set up your SmartLife account and pair all of your Tuya devices (this is important as you cannot access a device that has not been paired). Do not use a 'guest' account, otherwise it will get deleted without confirmation at step 3.
-
SCAN (Optional) - Run the TinyTuya scan to get a list of Tuya devices on your network. It will show device Address, Device ID and Version number (3.x):
python -m tinytuya scanNOTE: You will need to use one of the displayed Device IDs for step 4.
-
TUYA ACCOUNT - Set up a Tuya Account (see PDF Instructions):
- NOTE: Tuya often changes their portal and services. Please open an issue with screenshots if we need to update these instructions.
- Create a Tuya Developer account on iot.tuya.com. When it asks for the "Account Type", select "Skip this step..." (see screenshot).
- Click on "Cloud" icon -> "Create Cloud Project"
- Pick the correct Data Center "Region" for your location (check HERE to find your Region). This will be used by TinyTuya Wizard (screenshot).
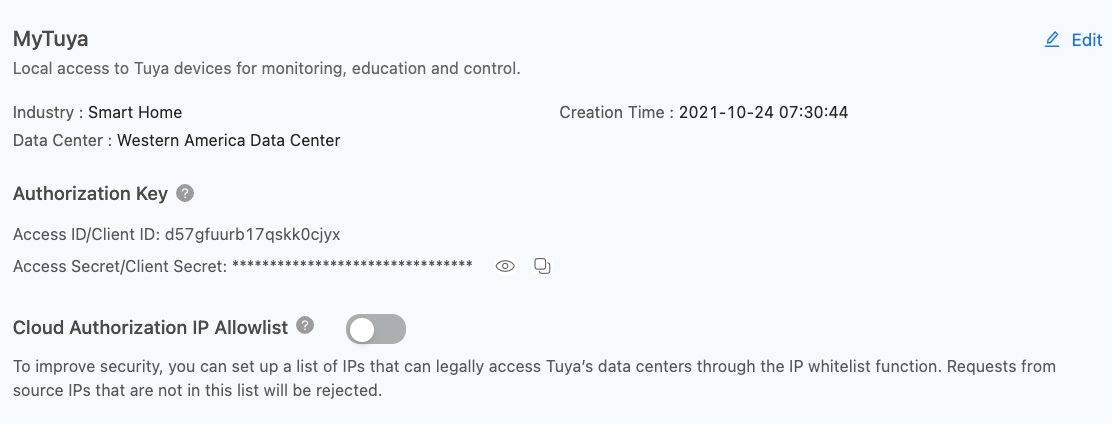
- Skip the configuration wizard but remember the Authorization Key: API ID and Secret for below (screenshot).
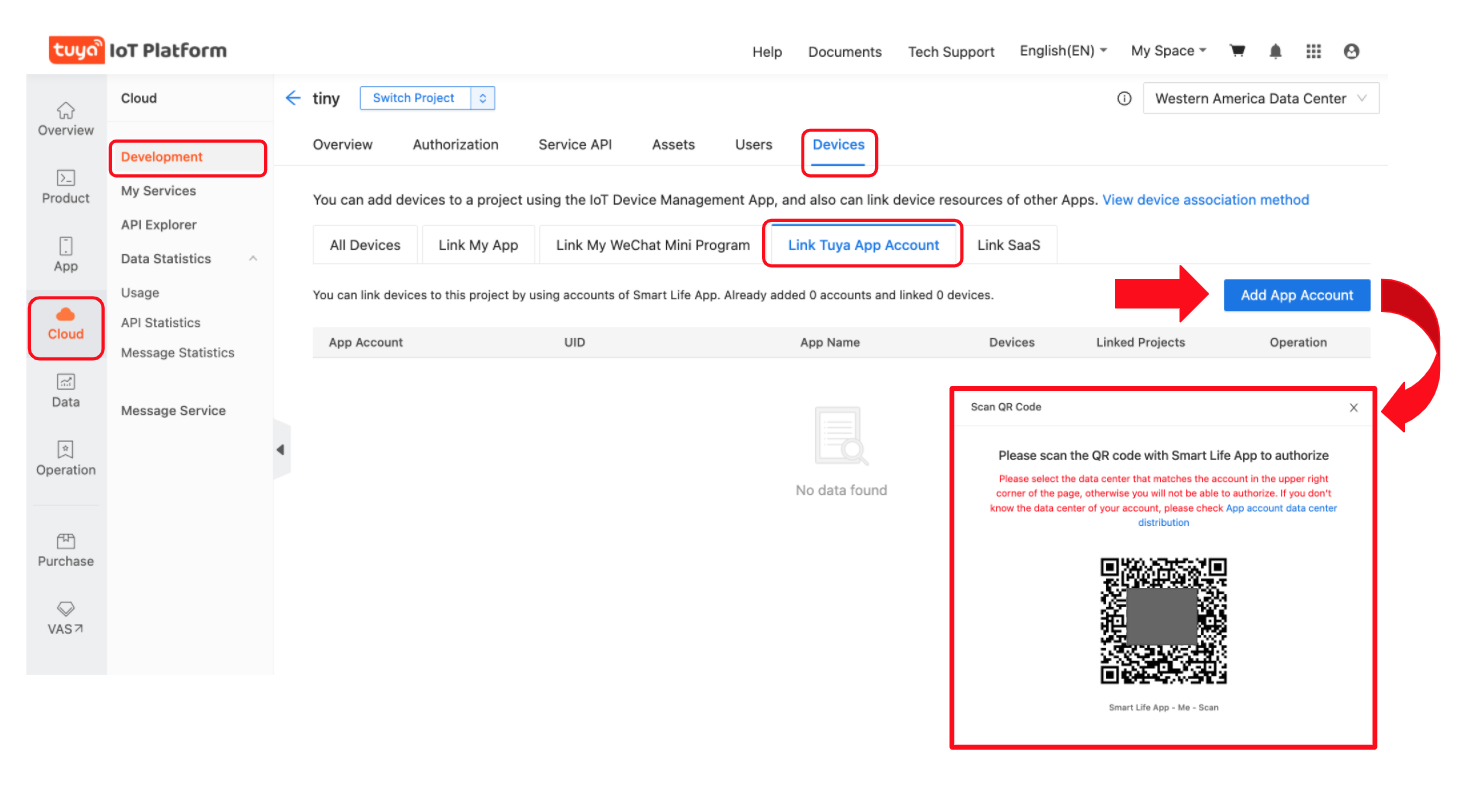
- Click on "Cloud" icon -> Select your project -> Devices -> Link Tuya App Account (see screenshot)
- Click Add App Account (screenshot) and it will pop-up a "Link Tuya App Account" dialog, chose "Automatic" and "Read Only Status" (it will still alow commands). Click OK and it will display a QR code. Scan the QR code with the Smart Life app on your Phone (see step 1 above) by going to the "Me" tab in the Smart Life app and clicking on the QR code button
[..]in the upper right hand corner of the app. When you scan the QR code, it will link all of the devices registered in your Smart Life app into your Tuya IoT project. If the QR code will not scan then make sure to disable any browser theming plug-ins (such as Dark Reader) and try again. - NO DEVICES? If no devices show up after scanning the QR code, you will need to select a different data center and edit your project (or create a new one) until you see your paired devices from the Smart Life App show up. (screenshot). The data center may not be the most logical. As an example, some in the UK have reported needing to select "Central Europe" instead of "Western Europe".
- SERVICE API: Under "Service API" ensure these APIs are listed:
IoT CoreandAuthorization. To be sure, click subscribe again on every service. Very important: disable popup blockers otherwise subscribing won't work without providing any indication of a failure. Make sure you authorize your Project to use those APIs:- Click "Service API" tab
- Click "Go to Authorize" button
- Select the API Groups from the dropdown and click
Subscribe(screenshot)
- RENEWAL: The subscription to the
IoT Coreservice expires after some time. By default, when you subscribe to it for the first time, it will last for one month. Once expired, the setup wizard won't be able to communicate with the Tuya account anymore, so it needs to be renewed. As of November 12th 2024, it can be renewed for a duration of 1, 3 or 6 months by simply filling in a form with some basic information (e.g. purpose of the project, type of developer).
-
WIZARD - Run Setup Wizard:
- From your Linux/Mac/Win PC run the TinyTuya Setup Wizard to fetch the Local_Keys for all of your registered devices:
python -m tinytuya wizard # use -nocolor for non-ANSI-color terminals - The Wizard will prompt you for the API ID key, API Secret, API Region (cn, us, us-e, eu, eu-w, sg, or in) from your Tuya IoT project as set in Step 3 above.
- To find those again, go to iot.tuya.com, choose your project and click
Overview- API Key: Access ID/Client ID
- API Secret: Access Secret/Client Secret
- To find those again, go to iot.tuya.com, choose your project and click
- It will also ask for a sample Device ID. You can have the wizard scan for one (enter
scan), use one from step 2 above or in the Device List on your Tuya IoT project. - The Wizard will poll the Tuya IoT Cloud Platfo
- From your Linux/Mac/Win PC run the TinyTuya Setup Wizard to fetch the Local_Keys for all of your registered devices:
