JuanFi
Juanfi is an open source system for coinslot integration for mikrotik hotspot
Install / Use
/learn @ivanalayan15/JuanFiREADME
JuanFi
-
Official Website: juanfi.juansystems.com
-
Android App: JuanFi Manager
JuanFi is an innovative open-source system designed for seamless coinslot integration with MikroTik Hotspot. It provides a comprehensive solution for managing and monetizing internet access through the integration of a coinslot mechanism. With JuanFi, hotspot owners can effortlessly incorporate a coinslot system into their network infrastructure, enabling them to offer paid internet access in an efficient and user-friendly manner.
Donation
We greatly appreciate donations as they help support the development and maintenance of JuanFi. If you wish to contribute and show your support, you can make a donation using the following methods: ``
- Gcash account: Ivan Julius Alayan - 09175425572
- PayPal account: paypal.me/ivanalayan
Community Group
Join our vibrant community group to connect with other users and contributors. Share your experiences, exchange ideas, hotspot portals, and stay up to date with the latest developments and enhancements of JuanFi.
- Facebook Group: JuanFi Community
Features
Hardware Option
- Wireless based
- Lan based
Coinslot System
- Mikrotik integration
- Pause expiration
- Codeless generation
- Anti Coinslot abuse system
- LCD Display
- Code generation in vendo using LCD without device needed
- Multi vendo system
Admin System
- Initial setup of the system
- Mikrotik connection setup, SSID setup, coinslot settings
- Promo Rates configuration ( Rates, expiration)
- Dashboard, Sales report
- Custom pin configuration
- coinslot abuse system config
Requirements
1.) NodeMCU(ESP8266) for wireless/lan or NodeMCU(ESP32) for wireless/lan
2.) Coinslot
3.) Mikrotik Router
4.) Access Point
5.) Node MCU baseboard( Optional for wireless)
6.) Power Supply (12v for nodeMCU, another 12v for Mikrotik)
7.) W5500 for Lan based
8.) LM2596 or any DC to DC buck that can convert to 5v for (Lan based only since no available baseboard for ESP32)
Architecture

ESP32 LAN Based Connection Diagram

ESP32 Wireless Based Connection Diagram

ESP8622 Wireless Based Connection Diagram

ESP8622 LAN Based Connection Diagram

Updated Connection diagram
<details> <summary> Expand for more images</summary>Credits to Tee Ay for the updated diagram
ESP8266 Simple Wireless

ESP8266 Simple Lan based

ESP8266 Wireless With Power Cut

ESP8266 Lan Based with Power Cut

Flashing the hardware
ESP8622 Flashing Instructions
<details> <summary>Expand for Instructions</summary>Here are the instructions to flash the ESP8622 using the custom pyflasher. Follow these steps to successfully flash the ESP8622 module with the required firmware.
Step 1: Download the Flashing Files
Download the necessary ESP8622 flashing files for your setup:
- ESP8622 Wireless Base folder - For wireless setup.
- ESP8622 Lan Base folder - For LAN-based setup.
Step 2: Open the NodeMCU-PyFlasher
- Connect your ESP8622 to your PC.
- Open the
NodeMCU-PyFlasher.exeapplication.
Step 3: Flashing JuanFi-FlashFile1.bin
- In the PyFlasher interface:
- Select the file
JuanFi-FlashFile1.bin. - Make sure the offset is set to
0x000000. - Click the
Flash Nodemcubutton and wait for the flashing process to complete.
- Select the file

Step 4: Flashing JuanFi-FlashFile2.bin
- In the PyFlasher interface:
- Select the file
JuanFi-FlashFile2.bin. - Set the offset to
0x200000. - Click the
Flash Nodemcubutton and wait for the flashing process to complete.
- Select the file

Step 5: Completing the Flashing Process
After flashing both files, your ESP8622 is now ready. Restart the NodeMCU to begin the setup.
Congratulations! You've successfully flashed your ESP8622 hardware and are ready to proceed with the JuanFi Setup.
</details> <br>ESP32 Flashing Instructions
<details> <summary>Expand for Instructions</summary>Follow these instructions to flash the ESP32 hardware using esptool.exe. This process will load the necessary firmware onto the ESP32 module.
Step 1: Download Flashing Files
Download the required flashing files based on your setup:
- ESP32 Wireless Base folder - For wireless setup.
- ESP32 Lan Base folder - For LAN-based setup.
Step 2: Run the Flashing Script
- Double-click
start_flash.bat. - Connect your ESP32 to your PC using a USB cable.

- A command prompt will appear, prompting you to select an available COM port for your ESP32.
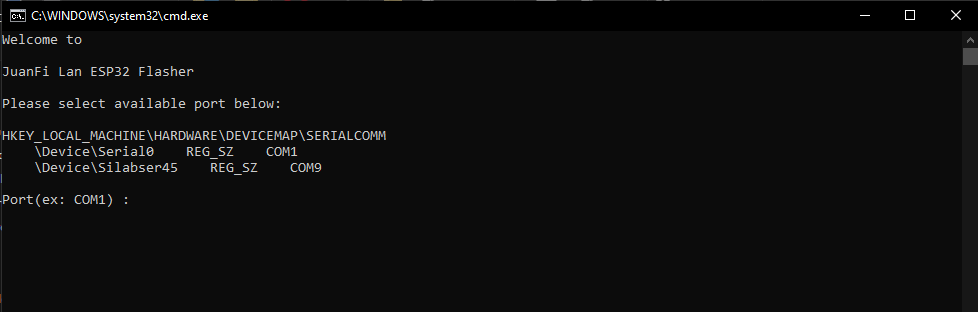
Step 3: Select COM Port
- Choose the appropriate COM port for your ESP32 (e.g., COM9).
- Press "Enter."

- A connecting message will appear, indicating the tool is attempting to connect to the ESP32.
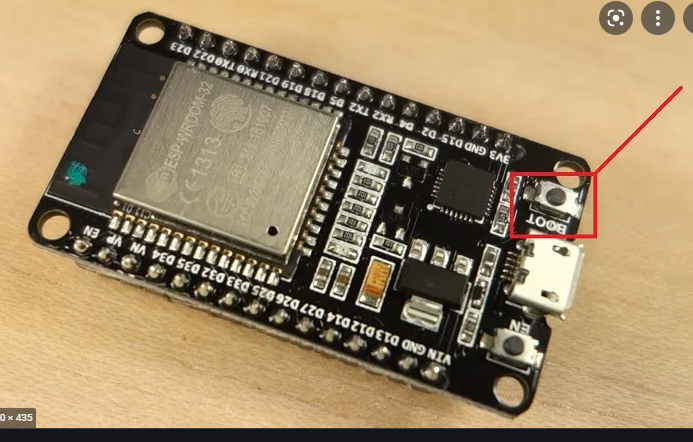
Step 4: Initiate Flashing
- Press and hold the flash button on the ESP32 for 3-5 seconds.
- The flashing process will start.

Step 5: Wait for Completion
Wait for the flashing process to complete.
Step 6: Finish
After the flashing process is finished, you can disconnect the ESP32 from your PC. The device is now ready for the JuanFi Setup.
Congratulations! You've successfully flashed your ESP32 hardware and are ready to proceed with the JuanFi Setup.
</details> <br>Setting up the Vendo
1. Connect to JuanFi Setup
For Esp32/Esp8622 Wireless Based
- Look for the "JuanFi Setup" SSID on your device.
- connect to the SSID
- Access the admin panel in your browser at http://172.217.28.1/login.

For Esp32/Esp8622 LanBase
- Plug your vendo into your PC/Laptop's ethernet port.
- Set your PC/Laptop's IP address as static to 172.217.28.10:
- IP address: 172.217.28.10
- Subnet Mask: 255.255.255.0
- Gateway: 172.217.28.10
- DNS: 172.217.28.10
- Access the admin panel in your browser at http://172.217.28.1/login.
2. Login to Admin Panel
Use the following default credentials:
- Username: admin
- Password: admin

8. Configure System
Configure the necessary fields according to your preferences, or upload a custom configuration file. The system will restart to apply the changes. The default Mikrotik API username and password are pisonet and abc123.
Note: Change the password of the operator account to prevent unauthorized access to the vendo.

Configure Promo Rates

Mikrotik Setup
1. Setup Mikrotik Hotspot
Set up the Mikrotik hotspot server according to your configuration. You can find tutorials online for setting up a hotspot server in Mikrotik.
2. Add this initial script in your terminal
Execute on mikrotik terminal
/system scheduler add interval=1d name="Reset Daily Income" on-event="/system script set source=\"0\" todayincome " policy=ftp,reboot,read,write,policy,test,password,sniff,sensitive,romon start-date=Sep/28/2021 start-time=00:00:00;
/system scheduler add interval=30d name="Reset Monthly Income" on-event="/system script set source=\"0\" monthlyincome " policy=ftp,reboot,read,write,policy,test,password,sniff,sensitive,romon start-date=Sep/28/2021 start-time=00:00:00;
/system script add dont-require-permissions=no name=todayincome owner=admin policy=ftp,reboot,read,write,policy,test,password,sniff,sensitive,romon source="0";
/system script add dont-require-permissions=no name= monthlyincome owner=admin policy=ftp,reboot,read,write,policy,test,password,sniff,sensitive,romon source="0";
/ip hotspot walled-garden ip add action=accept disabled=no dst-address-list=JuanfiVendo
/ip firewall filter add action=accept chain=input place-before=0 comment=JuanfiVendo src-address-list=JuanfiVendo
3. Make NodeMCU IP Address Static
Set the IP address of your vendo (NodeMCU) to static to prevent it from changing addresses.

Copy the mac-address and ip-address of your vendo and set the address-list to JuanfiVendo

4. Add IP Bindings Exception on Hotspot
Ensure the vendo's MAC address and IP address are added to IP bindings exceptions to prevent unauthorized usage.

5
Related Skills
node-connect
339.1kDiagnose OpenClaw node connection and pairing failures for Android, iOS, and macOS companion apps
frontend-design
83.8kCreate distinctive, production-grade frontend interfaces with high design quality. Use this skill when the user asks to build web components, pages, or applications. Generates creative, polished code that avoids generic AI aesthetics.
openai-whisper-api
339.1kTranscribe audio via OpenAI Audio Transcriptions API (Whisper).
commit-push-pr
83.8kCommit, push, and open a PR
