Gobox
Open source growbox automation
Install / Use
/learn @guerillagrow/GoboxREADME
GoBox - Growbox automation <img align="right" width="30" height="30" src="https://raw.githubusercontent.com/guerillagrow/gobox/master/static/img/cannabis-logo-sm.png">
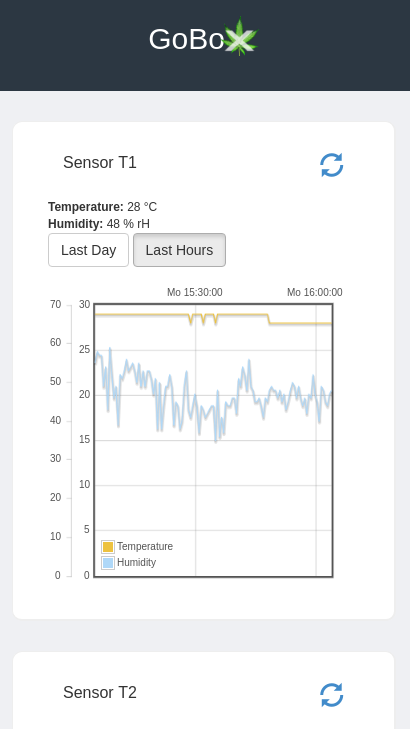
GoBox is a growbox automation app for Raspberry Pi. It allows you to connect two DHT11/DHT22 (Temperature & Humidity) sensors and 2 relays (one for light and one for air). You can adjust the relay on/off times via web interface and also see the latest sensor data. GoBox has zero dependencies neither python, apache or mysql are required. Just push the latest GoBox release on your Pi and you're ready to go.
NOTE: I'm using GoBox in production but it's still considered beta till we reached version 1.0.
Contents
- Features
- System requirements
2.1. Required hardware - Installation
3.1. Installation for Linux users 3.2. Installation for Windows users - Documentation
4.1. Configuration
4.2. Building from source
4.2.1. Linux
4.2.2. Windows
4.3. Wiring - Side notes
- TODOs
1.) Features
- Standalone app no mysql, web server etc. required
- Controlling of 2 Relays and 2 DHT11/DHT22 sensors
- Switch relays based on boolean expressions
- Standalone app no mysql, web server etc. required
- Password protected web interface
- Logging of temperature and humidity
2.) System requirements
- min. 512 MB RAM, 1024 recommended
- min. 1 GB free storage (SD-Card), > 2 GB free storage recommended
- Linux Raspberry pi OS (debian), but any other linux or unix system should be find too.
- Shell & root access
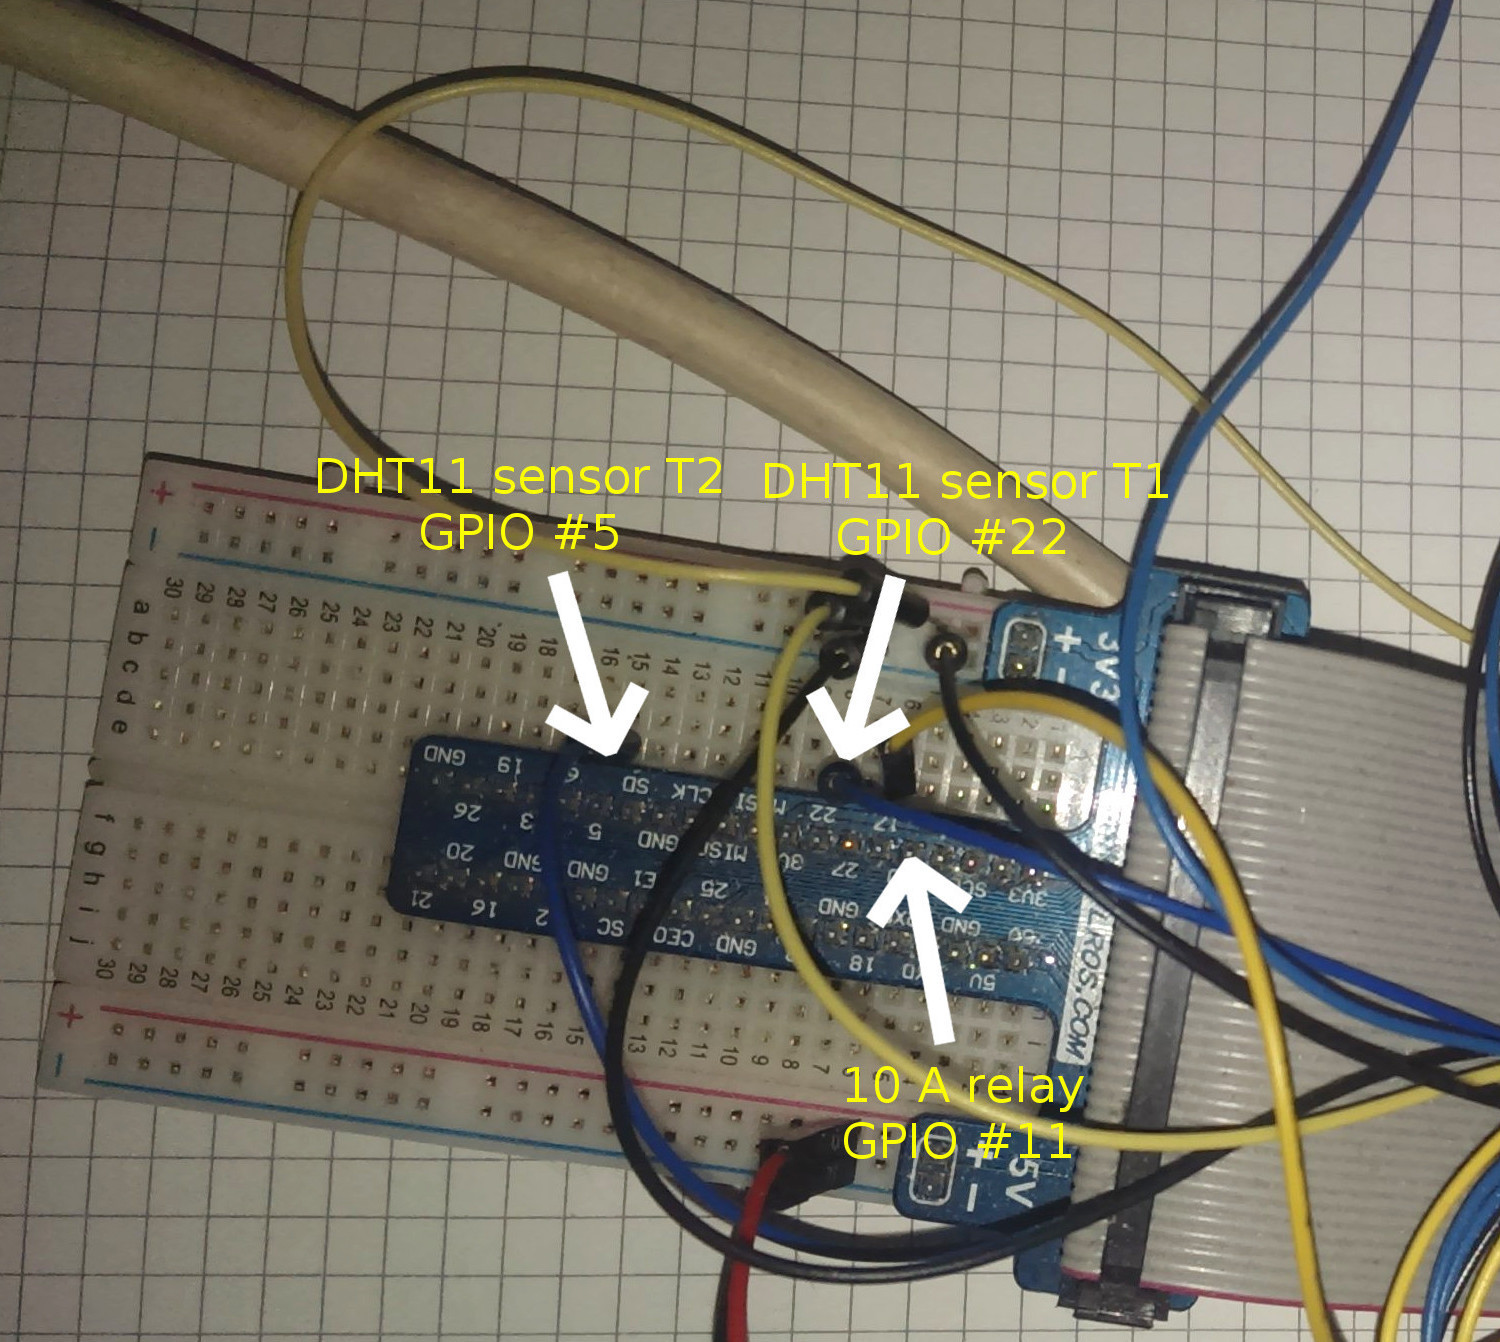
2.1.) Required hardware
- Raspberry Pi Model 3 (arm6)
- Jumper wires
- 2 DHT11 / DHT22 sensors
- 2 10 A relays (one for light & one for the exhaust fan)
- 2 multiway connectors for your relays
- For convenience a GPIO board
- Of course a exhaust fan and maybe a active coal filter
- Some fans for air circulation and plant movement
- Some lights
3.) Installation
3.1.) Installation for Linux users
-
Extract the gobox_v*.zip / tar file
-
Navigate into the folder containing the extracted files
-
Activate the remote root shell access and create following folders on your raspberry pi:
/usr/local/gobox/ -
Change the ./conf/app.conf and ./conf/raspberrypi.json file according to your used GPIO pins
4.1. Set the system time of your raspberrypi properly so the timestamps are correct -
Change the $RPI_IP variable inside the upload_gobox.sh file to theIP of your raspberry pi then run:
$ ./upload_gobox.sh [raspberry pi IP]5.1 Make the init script executable:
$ chmod +x /etc/init.d/gobox5.2. Set the system time of your Pi correctly:
$ date --set="Mo 9. Jul 17:40:26 CEST 2018 -
Start gobox with following command:
$ sudo service gobox startOn older distributions you may run:
$ /etc/init.d/gobox start -
If you want gobox as auto start service run following command:
$ sudo update-rc.d gobox defaults
$ sudo update-rc.d gobox enable
Thats it. Happy growing! :-) You can now access the web interface on: http://[raspberrypi]:8080
3.2.) Installation for Windows users
This is really for those who have no clue how to access the Pi from windows and don't know the "scp" and "ssh" command neither putty.
-
Download Putty & PSCP(To access the Pi whenever you want via SSH, see: https://www.chiark.greenend.org.uk/~sgtatham/putty/latest.html)
-
Unpack the downloaded gobox_v*.zip folder.
-
Open up your command promt (cmd.exe) and navigate into the folder containing the extracted files. Use following command to navigate (ignore the $-sign & replace path):
$ cd C:\path\to\extracted\gobox\release4.1. Set the system time of your Pi correctly login via ssh and execute following command:
$ date --set="Mo 9. Jul 17:40:26 CEST 2018 -
Exectute following commands replace $RPI_IP with the IP-Address of your Raspberry Pi:
cd [Path of the extracted release folder]
pscp -r ./views/ root@$RPI_IP:/usr/local/gobox/
pscp -r ./static/ root@$RPI_IP:/usr/local/gobox/
pscp ./cmd/gobox/gobox_arm root@$RPI_IP:/usr/local/bin/gobox
pscp ./cmd/sensd/sensd_arm root@$RPI_IP:/usr/local/bin/sensd

# Connect to your Pi using putty or the windows oppenssh client
# ssh root@$RPI_IP
# Run following commands on your Pi:

chmod +x /etc/init.d/gobox
sudo update-rc.d gobox defaults
sudo update-rc.d gobox enable
sudo service gobox start
4.) Documentation
4.1.) Configuration
There are 2 Configuration files one for the web server and on for the sensor stuff and relay time configuration.
The ./conf/app.conf file contains you http and app configuration, you could f.e.
change the http port or the "runmode"
The ./conf/raspberrypi.json file contains your relay config and
settings for your sensors. You can set the GPIO pin according to your setting.
Description of config variables in rapspberrypi.json:
devices.t1 => DHT11 Sensor #1
devices.t1.status => Is this sensor plugged in / used
devices.t1.gpio => GPIO Data Pin
devices.t1.read_every => Value in seconds / Interval to read from sensor
# Same for devices.t2.*
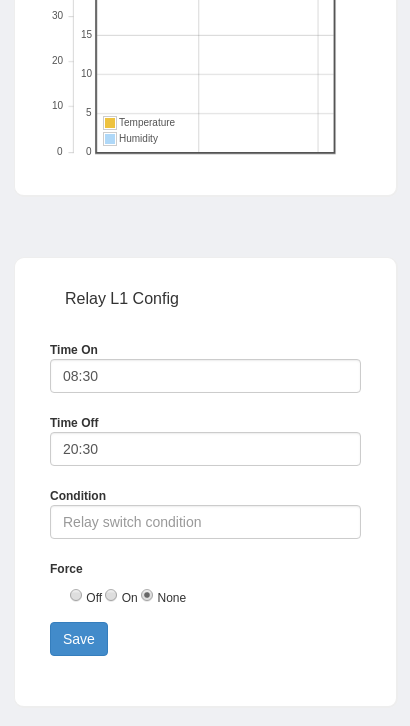
devices.relay_l1 => Relay config
devices.relay_l1.status => Is this relay plugged in / used
devices.relay_l1.settings => Relay settings
devices.relay_l1.settings.condition => Contition used to turn relay on/off, if not blank
the on/off time is ignored and only the condition
is used to switch the relay
devices.relay_l1.settings.force => -1: None; 0: Force off; 1: Force on
devices.relay_l1.settings.on => Time when relay goes on, like: 08:30
devices.relay_l1.settings.off => Time when relay goes off, like: 20:30
ui.metric_source => Use aggregated stats instead of live data (possible values: "live", "stats")
...
The relay switch condition from the config value "devices.relay_l1.settings.condition" can contain following variables:
- tnow string = Datetime string in format: "%Y-%m-%d %H:%M:%S"
- tdate string = Date string in format: "%Y-%m-%d"
- toclock string = Time string in format: "%H:%M"
- tweekday string = Weekday string in format: "%A" (Monday, ...)
- l1_ton string = Relay L1 Time-On in format: "%H:%M"
- l1_toff string = Relay L1 Time-Off in format: "%H:%M"
- l1_force int64 = Force relay L1 on/off, allowed values: 0: None; 1: On; -1: Off
- l1_last_switch_day string = Date string of last time the relay L1 was switched in format: "%Y-%m-%d"
- l1_last_switch_time string = Time string of the last time the relay L1 was switched in format: "%H:%M"
- l2_ton string = Relay L2 Time-On in format: "%H:%M"
- l2_toff string = Relay L2 Time-Off in format: "%H:%M"
- l2_force int64 = Force relay L2 on/off, allowed values: 0: None; 1: On; -1: Off
- l2_last_switch_day string = Date string of last time the relay L2 was switched in format: "%Y-%m-%d"
- l2_last_switch_time string = Time string of the last time the relay L2 was switched in format: "%H:%M"
- t1_temp float64 = Temperature value of T1 sensor
- t1_hum float64 = Humidity value of T1 sensor
- t2_temp float64 = Temperature value of T2 sensor
- t2_hum float64 = Humidity value of T2 sensor
- d1_temp float64 = Temperature value of D1 sensor
- d1_hum float64 = Humidity value of D1 sensor
- d2_temp float64 = Temperature value of D2 sensor
- d2_hum float64 = Humidity value of D2 sensor
- d2_hum float64 = Humidity value of D2 sensor
The sensd daemon executable reads the sensor data according to your raspberrypi.json
config file. You can use any kind of script or process to read the sensor data maybe a
custom python script or similar. You just have to enter it in the config file as "sensd_bin".
You custom sensd script must encode the temperature and humidity data as JSON object including following tags:
	Sensor  string    `json:"sensor"`
	Type    string    `json:"type"`
	Created time.Time `json:"created"` -> encoded as string
	Value   float64   `json:"value"`
4.2.) Building from source
4.2.1) Linux
Requirements:
- Go / golang >= 1.10 & configured GOPATH etc.
- gcc compiler (arm-linux-gnueabihf-gcc) only for sensd you can replace it with your own script
Run following command to build gobox:
# Install  arm gcc compiler to later compile sensd
$ sudo apt-get install gcc-arm-linux-gnueabihf
# Build from source
$ ./build.sh
4.2.2) Windows
Requirements:
-
Go / golang >= 1.10 & configured GOPATH etc.
-
gcc compiler f.e. MinGW (arm-linux-gnueabihf-gcc) only for sensd you can replace it with your own script
See: https://sourceforge.net/projects/mingw-gcc-arm-eabi/files/
Run following command to build gobox:
$ build.bat
4.3.) Wiring
Wiring according to default config:
5.) Side notes
Keep in mind that the lower you set the "read_every" (number of seconds) value of your sensors the more storage will be consumed by the logged sensor data. This might also affect the query times for loading graphs etc.
Usually all logged sensor data that is older than a month will be deleted every 24 hours.
Whats comming next? Well I think
Related Skills
node-connect
349.7kDiagnose OpenClaw node connection and pairing failures for Android, iOS, and macOS companion apps
xurl
349.7kA CLI tool for making authenticated requests to the X (Twitter) API. Use this skill when you need to post tweets, reply, quote, search, read posts, manage followers, send DMs, upload media, or interact with any X API v2 endpoint.
frontend-design
109.7kCreate distinctive, production-grade frontend interfaces with high design quality. Use this skill when the user asks to build web components, pages, or applications. Generates creative, polished code that avoids generic AI aesthetics.
openai-whisper-api
349.7kTranscribe audio via OpenAI Audio Transcriptions API (Whisper).
