Yolact
A simple, fully convolutional model for real-time instance segmentation.
Install / Use
/learn @dbolya/YolactREADME
You Only Look At CoefficienTs
    ██╗   ██╗ ██████╗ ██╗      █████╗  ██████╗████████╗
    ╚██╗ ██╔╝██╔═══██╗██║     ██╔══██╗██╔════╝╚══██╔══╝
     ╚████╔╝ ██║   ██║██║     ███████║██║        ██║
      ╚██╔╝  ██║   ██║██║     ██╔══██║██║        ██║
       ██║   ╚██████╔╝███████╗██║  ██║╚██████╗   ██║
       ╚═╝    ╚═════╝ ╚══════╝╚═╝  ╚═╝ ╚═════╝   ╚═╝
A simple, fully convolutional model for real-time instance segmentation. This is the code for our papers:
YOLACT++ (v1.2) released! (Changelog)
YOLACT++'s resnet50 model runs at 33.5 fps on a Titan Xp and achieves 34.1 mAP on COCO's test-dev (check out our journal paper here).
In order to use YOLACT++, make sure you compile the DCNv2 code. (See Installation)
For a real-time demo, check out our ICCV video:
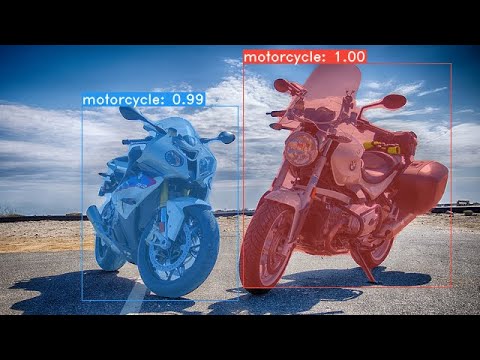
Some examples from our YOLACT base model (33.5 fps on a Titan Xp and 29.8 mAP on COCO's test-dev):


Installation
- Clone this repository and enter it:
git clone https://github.com/dbolya/yolact.git cd yolact - Set up the environment using one of the following methods:
- Using Anaconda
- Run
conda env create -f environment.yml
- Run
- Manually with pip
- Set up a Python3 environment (e.g., using virtenv).
- Install Pytorch 1.0.1 (or higher) and TorchVision.
- Install some other packages:
# Cython needs to be installed before pycocotools
pip install cython
pip install opencv-python pillow pycocotools matplotlib
- Using Anaconda
- If you'd like to train YOLACT, download the COCO dataset and the 2014/2017 annotations. Note that this script will take a while and dump 21gb of files into
./data/coco.sh data/scripts/COCO.sh - If you'd like to evaluate YOLACT on
test-dev, downloadtest-devwith this script.sh data/scripts/COCO_test.sh - If you want to use YOLACT++, compile deformable convolutional layers (from DCNv2).
Make sure you have the latest CUDA toolkit installed from NVidia's Website.
cd external/DCNv2
python setup.py build develop
Evaluation
Here are our YOLACT models (released on April 5th, 2019) along with their FPS on a Titan Xp and mAP on test-dev. Note: These models were re-uploaded to a huggingface collection, as the original download links expired.
| Image Size | Backbone | FPS | mAP | Weights | |:----------:|:-------------:|:----:|:----:|----------------------------------------------------------------------------------------------------------------------| | 550 | Resnet50-FPN | 42.5 | 28.2 | yolact_resnet50_54_800000.pth | | 550 | Darknet53-FPN | 40.0 | 28.7 | yolact_darknet53_54_800000.pth | | 550 | Resnet101-FPN | 33.5 | 29.8 | yolact_base_54_800000.pth | | 700 | Resnet101-FPN | 23.6 | 31.2 | yolact_im700_54_800000.pth |
YOLACT++ models (released on December 16th, 2019):
| Image Size | Backbone | FPS | mAP | Weights | |:----------:|:-------------:|:----:|:----:|----------------------------------------------------------------------------------------------------------------------| | 550 | Resnet50-FPN | 33.5 | 34.1 | yolact_plus_resnet50_54_800000.pth | | 550 | Resnet101-FPN | 27.3 | 34.6 | yolact_plus_base_54_800000.pth |
To evalute the model, put the corresponding weights file in the ./weights directory and run one of the following commands. The name of each config is everything before the numbers in the file name (e.g., yolact_base for yolact_base_54_800000.pth).
Quantitative Results on COCO
# Quantitatively evaluate a trained model on the entire validation set. Make sure you have COCO downloaded as above.
# This should get 29.92 validation mask mAP last time I checked.
python eval.py --trained_model=weights/yolact_base_54_800000.pth

# Output a COCOEval json to submit to the website or to use the run_coco_eval.py script.
# This command will create './results/bbox_detections.json' and './results/mask_detections.json' for detection and instance segmentation respectively.
python eval.py --trained_model=weights/yolact_base_54_800000.pth --output_coco_json

# You can run COCOEval on the files created in the previous command. The performance should match my implementation in eval.py.
python run_coco_eval.py

# To output a coco json file for test-dev, make sure you have test-dev downloaded from above and go
python eval.py --trained_model=weights/yolact_base_54_800000.pth --output_coco_json --dataset=coco2017_testdev_dataset
Qualitative Results on COCO
# Display qualitative results on COCO. From here on I'll use a confidence threshold of 0.15.
python eval.py --trained_model=weights/yolact_base_54_800000.pth --score_threshold=0.15 --top_k=15 --display
Benchmarking on COCO
# Run just the raw model on the first 1k images of the validation set
python eval.py --trained_model=weights/yolact_base_54_800000.pth --benchmark --max_images=1000
Images
# Display qualitative results on the specified image.
python eval.py --trained_model=weights/yolact_base_54_800000.pth --score_threshold=0.15 --top_k=15 --image=my_image.png

# Process an image and save it to another file.
python eval.py --trained_model=weights/yolact_base_54_800000.pth --score_threshold=0.15 --top_k=15 --image=input_image.png:output_image.png

# Process a whole folder of images.
python eval.py --trained_model=weights/yolact_base_54_800000.pth --score_threshold=0.15 --top_k=15 --images=path/to/input/folder:path/to/output/folder
Video
# Display a video in real-time. "--video_multiframe" will process that many frames at once for improved performance.
# If you want, use "--display_fps" to draw the FPS directly on the frame.
python eval.py --trained_model=weights/yolact_base_54_800000.pth --score_threshold=0.15 --top_k=15 --video_multiframe=4 --video=my_video.mp4

# Display a webcam feed in real-time. If you have multiple webcams pass the index of the webcam you want instead of 0.
python eval.py --trained_model=weights/yolact_base_54_800000.pth --score_threshold=0.15 --top_k=15 --video_multiframe=4 --video=0

# Process a video and save it to another file. This uses the same pipeline as the ones above now, so it's fast!
python eval.py --trained_model=weights/yolact_base_54_800000.pth --score_threshold=0.15 --top_k=15 --video_multiframe=4 --video=input_video.mp4:output_video.mp4
As you can tell, eval.py can do a ton of stuff. Run the --help command to see everything it can do.
python eval.py --help
Training
By default, we train on COCO. Make sure to download the entire dataset using the commands above.
- To train, grab an imagenet-pretrained model and put it in
./weights. - Run one of the training commands below.
- Note that you can press ctrl+c while training and it will save an
*_interrupt.pthfile at the current iteration. - All weights are saved in the
./weightsdirectory by default with the file name<config>_<epoch>_<iter>.pth.
- Note that you can press ctrl+c while training and it will save an
# Trains using the base config with a batch size of 8 (the default).
python train.py --config=yolact_base_config

# Trains yolact_base_config with a batch_size of 5. For the 550px models, 1 batch takes up around 1.5 gigs of VRAM, so specify accordingly.
python train.py --config=yolact_base_config --batch_size=5

# Resume training yolact_base with a specific weight file and start from the iteration specified in the weight file's name.
python train.py --config=yolact_base_config --resume=weights/yolact_base_10_32100.pth --start_iter=-1

# Use the help option to see a description of all available command line arguments
python train.py --help
Multi-GPU Support
YOLACT now supports multiple GPUs seamlessly during training:
- Before running any of the scripts, run: `export CUDA_VISIB
Related Skills
node-connect
335.2kDiagnose OpenClaw node connection and pairing failures for Android, iOS, and macOS companion apps
frontend-design
82.5kCreate distinctive, production-grade frontend interfaces with high design quality. Use this skill when the user asks to build web components, pages, or applications. Generates creative, polished code that avoids generic AI aesthetics.
openai-whisper-api
335.2kTranscribe audio via OpenAI Audio Transcriptions API (Whisper).
commit-push-pr
82.5kCommit, push, and open a PR
