Shadow
Show Current Sun Position and Shadow of House (Generate SVG)
Install / Use
/learn @clmun/ShadowREADME
Shadow SVG Generator - Show Sun or Moon Position and Shadow of House
<img src="https://raw.githubusercontent.com/clmun/Shadow/master/custom_components/shadow/images/Shadow_logo_256x256.png" alt="Logo" width="64" height="64"/>
🌞🌙 Shadow SVG Generator for Home Assistant
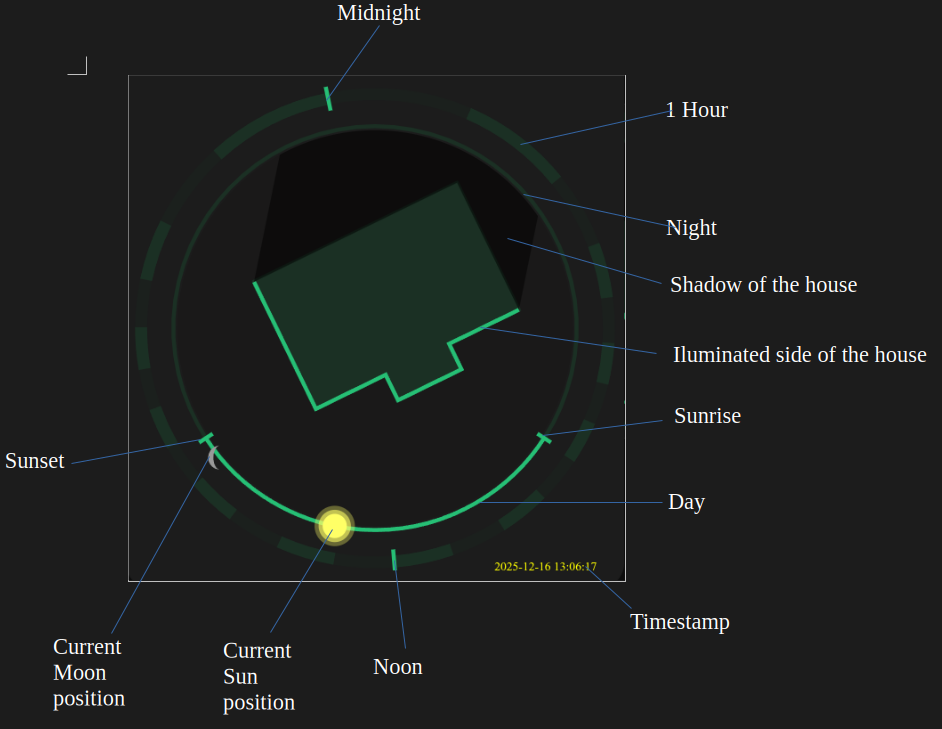
A Home Assistant custom component (via HACS) that generates dynamic SVG graphics showing illuminated sides and realistic shadows based on the Sun or Moon position.
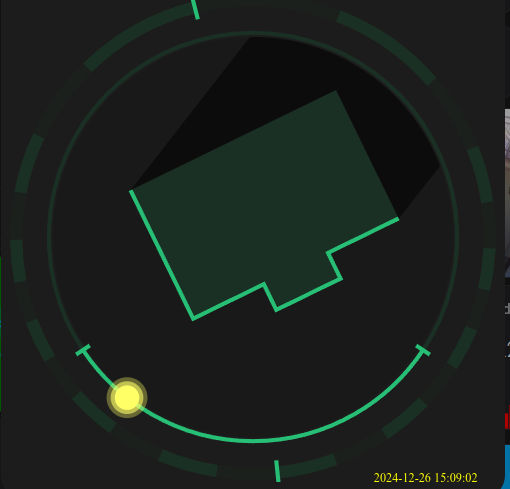
The SVG image illustrates where the Sun is currently positioned and which side of the house is facing the Sun.
The integration automatically uses data from Home Assistant (latitude, longitude, elevation, time_zone).
🌟 Features
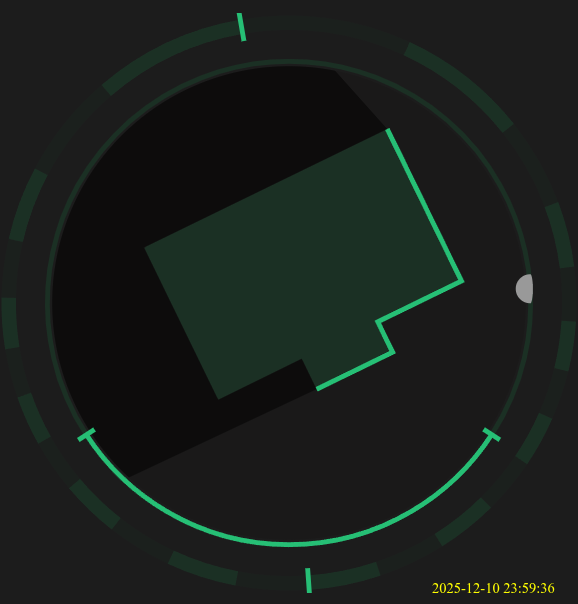
- House shadow representation based on real-time Sun or Moon position.
- Positioning based on user-defined location (town).
- Easy integration with Home Assistant via HACS or manual installation.
- Customizable colors, dimensions, and shapes via
shadow_config.py. - Shadow_config.py is generated automatically via tools/coords_to_shape.py script from Google Maps coordinates or can be created manually.
- Configurable update intervals for real-time shadow representation.
- Output SVG file accessible via Home Assistant's web server.
- Lightweight and efficient, suitable for various Home Assistant setups.
Lovelace Example
You can display the generated SVG in your Lovelace dashboard using the Picture Entity card or Picture card.
type: picture-entity
entity: camera.shadow_camera
🚀 Installation
Add the Shadow integration via HACS:
- In HACS, go to "Integrations".
- Click on the three dots in the top right corner and select "Custom Repositories".
- Enter the repository URL: https://github.com/clmun/Shadow
- Select "Integration" as the category and click "Add".
- Restart Home Assistant.
Add the Shadow integration manually:
- Download the component from the GitHub repository: https://github.com/clmun/Shadow
- Extract the downloaded files.
- Create a directory named
shadowin your Home Assistantcustom_componentsfolder if it doesn't already exist. - Copy the extracted files into the
custom_components/shadowdirectory. - In
configuration.yaml, add the Shadow sensor configuration as described above. - Save the file and restart Home Assistant.
🔧 Setup Instructions
- Search for "Shadow" in HACS and install it.
- In configuration.yaml, add the Shadow sensor configuration as described below.
sensor:
  - platform: shadow
    name: Shadow Elevation
    town: [Your Town Name]
    output_path: /config/www/shadow.svg
    update_interval: 60
- All settings needed for generating the picture (.svg format) are stored in
shadow_config.py(colors, dimensions, shape coordinates). This file can be generated automatically via thetools/coords_to_shape.pyscript (see below: How to generate the points for shape) or can be created manually. Minimal example configuration:
WIDTH = 100
HEIGHT = 100
BG_COLOR = "black" # Background color
PRIMARY_COLOR = "green" # Color of the shape
LIGHT_COLOR = "yellow" # Color of the illuminated side
SUN_RADIUS = 4 # Radius of the sun
SUN_COLOR = "orange" # Color of the sun
MOON_RADIUS = 4 # Radius of the moon
MOON_COLOR = "gray" # Color of the moon

SHAPE = [
   {'x': 40, 'y': 40}, # Bottom-left corner
   {'x': 60, 'y': 40}, # Bottom-right corner
   {'x': 60, 'y': 60}, # Top-right corner
   {'x': 40, 'y': 60}  # Top-left corner
]
- After configuring the
shadow_config.pyfile, restart Home Assistant. - The SVG file will be generated at the specified output path:
/config/www/shadow.svg. - Access the SVG file via Home Assistant's web server at
http://<your-home-assistant-url>/local/shadow.svg. - You can then use this SVG in your Lovelace dashboard or other places within Home Assistant.
- Somehow the picture is not updating in the picture card. A solution is to add it as a camera entity using the local file integration:
Go to Settings >> Devices & Services >> Add Integration >> Local File And here add a name for the file + path (/config/www/shadow.svg) >> And you will have the camera. Then use the camera entity in the picture card:
type: picture-entity
entity: camera.shadow_camera
- Enjoy your dynamic shadow SVG graphics!
⚙️ How to generate the points for shape
Define your house shape by listing its corner points in the SHAPE variable in shadow_config.py. Each point is a dictionary with x and y.
- SVG origin is top-left (0,0)
- x increases right, y increases down
- SVG size is 100 × 100
How to get coordinates:
Option 1: Graph paper
- Draw the shape.
- Count squares for each corner.
- Scale to fit 100 × 100.
Option 2: Google Maps (recommended)
- Measure each corner using Measure distance.
- Copy the lat/long points into tools/coords_to_shape.py.
- Run the script. This generates:
- shadow_config.py (with SHAPE filled in)
- shadow.svg for preview
- Copy shadow_config.py to:
custom_components/shadow/
📝 Disclaimer
This integration is provided "as is" without warranty of any kind. Use at your own risk . The author is not responsible for any damage or data loss that may occur from using this integration. By using this integration, you agree to the terms of this disclaimer.
Inspiration
This integration was inspired by the OpenHAB community and adapted for Home Assistant.
When I started with home automation, 10 years ago, I've started with OpenHAB and found this script and this idea fascinating.
Later, when I moved to Home Assistant, I kept the script and had the shadow running for all this time, but always waited for somebody more experienced to bring this to Home Assistant.
Well, in the end, with a big help from AI, I did it myself and share it now with the community.
So many thanks to the OpenHAB community for the original idea! And big thanks to AI for helping me with the adaptation to Home Assistant.:) (this line was generated by AI :) )
🙏 Acknowledgements
- Thanks to the OpenHAB community for the original idea and script.https://community.openhab.org/t/show-current-sun-position-and-shadow-of-house-generate-svg/34764
- Thanks to the Home Assistant community for continuous support and inspiration.
- Thanks to all contributors and users who provide feedback and help improve this integration.
📧 Contact
For questions, suggestions, or support, please reach out via the Home Assistant Community Forums or GitHub Issues page.
- Home Assistant Community Forums: https://community.home-assistant.io/
- GitHub Issues: https://github.com/clmun/Shadow/issues
☕ Support me
If you liked this integration and want to support the work done, buy me a coffee! 🫶
It costs nothing, and your contribution helps the future development of the project. 🙌
Thanks for the support, I appreciate any gesture of support! 🤗
