WitnessMe
Web Inventory tool, takes screenshots of webpages using Pyppeteer (headless Chrome/Chromium) and provides some extra bells & whistles to make life easier.
Install / Use
/learn @byt3bl33d3r/WitnessMeREADME
WitnessMe
<p align="center"> <img src="https://user-images.githubusercontent.com/5151193/60783062-1f637c00-a106-11e9-83de-83ef88115f74.gif" alt="WitnessMe"/> </p>WitnessMe is primarily a Web Inventory tool inspired by Eyewitness, its also written to be extensible allowing you to create custom functionality that can take advantage of the headless browser it drives in the back-end.
WitnessMe uses the Pyppeteer library to drive Headless Chromium.
Table of Contents
- WitnessMe
Motivation
Are there are a bunch of other tools that do this? Absolutely. See the following projects for alternatives (I'm sure there are more, these are the ones I've personally tried):
The reason why I wrote WitnessMe was that none of these projects had all of the features I wanted/needed in order for them to work well within my workflow. Additionally, some of them are prone to a decent amount of installation/dependency hell.
Here are some of the main features that make WitnessMe "stand out":
- Written in Python 3.7+
- Ability to parse extremely large Nessus and NMap XML files
- Docker compatible
- No installation/dependency hell
- Full test suite! Everything is less prone to bugs
- CSV & HTML reporting
- HTTP Proxy Support
- Provides a RESTful API! Scan stuff remotely!
- CLI interface to view and search scan results without having to view the reports.
- Signature scanning (Signatures use YAML files)
- Preview screenshots directly in the terminal (On MacOSX/ITerm2 and some Nix terminals)
- Extensibly written, allowing you to add functionality that can take advantage of headless chromium.
- Built to be deployed to the Clouds (e.g. GCP Cloud Run , AWS ElasticBeanstalk etc...)
Installation
Docker
Running WitnessMe from a Docker container is fully supported and is the easiest/recommended way of using the tool.
Note: it is highly recommended to give the Docker container at least 4GB of RAM during large scans as Chromium can be a resource hog. If you keep running into "Page Crash" errors, it's because your container does not have enough memory. On Mac/Windows you can change this by clicking the Docker Task Bar Icon -> Preferences -> Resources. For Linux, refer to Docker's documentation
Pull the image from Docker Hub:
docker pull byt3bl33d3r/witnessme
You can then spin up a docker container, run it like the main witnessme script and pass it the same arguments:
docker run --rm -ti $IMAGE_ID screenshot https://google.com 192.168.0.1/24
Alternatively, you can drop into a shell within the container and run the tools that way. This also allows you to execute the wmdb and wmapi scripts.
docker run --rm -ti --entrypoint=/bin/sh $IMAGE_ID
Python Package
WitnessMe is also available as a Python package (Python 3.7 or above is required). If you do install it this way it is extremely recommended to use pipx as it takes care of installing everything in isolated environments for you in a seamless manner.
Run the following commands:
python3 -m pip install --user pipx
pipx install witnessme
All of the WitnessMe scripts should now be in your PATH and ready to go.
Development Install
You really should only install WitnessMe this way if you intend to hack on the source code. You're going to Python 3.7+ and Poetry: please refer to the Poetry installation documentation in order to install it.
git clone https://github.com/byt3bl33d3r/WitnessMe && cd WitnessMe
poetry install
Quick Starts
Finding F5 Load Balancers Vulnerable to CVE-2020-5902
Install WitnessMe using Docker:
docker pull byt3bl33d3r/witnessme
Get the $IMAGE_ID from the docker images command output, then run the following command to drop into a shell inside the container. Additionally, specify the -v flag to mount the current directory inside the container at the path /transfer in order to copy the scan results back to your host machine (if so desired):
docker run -it --entrypoint=/bin/sh -v $(pwd):/transfer $IMAGE_ID
Scan your network using WitnessMe, it can accept multiple .Nessus files, Nmap XMLs, IP ranges/CIDRs. Example:
witnessme screenshot 10.0.1.0/24 192.168.0.1-20 ~/my_nessus_scan.nessus ~/my_nmap_scan.xml
After the scan is finished, a folder will have been created in the current directory with the results. Access the results using the wmdb command line utility:
wmdb scan_2020_$TIME/
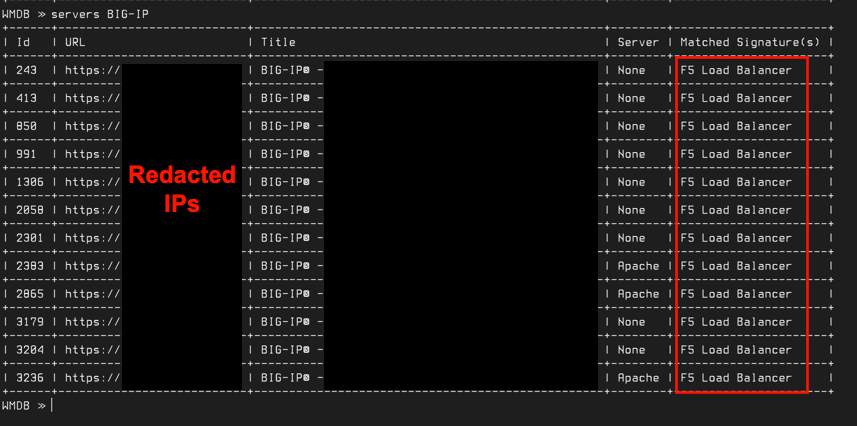
To quickly identify F5 load balancers, first perform a signature scan using the scan command. Then search for "BIG-IP" or "F5" using the servers command (this will search for the "BIG-IP" and "F5" string in the signature name, page title and server header):
Additionally, you can generate an HTML or CSV report using the following commands:
WMDB ≫ generate_report html
WMDB ≫ generate_report csv
You can then copy the entire scan folder which will contain all of the reports and results to your host machine by copying it to the /transfer folder.
Scraping Javascript Heavy Webpages
As of v1.5.0, WitnessMe has a grab command which allows you to quickly scrape Javascript heavy webpages by rendering the page first with Headless Chromium and then parsing the resulting HTML using the specified XPath (see here for an XPath cheatsheet).
Below are a few examples to get your started.
This grabs a list of all advertised domains on the 144.161.160.0/23 subnet from Hurricane Electric's BGP Toolkit:
witnessme -d grab -x '//div[@id="dns"]/table//tr/td[2]/a/text()' https://bgp.he.net/net/144.161.160.0/23#_dns
RESTful API
As of version 1.0, WitnessMe has a RESTful API which allows you to interact with the tool remotely.
Note: Currently, the API does not implement any authentication mechanisms. Make sure to allow/deny access at the transport level
To start the RESTful API for testing/development purposes run :
wmapi
The API documentation will then be available at http://127.0.0.1:8000/docs
Uvicorn should be used to enable SSL and run the API in production. See this dockerfile for an example.
Deploying to the Cloud (™)
Since WitnessMe has a RESTful API now, you can deploy it to the magical cloud and perform scanning from there. This would have a number of benefits, including giving you a fresh external IP on every scan (More OPSEC safe when assessing attack surface on Red Teams).
There are a number of ways of doing this, you can obviously do it the traditional way (e.g. spin up a machine, install docker etc..).
Recently cloud service providers started offering ways of running Docker containers directly in a fully managed environment. Think of it as serverless functions (e.g. AWS Lambdas) only with Docker containers.
This would technically allow you to really quickly deploy and run WitnessMe (or really anything in a Docker container) without having to worry about underlying infrastructure and removes a lot of the security concerns that come with that.
Below are some of the ones I've tried along with the steps necessary to get it going and any issues I encountered.
GCP Cloud Run
Unfortunately, it seems like Cloud Run doesn't allow outbound internet access to containers, if anybody knows of a way to get around this please get in touch
Cloud Run is by far the easiest of these services to work with.
This repository includes the cloudbuild.yaml file necessary to get this setup and running.
From the repositories root folder (after you authenticated and setup a project), these two commands will automatically build the Docker image, publish it to the Gcloud Container Registry and deploy a working container to Cloud Run:
gcloud builds submit --config cloudbuild.yaml
gcloud run deploy --image gcr.io/$PROJECT_ID/witnessme --platform managed
The output will give you a HTTPS url to invoke the WitnessMe RESTful API from :)
When you're done:
gcloud run services delete witnessme
gcloud container images delete gcr.io/$PROJECT_ID/witnessme
AWS ElasticBeanstalk
TO DO
Usage
There are 3 main utilities:
witnessme: is the main CLI interface.wmdb: allows you to
