Peaks.js
JavaScript UI component for interacting with audio waveforms
Install / Use
/learn @bbc/Peaks.jsREADME
Note: Ongoing development of this project has moved to https://codeberg.org/chrisn/peaks.js.
![]()

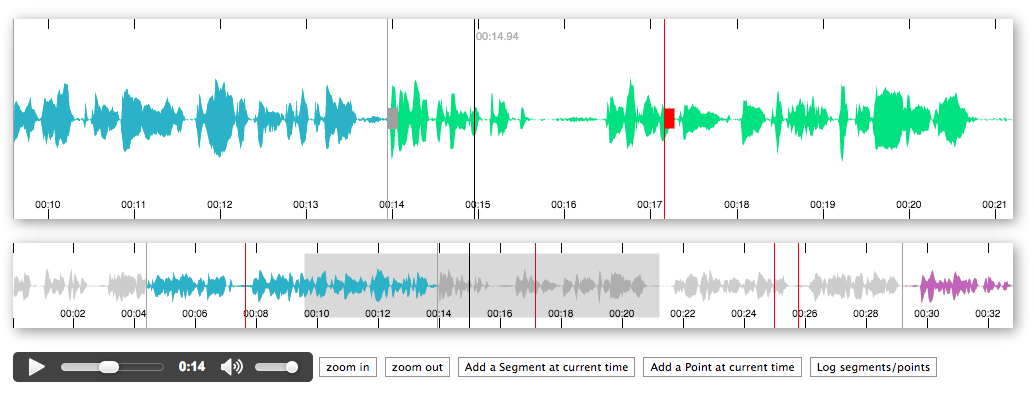
Peaks.js uses the HTML canvas element to display the waveform at different zoom levels, and has configuration options to allow you to customize the waveform views. Peaks.js allows users to interact with the waveform views, including zooming and scrolling, and creating point or segment markers that denote content to be clipped or for reference, e.g., distinguishing music from speech or identifying different music tracks.
Features
- Zoomable and scrollable waveform view
- Fixed width waveform view
- Mouse, touch, scroll wheel, and keyboard interaction
- Client-side waveform computation, using the Web Audio API, for convenience
- Server-side waveform computation, for efficiency
- Mono, stereo, or multi-channel waveform views
- Create point or segment marker annotations
- Customizable waveform views
You can read more about the project and see a demo here.
Contents
- Installing Peaks.js
- Add Peaks.js to your web page
- Initialize Peaks.js
- Generating waveform data
- Next steps
- Demos
- API
- Building Peaks.js
- Contributing
- License
- Credits
Installing Peaks.js
You can start using Peaks.js by either including the UMD bundle in a <script> tag in your web page, or by installing it using npm or yarn and including it in your module bundle with Webpack, Rollup, Parcel, etc.
Add a script tag
To add the Peaks.js UMD bundle to your web page, add a <script> tag:
<script src="https://unpkg.com/peaks.js/dist/peaks.js"></script>
The UMD bundle is available at unpkg and cdnjs.
Install with npm
We recommend that you use an ES module bundler.
Run the following commands to include Peaks.js in your module bundle:
npm install --save peaks.js
npm install --save konva
npm install --save waveform-data
Note that Peaks.js uses Konva and waveform-data as peer dependencies, so you must also install those modules.
Add Peaks.js to your web page
To include Peaks.js in your web page, you need to add container <div> elements that Peaks.js will use to render the waveform views, and a media element for your audio or video content. Here is an example HTML fragment:
<div id="zoomview-container"></div>
<div id="overview-container"></div>
<audio id="audio">
  <source src="sample.mp3" type="audio/mpeg">
  <source src="sample.ogg" type='audio/ogg codecs="vorbis"'>
</audio>
The container divs should be left empty, as shown above, as their content will be replaced by the waveform view canvas elements. They should also be styled to have the desired width and height:
#zoomview-container, #overview-container {
  width: 1000px;
  height: 100px;
}
Initialize Peaks.js
The next step is to initialize a Peaks instance with Peaks.init() and your configuration options.
The following examples show how to initialize Peaks.js with a minimal configuration. Refer to the Configuration section in the API documentation for details of all the available options.
Using a script tag
<script src="https://unpkg.com/peaks.js/dist/peaks.js"></script>
<script>
(function(Peaks) {
  const options = {
    zoomview: {
      container: document.getElementById('zoomview-container')
    },
    overview: {
      container: document.getElementById('overview-container')
    },
    mediaElement: document.getElementById('audio'),
    webAudio: {
      audioContext: new AudioContext()
    }
  };

  Peaks.init(options, function(err, peaks) {
    if (err) {
      console.error(`Failed to initialize Peaks instance: ${err.message}`);
      return;
    }

    // Do something when the waveform is displayed and ready
  });
})(peaks);
</script>
Using an ES2015 module import
import Peaks from 'peaks.js';

const options = {
  zoomview: {
    container: document.getElementById('zoomview-container')
  },
  overview: {
    container: document.getElementById('overview-container')
  },
  mediaElement: document.getElementById('audio'),
  webAudio: {
    audioContext: new AudioContext()
  }
};

Peaks.init(options, function(err, peaks) {
  if (err) {
    console.error('Failed to initialize Peaks instance: ' + err.message);
    return;
  }

  // Do something when the waveform is displayed and ready
});
Generating waveform data
Peaks.js creates its audio waveform visualization by processing the audio to produce waveform data. There are two ways that you can do this:
- Pre-compute the waveform data from the audio, using audiowaveform, and provide the data to Peaks.js from your web server
- Compute the waveform data in the browser using the Web Audio API
Using the Web Audio API can work well for short audio files, but involves downloading the entire audio file to the browser and is CPU intensive. Pre-computing the waveform data is preferable for longer audio files, because it saves your users' bandwidth and allows the waveform to be rendered faster.
Pre-computed waveform data
Peaks.js uses waveform data files produced by audiowaveform. These can be generated in either binary (.dat) or JSON format. Binary format is preferred because of the smaller file size (including after gzip or Brotli compression).
You should also use the -b 8 option when generating waveform data files, as Peaks.js does not currently support 16-bit waveform data files, and also to minimise file size.
To generate a binary waveform data file:
audiowaveform -i sample.mp3 -o sample.dat -b 8
To generate a JSON format waveform data file:
audiowaveform -i sample.mp3 -o sample.json -b 8
Refer to the audiowaveform documentation for full details of the available command line options, or use the manual page:
man audiowaveform
Once you have created a waveform data file, you can use this from Peaks.js by passing a dataUri option to Peaks.init():
import Peaks from 'peaks.js';

const options = {
  zoomview: {
    container: document.getElementById('zoomview-container')
  },
  overview: {
    container: document.getElementById('overview-container')
  },
  mediaElement: document.getElementById('audio'),
  dataUri: {
    arraybuffer: 'sample.dat' // or json: 'sample.json'
  }
};

Peaks.init(options, function(err, peaks) {
  // Do something when the waveform is displayed and ready, or handle errors
});
Web Audio based waveform data
Peaks.js can use the Web Audio API to generate waveforms, which means you do not have to pre-compute a waveform data file beforehand.
To use Web Audio, omit the dataUri option and instead pass a webAudio object that contains an AudioContext instance. Your browser must support the Web Audio API.
import Peaks from 'peaks.js';

const audioContext = new AudioContext();

const options = {
  zoomview: {
    container: document.getElementById('zoomview-container')
  },
  overview: {
    container: document.getElementById('overview-container')
  },
  mediaElement: document.getElementById('audio'),
  webAudio: {
    audioContext: audioContext,
    scale: 128,
    multiChannel: false
  }
};

Peaks.init(options, function(err, peaks) {
  // Do something when the waveform is displayed and ready, or handle errors
});
Alternatively, if you have an AudioBuffer containing decoded audio samples, e.g., from
AudioContext.decodeAudioData
then an AudioContext is not needed:
import Peaks from 'peaks.js';

const audioContext = new AudioContext();

// arrayBuffer contains the encoded audio (e.g., MP3 format)
audioContext.decodeAudioData(arrayBuffer)
  .then(function(audioBuffer) {
    const options = {
      zoomview: {
        container: document.getElementById('zoomview-container')
      },
      overview: {
        container: document.getElementById('overview-container')
      },
      mediaElement: document.getElementById('audio'),
      webAudio: {
        audioBuffer: audioBuffer
      }
    };

    Peaks.init(options, function(err, peaks) {
      // Do something when the waveform is displayed and ready, or handle errors
    });
  });
Next steps
We recommend that you take a look at the demos, which show how to use the various op
Related Skills
docs-writer
99.5k`docs-writer` skill instructions As an expert technical writer and editor for the Gemini CLI project, you produce accurate, clear, and consistent documentation. When asked to write, edit, or revie
model-usage
341.2kUse CodexBar CLI local cost usage to summarize per-model usage for Codex or Claude, including the current (most recent) model or a full model breakdown. Trigger when asked for model-level usage/cost data from codexbar, or when you need a scriptable per-model summary from codexbar cost JSON.
project-overview
FlightPHP Skeleton Project Instructions This document provides guidelines and best practices for structuring and developing a project using the FlightPHP framework. Instructions for AI Coding A
ddd
Guía de Principios DDD para el Proyecto > 📚 Documento Complementario : Este documento define los principios y reglas de DDD. Para ver templates de código, ejemplos detallados y guías paso
