Squiggly
Open source web based EEG visualizer and analyzer
Install / Use
/learn @alexdni/SquigglyREADME
Squiggly - EEG Assessment Platform
Rapid, transparent, open-source tool for analyzing 19-channel EEG recordings with support for Eyes-Open (EO) and Eyes-Closed (EC) conditions.
![]()
Demo
Watch the full demo on YouTube
Features
File Support
- EDF (European Data Format) - Standard clinical EEG format with 19-channel 10-20 montage validation
- CSV Format - Support for Divergence/Flex device recordings with automatic timestamp detection
Interactive EEG Viewer
- Real-time waveform display with per-channel rendering
- Adjustable gain, time scale, and highpass/lowpass/notch filters
- Time slider for quick navigation across the recording
- Channel selection for focused review
Annotation & Artifact Marking
- Draw artifact regions directly on the EEG waveform
- Annotations persist across sessions (stored in database)
- Add artifact, event, or note annotations with start/end times
- Remove annotations individually
De-Artifacting Options
- ICA (Automatic) - Independent Component Analysis detects and removes eye blink, muscle, and other artifacts automatically
- Manual - Use your hand-drawn artifact annotations to exclude marked segments from analysis, skipping ICA entirely
- Choose your method before each analysis run via the mode selector
Preprocessing Pipeline
- Configurable bandpass filtering (0.5-45 Hz default)
- Notch filtering (50/60 Hz)
- Automatic resampling to target rate (250 Hz default)
- Bad channel detection and interpolation
- Quality control metrics per condition with accurate epoch rejection reporting
Multi-Domain Analysis
| Domain | Metrics | |--------|---------| | Power Spectral | Absolute & relative band power (Delta, Theta, Alpha1, Alpha2, SMR, Beta2, HiBeta, LowGamma) | | Connectivity | Weighted Phase-Lag Index (wPLI), network graph metrics | | Network Metrics | Global efficiency, clustering coefficient, small-worldness, interhemispheric connectivity | | Complexity | Lempel-Ziv Complexity (LZC) per channel with normalization | | Asymmetry | Frontal Alpha Asymmetry (FAA), Power Asymmetry Index (PAI) | | Band Ratios | Theta/Beta, Alpha/Theta (frontal and posterior averages) | | Alpha Peak | Individual Alpha Frequency (IAF) per channel |
Heuristic Risk Assessment
Pattern flagging based on within-subject thresholds:
- ADHD-like: Elevated frontal theta/beta ratio (>2.5)
- Anxiety-like: Elevated frontal beta ratio (>0.25)
- Depression-like: Frontal alpha asymmetry (<-0.15)
- Sleep Dysregulation: Elevated delta power (>0.25)
- Hyper-arousal: Elevated high-beta (>0.15)
Interactive Visualizations
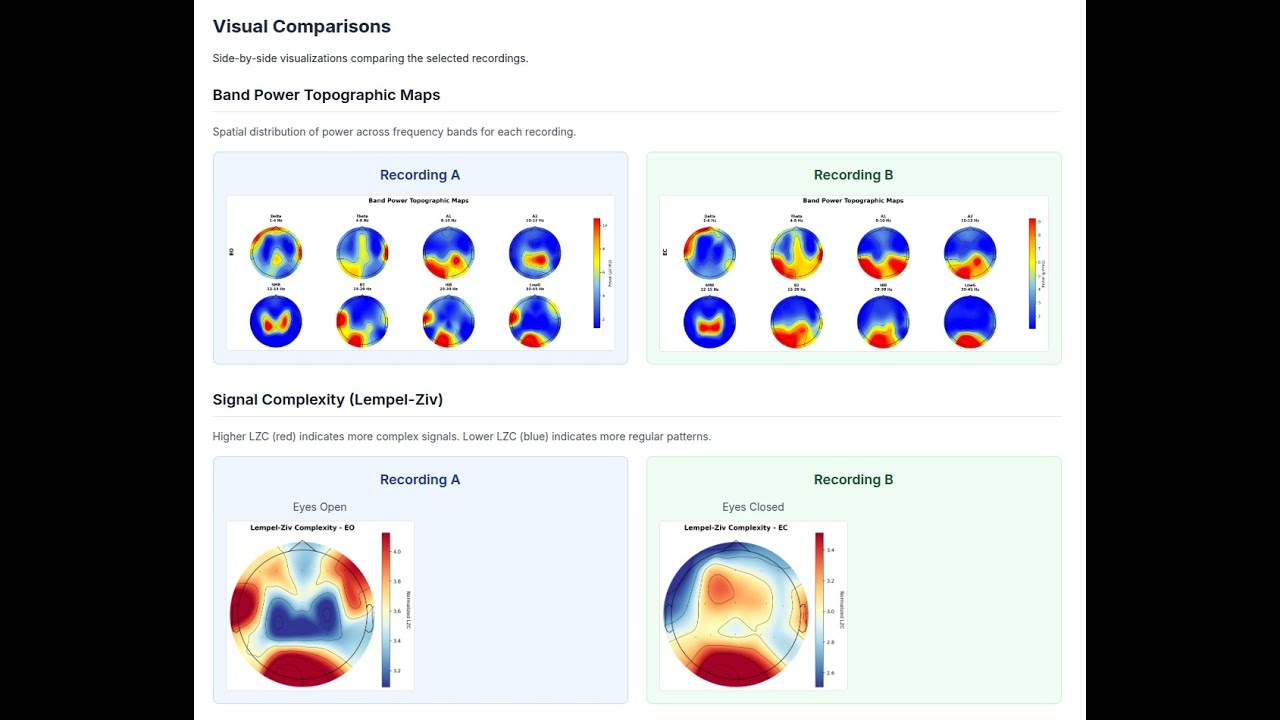
- Topomaps per band and condition
- Spectrograms for key channels (Fp1, Fz, Cz, Pz, O1)
- Brain connectivity graphs (wPLI-based)
- Network metrics summary charts
- Alpha peak frequency topomaps
- LZC complexity topomaps
AI Interpretation (Optional)
- GPT-4 powered analysis summaries
- Structured interpretation covering all domains
- Cached results for instant retrieval
Comparison Mode
- Compare any two recordings within a project
- Power change analysis (absolute and percent)
- Coherence and asymmetry deltas
- Side-by-side visualization comparison
- AI interpretation for comparative results
Analysis Workflow
- Upload a recording and review it in the EEG viewer
- Optionally mark artifact segments by hand
- Choose ICA or Manual de-artifacting
- Click "Start Analysis" when ready (no auto-trigger on upload)
- Re-analyze at any time with a different method
Export
- Full analysis results as JSON
- Visual assets as PNG images
- All data accessible via API
Collaboration
- Google OAuth authentication
- Project-level access control
- Member sharing and permissions
Architecture
+----------------+     +----------------+     +----------------+
|    Vercel      |     |   Railway      |     |   Supabase     |
|   Next.js      |---->|    Python      |     |  PostgreSQL    |
|   Frontend     |     |    Worker      |     |   Storage      |
+----------------+     +----------------+     +----------------+
       |                    |                    |
       +--------------------+--------------------+
                     Supabase Auth (Google OAuth)
| Component | Technology | |-----------|------------| | Frontend | Next.js 14 (App Router), React, TypeScript, Tailwind CSS | | Backend | Next.js API Routes | | Database | Supabase PostgreSQL with Row-Level Security | | Storage | Supabase Storage (recordings, visuals, exports) | | Auth | Supabase Auth with Google OAuth | | Worker | Python Flask/Gunicorn on Railway | | Signal Processing | MNE-Python, NumPy, SciPy, antropy, scikit-learn | | Visualization | Plotly, matplotlib, Chart.js |
Prerequisites
- Node.js 18+ and npm
- Python 3.11+ (for local development)
- Supabase account
- Google Cloud project (for OAuth)
- Railway account (for Python worker)
- Vercel account (for frontend)
- OpenAI API key (optional, for AI interpretation)
Setup Instructions
1. Clone and Install Dependencies
git clone https://github.com/alexdni/squiggly.git
cd squiggly
npm install
2. Set Up Supabase
- Create a new project at supabase.com
- Run the schema SQL:
- Navigate to SQL Editor in Supabase dashboard
- Copy and paste contents of
supabase/schema.sql - Execute the script
- Create Storage buckets:
- Go to Storage in Supabase dashboard
- Create three private buckets:
recordings,visuals,exports
- Enable Google OAuth:
- Go to Authentication > Providers
- Enable Google provider
- Add your Google OAuth credentials
3. Configure Environment Variables
cp .env.example .env.local
Edit .env.local:
# Supabase
NEXT_PUBLIC_SUPABASE_URL=https://your-project.supabase.co
NEXT_PUBLIC_SUPABASE_ANON_KEY=your-anon-key
SUPABASE_SERVICE_ROLE_KEY=your-service-role-key

# Worker (configure after Railway deployment)
WORKER_MODE=http
WORKER_SERVICE_URL=https://your-railway-app.railway.app
WORKER_AUTH_TOKEN=your-secure-token

# Optional: AI Interpretation
OPENAI_API_KEY=sk-your-openai-key
4. Install Python Dependencies (for local development)
cd api/workers
pip install -r requirements.txt
cd ../..
5. Run Development Server
npm run dev
Open http://localhost:3000 in your browser.
Deployment
Deploy Python Worker to Railway
- Create new project in Railway
- Connect to your GitHub repository
- Set root directory:
api/workers - Set environment variables:
WORKER_AUTH_TOKEN: Generate a secure random token
- Railway auto-detects
Procfileand deploys with Gunicorn - Copy the generated Railway URL
Deploy Frontend to Vercel
- Import project in Vercel
- Set environment variables:
NEXT_PUBLIC_SUPABASE_URL=https://your-project.supabase.co NEXT_PUBLIC_SUPABASE_ANON_KEY=your-anon-key SUPABASE_SERVICE_ROLE_KEY=your-service-role-key WORKER_MODE=http WORKER_SERVICE_URL=https://your-railway-app.railway.app WORKER_AUTH_TOKEN=your-secure-token OPENAI_API_KEY=sk-your-key # Optional - Deploy
Project Structure
squiggly/
├── app/                          # Next.js App Router
│   ├── api/                      # API routes
│   │   ├── analyses/             # Analysis CRUD, processing & AI interpretation
│   │   ├── projects/             # Project management & comparison
│   │   ├── recordings/           # Recording management & annotations
│   │   └── upload/               # File upload handling
│   ├── dashboard/                # Main dashboard
│   ├── login/                    # Authentication
│   ├── projects/                 # Project pages
│   └── analyses/                 # Analysis detail pages
├── api/workers/                  # Python signal processing
│   ├── analyze_eeg.py            # Main orchestrator
│   ├── preprocess.py             # Signal preprocessing (ICA & manual modes)
│   ├── extract_features.py       # Feature extraction
│   ├── generate_visuals.py       # Visualization generation
│   ├── evaluate_rules.py         # Risk pattern detection
│   └── server.py                 # Flask HTTP server
├── components/                   # React components
│   ├── AnalysisDetailsClient.tsx # Full analysis dashboard with mode selector
│   ├── ComparisonView.tsx        # Recording comparison
│   ├── RawEEGViewer.tsx          # Legacy waveform viewer
│   ├── eeg-viewer/               # New interactive EEG viewer
│   │   ├── EEGViewer.tsx         # Main viewer component
│   │   ├── EEGUnifiedChart.tsx   # Multi-channel chart renderer
│   │   ├── EEGToolbar.tsx        # Gain, filter, and display controls
│   │   ├── EEGTimeSlider.tsx     # Time navigation slider
│   │   ├── EEGAnnotationModal.tsx# Annotation creation dialog
│   │   ├── useEEGData.ts         # File loading hook
│   │   ├── useEEGAnnotations.ts  # Annotation persistence hook
│   │   └── useEEGFilters.ts      # Signal filter hook
│   └── FileUploadZone.tsx        # Upload interface
├── lib/                          # Utilities
│   ├── supabase.ts               # Supabase client
│   ├── eeg-filters.ts            # Browser-side EEG signal filters
│   ├── openai-client.ts          # OpenAI integration
│   ├── worker-client.ts          # Python worker HTTP client
│   ├── prompts/                  # AI prompt templates
│   └── constants.ts              # Configuration defaults
├── types/                        # TypeScript definitions
└── supabase/                     # Database schema
Usage
1. Create a Project
Projects organize recordings for a subject/client. Add optional metadata (age, ge
Related Skills
node-connect
354.2kDiagnose OpenClaw node connection and pairing failures for Android, iOS, and macOS companion apps
frontend-design
112.2kCreate distinctive, production-grade frontend interfaces with high design quality. Use this skill when the user asks to build web components, pages, or applications. Generates creative, polished code that avoids generic AI aesthetics.
openai-whisper-api
354.2kTranscribe audio via OpenAI Audio Transcriptions API (Whisper).
qqbot-media
354.2kQQBot 富媒体收发能力。使用 <qqmedia> 标签,系统根据文件扩展名自动识别类型(图片/语音/视频/文件)。
