Cartoonify
Deploy and scale serverless machine learning app - in 4 steps.
Install / Use
/learn @ahmedbesbes/CartoonifyREADME
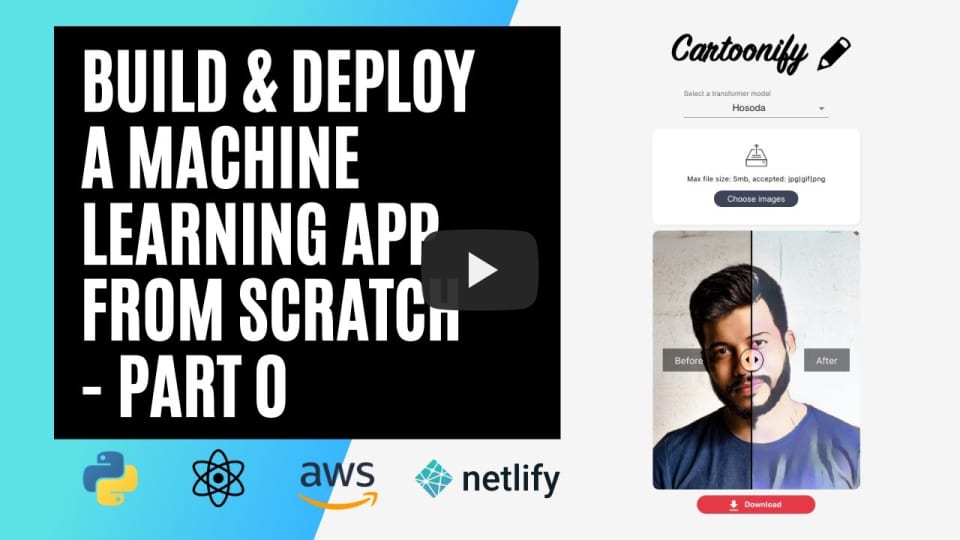
Build and Deploy Cartoonify: a Serverless Machine Learning App
<a href="https://www.buymeacoffee.com/ahmedbesbes" target="_blank"><img src="https://www.buymeacoffee.com/assets/img/custom_images/orange_img.png" alt="Buy Me A Coffee" style="height: 41px !important;width: 174px !important;box-shadow: 0px 3px 2px 0px rgba(190, 190, 190, 0.5) !important;-webkit-box-shadow: 0px 3px 2px 0px rgba(190, 190, 190, 0.5) !important;" ></a>
This repo contains all the code needed to run, build and deploy Cartoonify: a toy app I made from scratch to turn your pictures into cartoons.
<p align="center"> <img src="./images/demo_cartoonify.gif" width="40%"> </p>Here's what motivated me in starting this project:
-
Give GANs a try. I've been fascinated by these models lately. Trying the CartoonGAN model to turn your face into a cartoon seemed like real fun
-
Learn about deploying an application on a serverless architecture using different services of AWS (Lambda, API Gateway, S3, etc.)
-
Practice my React skills. I was so damn bored of Plotly, Dash and Streamlit. I wanted, for once, to build something custom and less mainstream
-
Use Netlify to deploy this React app. I saw demos of how easy this process was and I wanted to try it to convince myself
If you're interested in this project, here's a short introduction 🎥
0. Some prerequisites to build and deploy Cartoonify 🛠
If you want to run and deploy Cartoonify, here are some prerequisites first:
- An AWS account (don't worry, deploying this app will cost you almost nothing)
- A free account on Netlify
- Docker installed on your machine
- node and npm (preferably the latest versions) installed on your machine
- torch and torchvision to test CartoonGAN locally (optional)
All set? you're now ready to go.
Testing cartoonGAN on Google colab
check out cartoongan/notebooks/standalone_cartoonify.ipynb
or online on Colab
Please follow these four steps:
1. Test CartoonGAN locally
Some parts of the CartoonGan code as well as the pretrained models are borrowed from this repo. A shout out to them for the great work!
This is more of an exploratory step where you get to play with the pretrained models and try them (so inference only) on some sample images.
If you're interested in the training procedure, have a look at the CartoonGAN paper
- Download the four pretrained models first. These weights will be loaded inside the Generator model defined in
cartoongan/network/Transformer.py
cd cartoongan
bash download_pth.sh
- To test one of the four models, head over the notebook
cartoongan/notebooks/CartoonGAN.ipynband change the input image path to your test image. This notebook callscartoongan/test_from_code.pyscript to make the transformation.
cd cartoongan/notebooks
jupyter notebook

You can watch this section on Youtube to learn more about GANs and the CartoonGAN model
<p align="center">
2. Deploy CartoonGAN on a serverless API using AWS Lambda
The goal of this section is to deploy the CartoonGAN model on a serverless architecture so that it can be requested through an API endpoint ... from the internet :computer:
Why does a serverless architecture matter?
In a serverless architecture using Lambda functions, for example, you don't have to provision servers yourself. Roughly speaking, you only write the code that'll be execuded and list its dependencies and AWS will manage the servers for you automatically and take care of the infrastructure.
This has a lot of benefits:
-
Cost efficiency: you don't have to pay for a serverless architecture when you don't use it. On the opposite, when you have an EC2 machine running and not processing any request, you still pay for it.
-
Scalability: if a serverless application starts having a lot of requests at the same time, AWS will scale it by allocating more power to manage the load. If you had the manage the load by yourself using EC2 instances, you would do this by manually allocating more machines and creating a load balancer.
Of course, Serverless architectures cannot be a perfect fit for any use-case. In some situations, they are not practical at all (need for real-time or quick responses, use of WebSocket, heavy processing, etc.).
Since I frequently build machine learning models and integrate them into web applications, I found that a serverless architecture was interesting in these specific use-cases. Of course, here the models are used in inference only :warning:
Cartoonify workflow
Here's the architecture of the app:
<p align="center"> <img src="./images/infrastructure.png" width="75%" > </p>-
On the right side, we have a frontend interface in React and on the left side, we have a backend deployed on a serverless AWS architecture.
-
The backend and the frontend communicate with each other over HTTP requests. Here is the workflow:
- An image is sent from the client through a POST request
- The image is then received via API Gateway
- API Gateway triggers a Lambda function to execute and passes the image to it
- The Lambda function starts running: it first fetches the pretrained models from S3 and then applies the style transformation on it
- Once the Lambda function is done running, it sends the transformed image back to the client through API Gateway.
Deploy using the Serverless framework
We are going to define and deploy this architecture by writing it as a Yaml file using the Serverless framework: an open-source tool to automate deployment to AWS, Azure, Google Cloud, etc.
<p align="center"> <img src="./images/serverless.png" width="75%"> </p>Here are the steps to follow:
- Install the serverless framework on your machine
npm install -g serverless
- Create an IAM user on AWS with administrator access and name it cartoonify. Then configure serverless with this user's credentials:
serverless config credentials --provider aws \
                              --key <ACCESS_KEY> \
                              --secret <SECRET_KEY> \
                              --profile cartoonify
- bootstrap a serverless project with a python template at the root of this project
serverless create --template aws-python --path backend
From now on, you can either follow the steps from 4 to 10 to understand what happens, or run the code you just cloned to deploy the app.
If you're in hurry, just run these two commands:
cd backend/
npm install
sls deploy
- install two Serverless plugins:
sls plugin install -n serverless-python-requirements
npm install --save-dev serverless-plugin-warmup
-
Create a folder called
networkinsidebackendand put the following two files in it:- Transformer.py: a script that holds the architecture of the generator model.
- A blank __init__.py
-
Modify the serverless.yml file with the following sections:
# The provider section where we setup the provider, the runtime and the permissions:

provider:
  name: aws
  runtime: python3.7
  profile: cartoonify
  region: eu-west-3
  timeout: 60
  iamRoleStatements:
      - Effect: Allow
      Action:
          - s3:getObject
      Resource: arn:aws:s3:::cartoongan/models/*
      - Effect: Allow
      Action:
          - "lambda:InvokeFunction"
      Resource: "*"
# The custom section where we configure the plugins:
custom:
  pythonRequirements:
  dockerizePip: true
  zip: true
  slim: true
  strip: false
  noDeploy:
    - docutils
    - jmespath
    - pip
    - python-dateutil
    - setuptools
    - six
    - tensorboard
  useStaticCache: true
  useDownloadCache: true
  cacheLocation: "./cache"
  warmup:
  events:
    - schedule: "rate(5 minutes)"
  timeout: 50
# The package section where we exclude folders from production
package:
  individually: false
  exclude:
    - package.json
    - package-log.json
    - node_modules/**
    - cache/**
    - test/**
    - __pycache__/**
    - .pytest_cache/**
    - model/pytorch_model.bin
    - raw/**
    - .vscode/**
    - .ipynb_checkpoints/**
# The functions section where we create the Lambda function and define the events that invoke it:
functions:
  transformImage:
    handler: src/handler.lambda_handler
    memorySize: 3008
    timeout: 300
    events:
      - http:
          path: transform
          method: post
          cors: true
    warmup: true
# and finally the plugins section:
plugins:
  - serverless-python-requirements
  - serverless-plugin-warmup
- List the dependencies inside requirements.txt
https://download.pytorch.org/whl/cpu/torch-1.1.0-cp37-cp37m-linux_x86_64.whl
https://download.pytorch.org/whl/cpu/torchvision-0.3.0-cp37-cp37m-linux_x86_64.whl
Pillow==6.2.1
- Create an
srcfolder insidebackendand put handler.py in it to define the lambda function. Then modify handler.py
# Define imports
try:
    import unzip_requirements
except ImportError:
    pass

import json
from io import BytesIO
import time
import os
import base64

import boto3
import numpy as np
from PIL import Image

import torch
import torchvision.transforms as transforms
from torch.a
Related Skills
bluebubbles
352.9kUse when you need to send or manage iMessages via BlueBubbles (recommended iMessage integration). Calls go through the generic message tool with channel="bluebubbles".
slack
352.9kUse when you need to control Slack from OpenClaw via the slack tool, including reacting to messages or pinning/unpinning items in Slack channels or DMs.
tmux
352.9kRemote-control tmux sessions for interactive CLIs by sending keystrokes and scraping pane output.
claude-opus-4-5-migration
111.5kMigrate prompts and code from Claude Sonnet 4.0, Sonnet 4.5, or Opus 4.1 to Opus 4.5
