TelnetVXP
No description available
Install / Use
/learn @XimikBoda/TelnetVXPREADME
TelnetVXP
What the heck is this?
You probably know what telnet is. If not, please read the wiki :)
This is a simple telnet client on the MRE platform. It is also portable enough to extract the terminal itself (without the Telnet things) and put it on your application as an terminal emulator, see Console_io.cpp
What does it run on?
MRE platform, for example Nokia S30+ phones like Nokia 220 (tested), Nokia 225 (tested),... and some other (mostly Chinese) phones. If your (cell / feature) phone can run .vxp apps, it's likely to be able to run this app.
How does it work?
TelnetVXP = Telnet Client + Terminal emulator
What are the source files in this repo about?
Files in this repo (as the writting time):
|File(s)|Descriptions|
|-|-|
|Console.cpp and Console.h|Terminal emulator|
|Console_io.cpp and Console_io.h|Console APIs in case you want to use the terminal emulator for your own project|
|Profont6x11.h|Font for the terminal emulator (because MRE's default one is not really suitable for a terminal)|
|T2Input.cpp and T2Input.h|Virtual keyboard implementation (we will talk about this later)|
|main.cpp and main.h|Main file contain vm_main function and basic MRE events registerer|
How to build?
Read How to use first before reading this!!!
You should have Visual Studio 2008 (I don't think newer versions will work) and MRE SDK and a compiler among ADS1.2 (I made a video about cr@cking it here, RVDS (cr@cking is even easier than ADS1.2) and GCC (I recommend GCC). You might need to fix path problems when using GCC.
- Step 1: Clone this repo:
git clone https://github.com/XimikBoda/TelnetVXP
Note: If you load this project and build it directly, it might not work. Why? Because paths are stored in .bat and project config file, and you are likely to have different path of the project and SDK than the authors :). That's why there is step 2:
- Step 2: Open
MRELauncher.exeand create new project:


REMEMBER to choose the MRE application project (.vxp) and your phone's resolution.
Any other things is up to you.
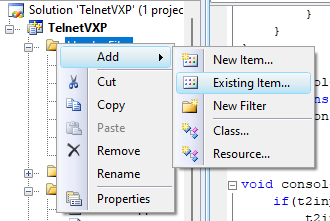
- Step 3: Open the project it Visual Studio 2008, add all the
.hand.cppfiles in this repo to the project by Left click at theHeader filesandSource fileson the left, then select Add -> Existing item
Then save your VS2008 project (<kbd>CTRL</kbd> + <kbd>Shift</kbd> + <kbd>S</kbd>)
- Step 4: Load your project to MRELauncher:
Click on the
Open projectbutton, browse to your newly created project and select the.vcprojfiles

- Step 5: Change project settings:
Click on
Optionsbutton:

Select your compiler type and click Thumb Command

Press Ok
- Step 6: Click the make button

Your VXP file should be at arm/. If there are two VXP files there, choose the one has the bigger size (Ximik Boda added another config)
-
Step 8: Copy the VXP file to the phone (by using USB cable or SD card is up to you). Then open the file manager, find the signed VXP app and press open to run.
How to use?
When you open the app, it will prompt you for inputing the host and port to connect to. If it can't connect to the host & port you provided, it will quit after 25 seconds.
Virtual keyboard
It's designed by Ximik Boda to type 1 key just by pressing 2 times (much quicker than default cellphone typing method)
To know the keyboard layout, press the right soft key (the key that above the call key), it will print the keyboard layout to you.
For typing, look at the phone's physical keyboard: the key 1 has some special characters, the key 2 has some letter a, b, c,...
If you want to type key a, for example, press key 2, then look at the small virtual keyboard appear on the screen, you will find the key a at the location of key 1 now. Press key 1 to finally send the key a
Special keys are at key 1 and key *
The enter button (\r\n) is the OK key.
Up / Down / Left / Right key is the D-Pad keys.
You might want to watch the demo video at the top of this Readme file. A picture worth thousands words :)
Author
Related Skills
node-connect
349.0kDiagnose OpenClaw node connection and pairing failures for Android, iOS, and macOS companion apps
frontend-design
109.4kCreate distinctive, production-grade frontend interfaces with high design quality. Use this skill when the user asks to build web components, pages, or applications. Generates creative, polished code that avoids generic AI aesthetics.
openai-whisper-api
349.0kTranscribe audio via OpenAI Audio Transcriptions API (Whisper).
qqbot-media
349.0kQQBot 富媒体收发能力。使用 <qqmedia> 标签,系统根据文件扩展名自动识别类型(图片/语音/视频/文件)。
