AutoFR
AutoFR generates filter rules for the web to block ads while considering visual breakage automatically.
Install / Use
/learn @UCI-Networking-Group/AutoFRREADME
AutoFR: Automated Filter Rule Generation for Adblocking
We introduce AutoFR, a reinforcement learning (RL) framework to fully automate the process of filter rule creation to block ads and minimize visual breakage optimized per-site. The implementation of the framework is based on the paper, "AutoFR: Automated Filter Rule Generation for Adblocking" (USENIX Security 2023). If you use AutoFR for publication, please cite us.
For more information, see:
- USENIX Security 2023 Paper
- USENIX Security 2023 Slides
- USENIX Security 2023 Artifact Evaluation
- Extended Version
- Project Page
AutoFR Dataset
The dataset and its detailed description are available. In summary, the dataset contains 1042 zip files, one per-site. Each zip file includes the raw collected data of outgoing HTTP requests, AdGraphs, annotated site snapshots, the action space, filter rules, and more.
This includes a Top5k_rules.csv file that shows all the filter rules created within each zip file.
Users must sign a consent form (at the bottom of the web page) before accessing the dataset.
How It Works
AutoFR is the first to balance the trade-off between blocking ads vs. avoiding visual breakage. The user gives AutoFR inputs (e.g., the website to generate rules for, and breakage tolerance threshold w) to AutoFR. It will run our RL algorithm based on multi-arm bandits and generate filter rules that block ads while adhering to the given w threshold.
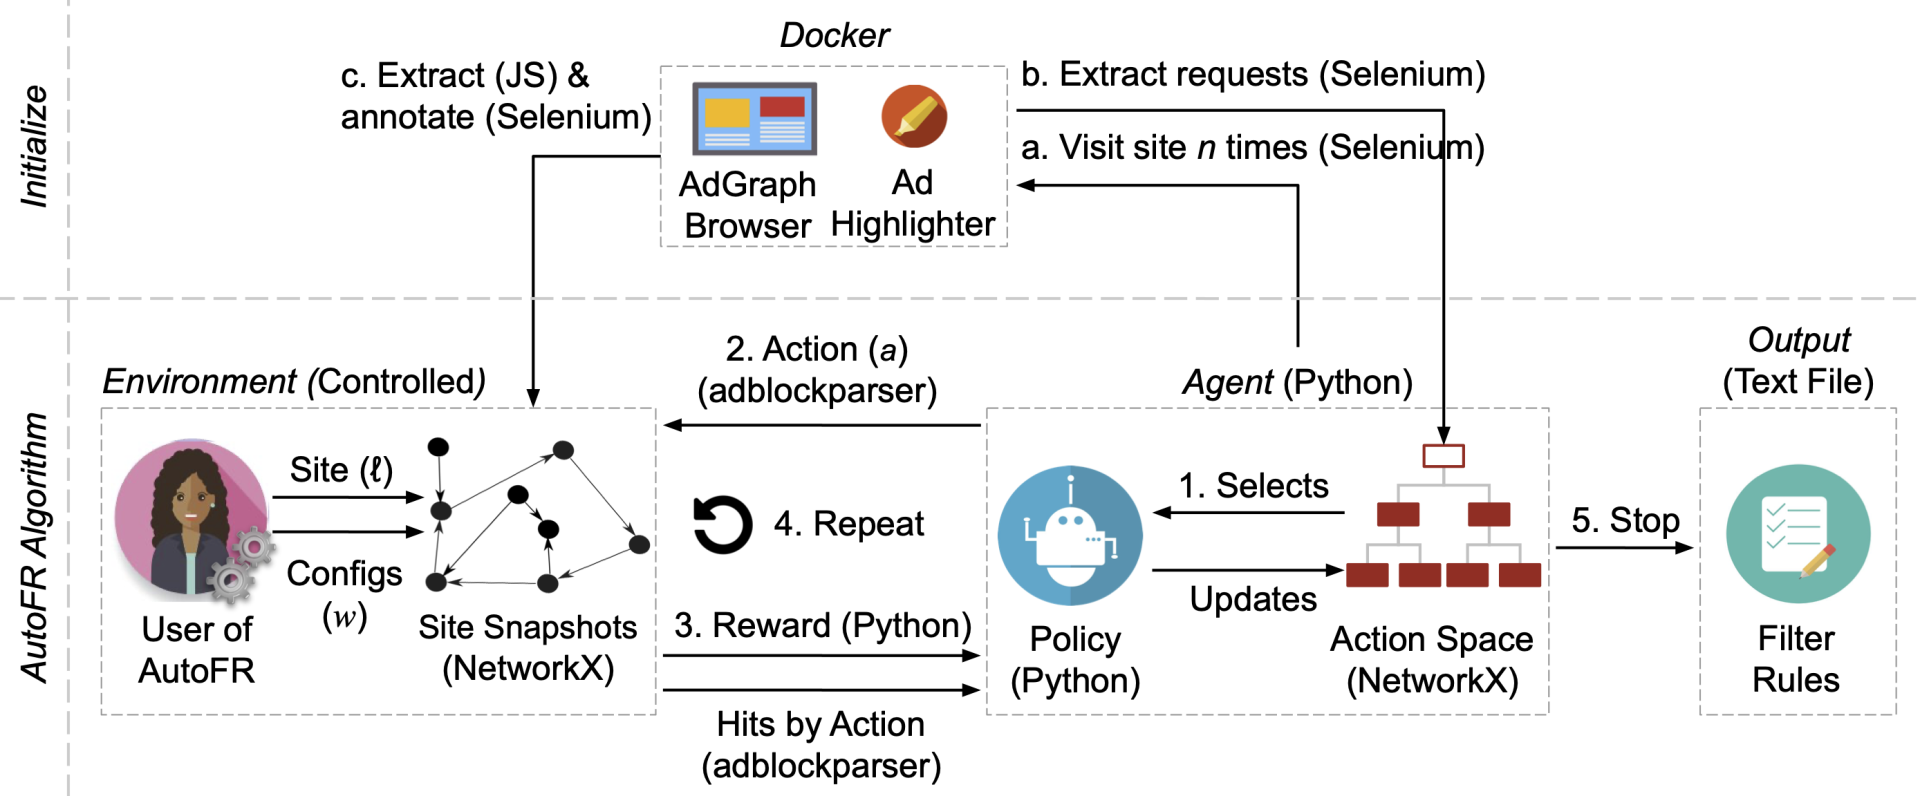
AutoFR Example Workflow (Fig. 4 of paper): INITIALIZE (a–c, Alg. 1): (a) spawns n=10 docker instances and visits the site until it finishes loading; (b) extracts the outgoing requests from all visits and builds the action space; (c) extracts the raw graph and annotates it to denote visible ads, images, and text, using JS and Selenium. Once all 10 site snapshots are annotated, we run the RL portion of the AutoFR procedure (steps 1–4). Lastly, AutoFR outputs the filter rules at step 5, e.g., ||s.yimg.com/rq/darla/4-10-0/html/r-sf.html.
For more information, see Background Information.
Running AutoFR
Follow the instructions below to run AutoFR. Preview the dependencies.
See Debugging Tips to help solve some common problems.
Setup
-
Install the core dependencies.
$ sudo apt-get install git python3 python3-dev python3-pip
$ pip3 install virtualenv
- Install docker using its official instructions.
-
$ git clone https://github.com/UCI-Networking-Group/AutoFR.git
- If you are an artifact reviewer,
git checkout artifact-review -
git submodule update --init --recursive
- If you are an artifact reviewer,
-
Navigate to the project directory using a terminal window.
-
Create a virtual environment and activate it. The "[/save-path/autofrenv]" below is a placeholder for your path and name of your environment. As an example, if you have your virtual environments saved under ~/.virtualenvs, then you can do: "~/.virtualenvs/autofrenv"
$ virtualenv --python=python3 [/save-path/autofrenv]
$ source [/save-path/autofrenv]/bin/activate
- Install AutoFR dependencies.
$ pip3 install -e .
- Build the docker container.
$ docker build -t flg-ad-highlighter-adgraph --build-arg USER_ID=$(id -u) --build-arg GROUP_ID=$(id -g) -f framework-with-ad-highlighter/DockerAdgraphfile .
- Create output directories that AutoFR expects. See Understanding the Output for description.
$ mkdir temp_graphs; mkdir -p data/output/
- Done. You are now ready to use AutoFR.
Create Filter Rules
- Make sure you have followed the setup instructions.
- Open up the AutoFR project directory using a terminal window.
- Activate your virtual environment.
- Choose a site that has ads with AdChoice transparency logos. We use https://cricbuzz.com as an example here.
- Choose how many docker instances you can start in parallel. This depends on the number of cores you have on your system. Pass it using the
--chunk_thresholdargument. Below, we use6as an example. The--init_state_iterations 10denotes that you require the run to collect 10 site snapshots. -
$ python scripts/autofr_controlled.py --site_url "https://cricbuzz.com" --chunk_threshold 6 --init_state_iterations 10
- Filter rules will be presented at the end.
Explore other possible inputs you can give scripts/autofr_controlled.py by running:
$ python scripts/autofr_controlled.py --help
(autofrenv) python scripts/autofr_controlled.py --help
usage: autofr_controlled.py [-h] --site_url SITE_URL [--output_directory OUTPUT_DIRECTORY] [--chunk_threshold CHUNK_THRESHOLD]
                            [--gamma GAMMA] [--confidence_ucb CONFIDENCE_UCB] [--w_threshold W_THRESHOLD]
                            [--iteration_threshold ITERATION_THRESHOLD] [--init_state_iterations INIT_STATE_ITERATIONS]
                            [--default_q_value DEFAULT_Q_VALUE] [--reward_func_name {RewardByCasesVer1}]
                            [--bandit_klass_name {DomainHierarchyMABControlled}] [--action_space_klass_name {ActionSpace}]
                            [--log_level LOG_LEVEL]

We run AutoFR-C.

options:
  -h, --help            show this help message and exit
  --site_url SITE_URL   Site to test
  --output_directory OUTPUT_DIRECTORY
                        output directory for saving agent
  --chunk_threshold CHUNK_THRESHOLD
                        How many times at once we will spawn a browser instance (reduce this number if your machine cannot
                        handle many parallel processes)
  --gamma GAMMA         How much do we care about future rewards. Default is 1/n. If passed in, it will be treated as a float
                        value
  --confidence_ucb CONFIDENCE_UCB
                        Confidence level for UCB calculation
  --w_threshold W_THRESHOLD
                        Preference to avoid visual breakage. Between 0 and 1, use number closer to 1 if you really care about
                        avoiding breakage.
  --iteration_threshold ITERATION_THRESHOLD
                        Multiplier to how many iterations per round
  --init_state_iterations INIT_STATE_ITERATIONS
                        Number of site snapshots required for AutoFR to run (reduce this number if the process cannot detect ads
                        easily for the website)
  --default_q_value DEFAULT_Q_VALUE
                        whether we do initializing only. New filter rules will be outputted
  --reward_func_name {RewardByCasesVer1}
                        Name of reward function
  --bandit_klass_name {DomainHierarchyMABControlled}
                        Name of bandit control class
  --action_space_klass_name {ActionSpace}
                        Name of action space class
  --log_level LOG_LEVEL
                        Log level
Debugging Tips
Thank you for trying AutoFR, here I provide some debugging tips.
InvalidSiteFeedbackException: Expected 10 init states but got X
If you get exceptions such as InvalidSiteFeedbackException: Expected 10 init states but got 0, this means that you are not able to collect valid site snapshots of a website. A valid site snapshot requires that ads are detected (counter of ads > 0).
A. Reduce Required Site Snapshots:
There are a few things you can do. If the exception says that you are able to collect some site snapshots like Expected 10 init states but got 4, then you may want to reduce the number of required site snapshots by passing in a different value for --init_state_iterations
$ python scripts/autofr_controlled.py --site_url "https://cricbuzz.com" --chunk_threshold 6 --init_state_iterations 4
B. Reduce Parallel Processes:
It could be possible that your machine cannot handle the number of parallel processes. Try to reduce the number by changing --chunk_threshold
$ python scripts/autofr_controlled.py --site_url "https://cricbuzz.com" --chunk_threshold 2 --init_state_iterations 4
C. Can Ad Highlighter Detect Ads for the Given Site?
It could simply mean that Ad Highlighter cannot detect any ads for the given website. This could be due to many reasons, such as the website changing over time and no longer serving ads that can be detected by Ad Highlighter, or it could be detecting that you are using a crawler (AutoFR uses Selenium) and purposefully not serving ads.
To verify whether Ad Highlighter can detect ads for the given website, go to the web extension and download its code and install it manually on Chrome.
- Download the code above.
- Open Chrome > Manage Extensions > Load unpacked
- Choose the perceptual-adblocker directory (this is Ad Highlighter). This should install the web extension.
- Remember to disable any adblocker that active for your browser
- Visit the website that you are testing with AutoFR and see if Ad Highlighter will identify those ads (there should be an red-ish overlay on those ads)
- Once you are done verifying, make sure to disable Ad Highlighter and re-active any adblockers before.
If Ad Highlighter does not identify any ads for the given website, this means that you need to updat
Related Skills
node-connect
350.8kDiagnose OpenClaw node connection and pairing failures for Android, iOS, and macOS companion apps
frontend-design
110.4kCreate distinctive, production-grade frontend interfaces with high design quality. Use this skill when the user asks to build web components, pages, or applications. Generates creative, polished code that avoids generic AI aesthetics.
openai-whisper-api
350.8kTranscribe audio via OpenAI Audio Transcriptions API (Whisper).
qqbot-media
350.8kQQBot 富媒体收发能力。使用 <qqmedia> 标签,系统根据文件扩展名自动识别类型(图片/语音/视频/文件)。
