PotreeCraft
PotreeCraft is a QGIS plugin which provides a graphic UI for integrating vector-based data into Potree projects.
Install / Use
/learn @ThomasFarmer/PotreeCraftREADME
PotreeCraft
version 2.1.2
rework in progress
PotreeCraft is a QGIS plugin which provides a graphic UI for integrating vector-based data into Potree projects. This is an open source tool for beginner users of the potree project or colleagues with no javascript knowledge. The PotreeCraft tool builds on the well-known Potree project, and lets users create pointcloud publications with integrated shapefile-based vector data with little to no effort. The plugin reads the added vector layer information of a given QGIS project and passed over the layer metadata and coloring styles to Potree, thus allowing the user to manage the vector-based data through a familiar and user-friendly interface what QGIS 3 provides. The plugin itself relies on PotreeConverter:
- PotreeConverter will create the blank Potree project itself, which later recieves the additional vector data files and a new homepage for the project with the necessary javascript code added.
and you can download PotreeConverter 2.1.1 stable release from the project's github page.
This project was created and tested with the version 2.1.1, and it was primarily made under a linux environment, but I intend to make it cross-platform and provide Windows support.
Known issues
Early build of v 2.1.2. Missing features / present bugs:
- Annotation points not supported yet.
- Duplicate vector folder generation, shape to geojson to project import is not streamlined yet.
- .laz not supported by default for tif generation. it might work in theory after we install the missing packages, but it was not tested yet.
- for .laz to be processed, user has to select blast2dem to process it, but blast2dem does not work natively on linux.
- Plugin window is huge, might be a problem on older laptops. I might have to implement tabs once again.
- Windows tests were minimal, but not extensive for now. blast2dem seems operational, but the popup command line window remains empty. User has to wait patiently with no information on how the process is progressing, but in the end when the process closes, the raster layer will be imported. There is no way to customize blast2dem functionality yet, so pointclouds imported with that method look way worse compared to core backend.
How to use the CLI tool
Having python installed is absolutely neccessary for this project, but besides that, the codebase so far only uses the core python libraries, so no additional packages are required here.
When we first interact with the script, it will tell us that it has no knowledge of the location of PotreeConverter.
user@pc:~/Documents/PotreeCraft$ python3 potreecraft_cli.py
The CLI will respond with the following line:
potreeconverter not found, please run --configure.
By running the command we'll be prompted to point to our PotreeConverter location.
user@pc:~/Documents/PotreeCraft$ python3 potreecraft_cli.py --configure
PotreeConverter executable location: /home/user/Documents/PtCvt_211/PotreeConverter
Saved PotreeConverter location to /home/user/Documents/PotreeCraft/cmd_tool/potreecraft_cli.ini
Upon interacting with the CLI tool after configuration, it will give us now an extended list on possible parameters we can pass over to the program. Mosto f these stem from the PotreeConverter CLI tool itself, and these will end up being passed over to it.
user@pc:~/Documents/PotreeCraft/cmd_tool$ python3 potreecraft_cli.py
usage: potreecraft_cli.py [-h] [--configure] [-i INPUT] [-o OUTPUT] [-p PROJECT_NAME]
                          [--projection PROJ4] [--encoding {BROTLI,UNCOMPRESSED}]
                          [-m {poisson,poisson_average,random}] [--chunkMethod CHUNK_METHOD]
                          [--keep-chunks] [--no-chunking] [--no-indexing]
                          [--attributes ATTRIBUTES] [--title TITLE] [--vector-data VECTOR_DATA]
potreecraft_cli.py: error: the following arguments are required: -i/--input, -o/--output
- -i : input .las file location. (required)
- -o : output folder location. (required)
- -p : generated html page name (required)
- --vector-data : location of folder with related vector data in geojson format.
We could start running a conversion command for example such as:
python3 potreecraft_cli.py -i /home/user/Documents/test_data/las/roadsection.las -o /home/user/Documents/output_test -p "clitest" --vector-data /home/user/Documents/test_data/vector/
There's an option to pull OpenStreetMap data with Cesium to project under the pointcloud. With --cesium-map true. We have the option to set the map layer's Z elevation with the --cesium-map-sea-level tag.
It is also advised to manually specify the projection when Cesium is used, since some pointcloud files might be missing the required metadata tags. This can be done by adding the --projection tag, and a proj4 string format of the projection. In this example we're using the Hungarian EOV (EPSG:23700) projection.
python3 potreecraft_cli.py -i /home/user/Documents/test_data/las/roadsection.las -o /home/user/Documents/output_test -p "clitest" --vector-data /home/user/Documents/test_data/vector/ --cesium-map true --cesium-map-sea-level 80 --projection +proj=somerc +lat_0=47.14439372222222 +lon_0=19.04857177777778 +k_0=0.99993 +x_0=650000 +y_0=200000 +ellps=GRS67 +towgs84=52.17,-71.82,-14.9 +units=m +no_defs
How to use the QGIS plugin
After downloading the .zip file from releases (one marked as a plugin, not a cli tool), we can
Plugins -> Manage and install plugins -> Install from .zip.
After that, we may have to activate the plugin by going over to the Installed section and puttin a checkbox next to it.
The interface in the current build looks like the following:
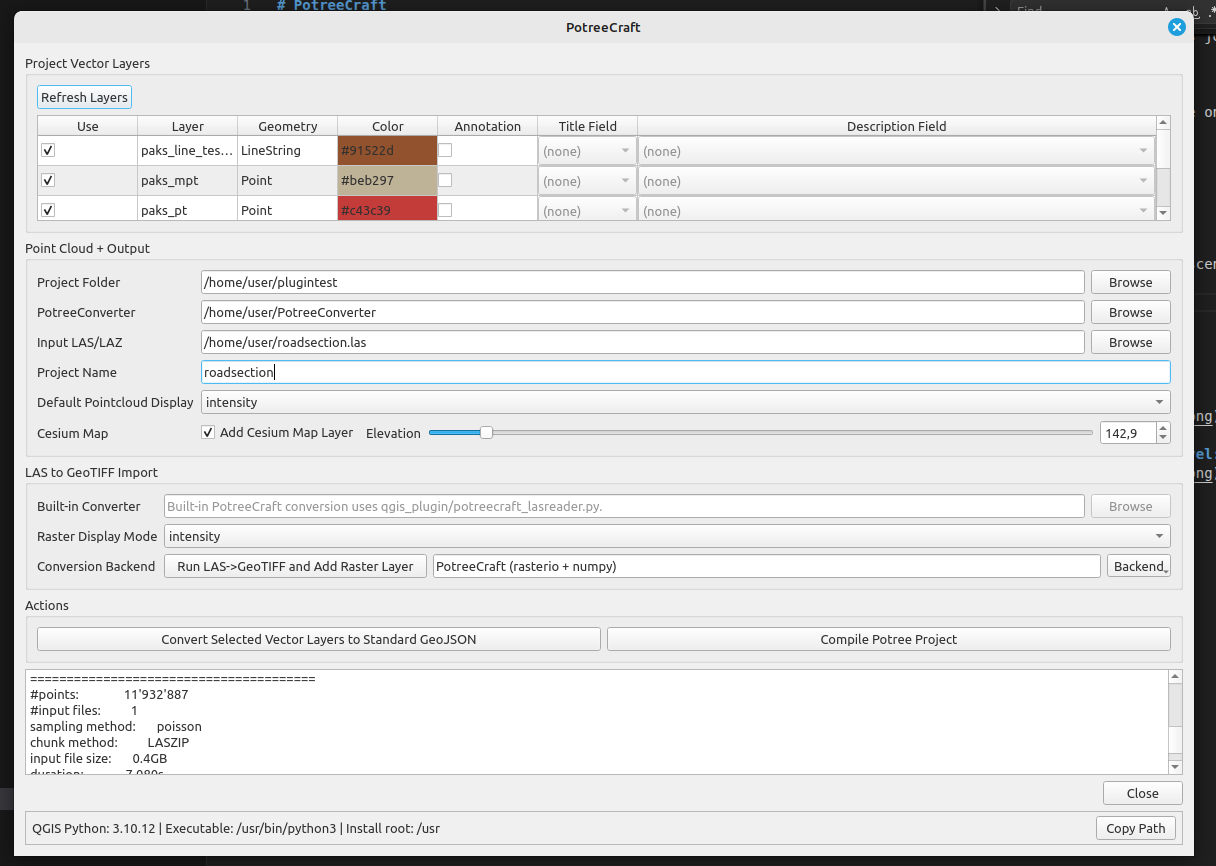
In the top section we have a list of our current vector layers in the project, with some information on their type and color assigned. Other options are grayed out due to missing backend implmenetation for now.
In the second section we have the core settings, such as:
- Project folder (previously output folder), this is where our files will be generated.
- PotreeConverter: We have to point to our potreeconverter binary, so the plugin could reference it. Note, the whole project was written and tested using version 2.1.1. Other versions most likely will break the whole system.
- Input LAS/LAZ: the pointcloud we'll use for conversion - both geotiff and potree.
- Project name: this piece of information is used in the potree project generation. Normally mirrors the pointcloud file's name.
- Default pointcloud display: when the potree project is created, this property will be the default coloring the pointcloud will take. So far intensity, rbg, and elevation is supported.
- Cesium map settings: We have the option to pull in an openstreetmap layer under our cloud, and set a default elevation level for this map layer.
Third section is related to the geotiff import:
- Built in converter / blast2dem: currently we have two options to import our pointcloud to qgis with this plugin. If neither works, a user might try to import it by hand through pdal.
- Raster display mode: similar to pointcloud display, we have a few options on how to display our pointcloud as a raster layer: points should take intensity, rgb or elevation values. Currently rbg ends us being grayscale and not truly colorful, this is something i might have to look into later.
- Run LAS->GeoTiff conversion and add as raster layer: quite self-explanatory, this will create a tif file, and import it as a raster to the project.
Fourth section, actions:
- Convert selected vector layers into geojson: due to our implementation of potree's vector handling, we're relying on geojson format instead of shapefiles as we did in v. 1.0. This button exports our layers as geojson ones and puts them in our project folder.
- Compile Potree project: This is the button we want to push after we're done editing the settings. The project will convert and the files will be created in the project folder set in the first section.
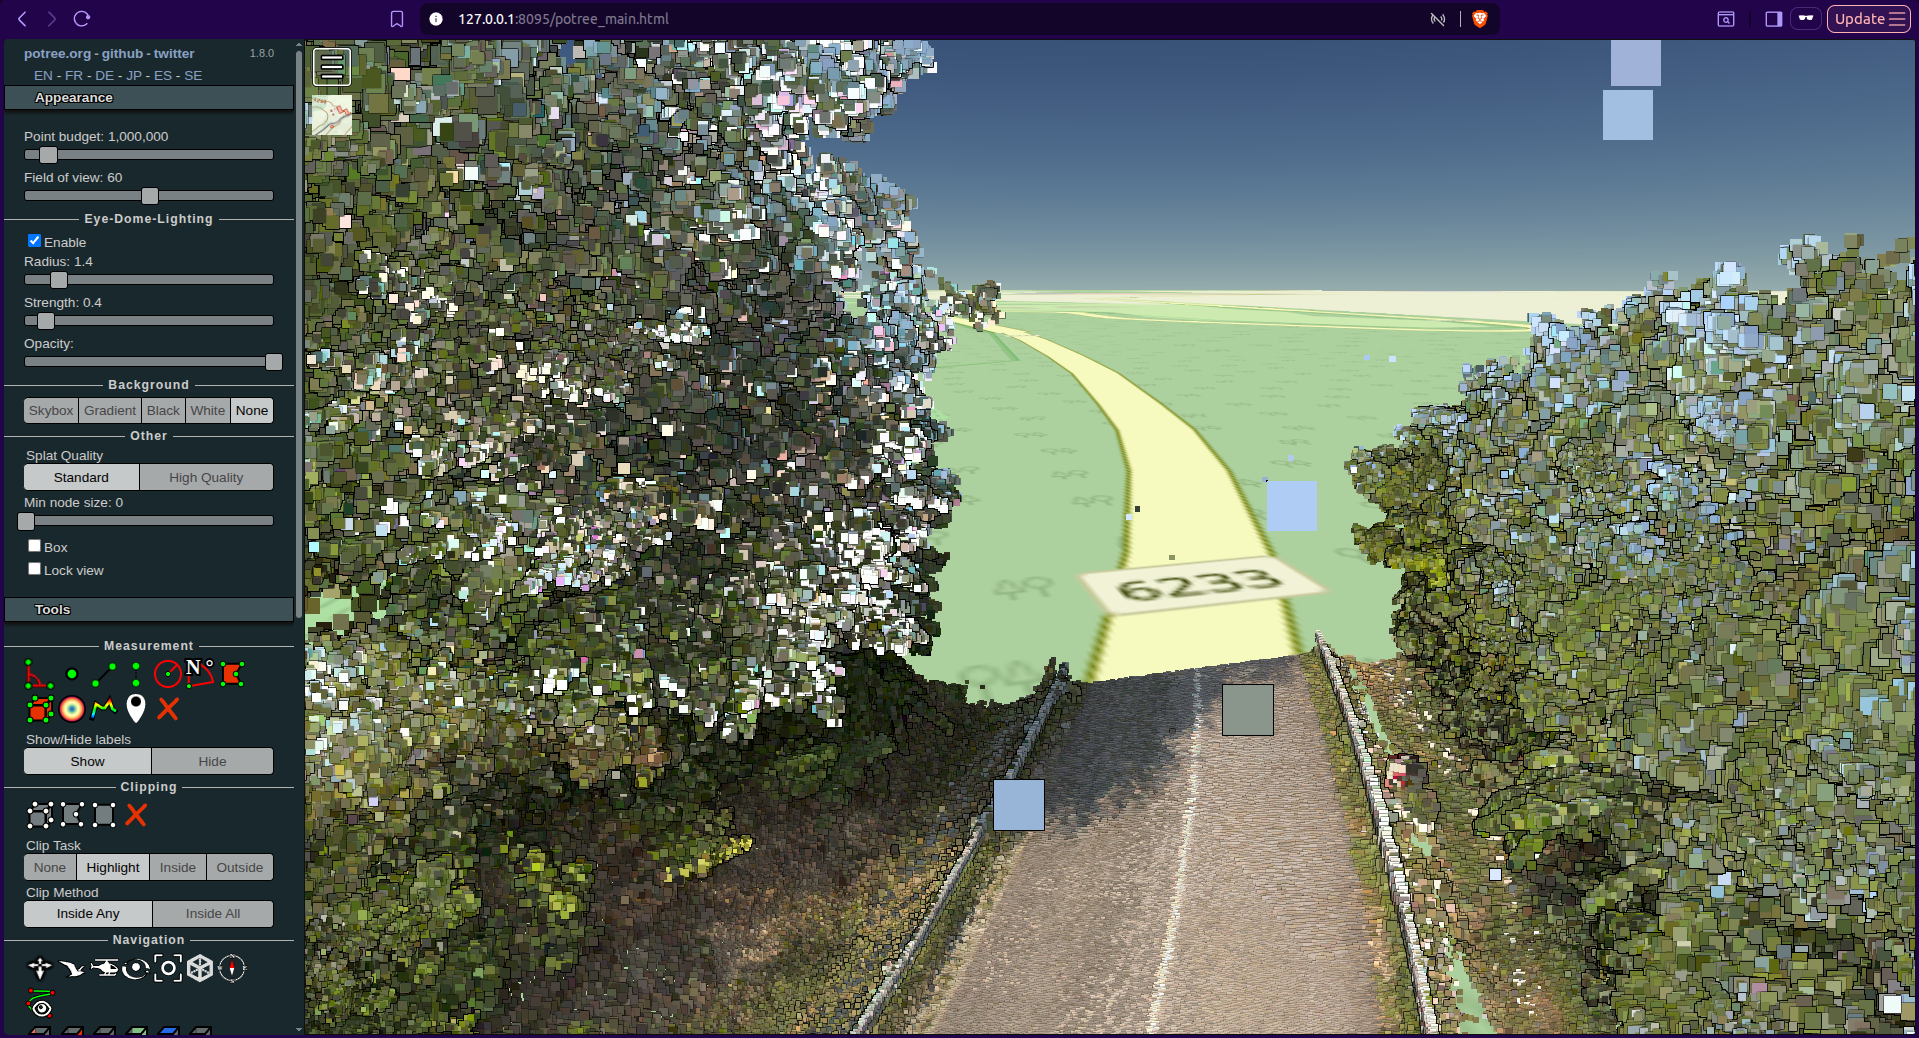
How to view the potree project
After the process is done, we should spin up a http server in the output folder and check the output. This can be done in various ways, on Windows's for example python's integrated simple http server can do this job perfectly.
python3 -m http.server 8095
This can also work on linux, however I've ran into some graphical issues while running it, so i recommend the one found in npm.
npm install http-server -g

http-server -p 8095
The vector layers all get a randomly generated color if we used the CLI, but with the GUI they mirror the color set for them in the QGIS project.
Screenshots
Test output pointcloud with test vector data:

Test output pointcloud with openstreetmap data pulled with cesium, map elevated to 150 meters above sea level: