GenericScriptableArchitecture
ScriptableObject architecture with small, easy-to-expand codebase, and simple UI.
Install / Use
/learn @SolidAlloy/GenericScriptableArchitectureREADME
Generic ScriptableObject Architecture
ScriptableObject architecture with a small, easy-to-expand codebase, and simple UI.

![]()
Another take on ScriptableObject architecture from Ryan Hipple's 2017 Unite talk
Main differences from ScriptableObject-Architecture and unity-atoms:
- Small code base. With help of generic classes, there is only one class for a variable, one class for a scriptable event, etc. It allows to implement extensions of the plugin easily and modify it to your liking.
- Intuitive, easy-to-learn interface, allowing you to use all the advantages of ScriptableObject Architecture without cluttering UI with unnecessary buttons and fields.
- Integrations with other plugins. You can subscribe to events and variables using UniRx. You can use them as signals in Timeline. The way you can work with scriptable events and variables is versatile and integrated into Editor, so you can use them the way you like.
What is ScriptableObject Architecture
ScriptableObject architecture allows to write less code and do more design work in the editor. You can design components and prefabs that are highly decoupled and are driven by data. Where they receive the data from doesn't matter which alllows to arrange components and prefabs in multiple ways, so you don't have to rewrite code when you need to change a gameplay mechanic or even add a new mechanic.
In ScriptableObject architecture, variables and events are scriptable objects. They are stored as separate files which can seem redundant at first. But think about it - you put a variable once in the file system, and can change it or react to the change from everwhere: from a game object in a scene, from a prefab, from different scenes at once, even from other scriptable objects. At the same time, two prefabs don't need to know about each other to pass the information between them. They pass the information to a variable/event and don't care, who receives it or how many objects are listening for this change.
Have you ever heard of advantages of ECS? That data-driven architecture is good for games and allows for better decoupling of systems and managing mechanics? ScriptableObject architecture provides just that. It doesn't provide the efficiency benefit of ECS, but doesn't require you to change the GameObject-Component workflow you are used to. So it's very easy to pick up and integrate only where you need it. Of course, not every variable should be a scriptable object. You declare variables as scriptable objects only when you need to interact with the 'outside world', be it another prefab or scene.
Requirements
- Unity 2020.2 or higher
- .NET 4.x :heavy_exclamation_mark: (when using Unity 2021.1 or lower)
How To Install
:heavy_exclamation_mark: Before installing the package, please disable the Assembly Version Validation option in Player Settings.
Install with OpenUPM
Once you have the OpenUPM cli, run the following command:
openupm install com.solidalloy.generic-scriptable-architecture
Or if you don't have it, add the scoped registry to manifest.json with the desired dependency semantic version:
  "scopedRegistries": [
    {
      "name": "package.openupm.com",
      "url": "https://package.openupm.com",
      "scopes": [
        "com.solidalloy",
        "com.openupm",
        "org.nuget"
      ]
    }
  ],
  "dependencies": {
    "com.solidalloy.generic-scriptable-architecture": "1.3.3"
  },
Install via Package Manager
Project supports Unity Package Manager. To install the project as a Git package do the following:
- In Unity, open Project Settings -> Package Manager.
- Add a new scoped registry with the following details:
- Name: package.openupm.com
- URL: https://package.openupm.com
- Scope(s):
- com.openupm
- com.solidalloy
- org.nuget
- Hit Apply.
- Go to Window -> Package Manager.
- Press the + button, Add package from git URL.
- Enter com.solidalloy.generic-scriptable-architecture, press Add.
Quick Start
Variable
-
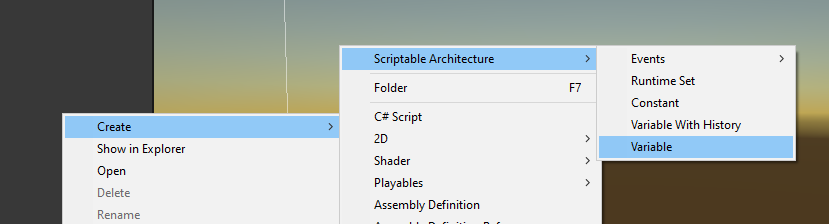
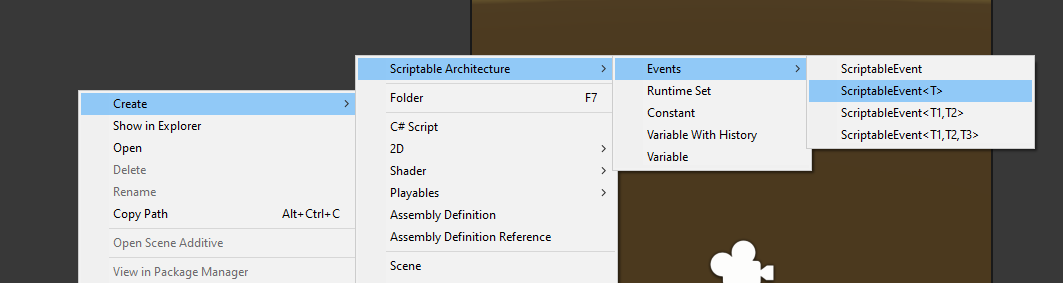
Go to the Create context menu, choose Variable
-
Choose a type of the variable you would like to use. Here, we will choose
float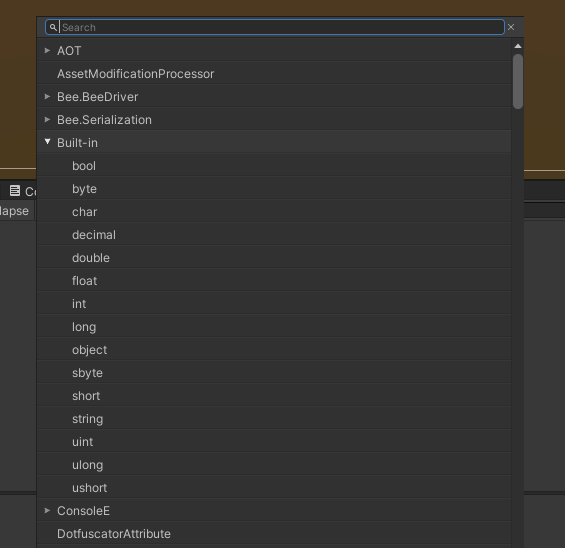
-
Enter a name for the variable, and it will be created

-
You can create a description for the variable, choose its initial value. Notice how the variable is a generic class, so you can create variables of any type with the same steps, without having to write any additional classes. We will cover the "Enable stack trace" in the Stack trace section.

-
Let's now use the variable. We have one class that will increment the counter:
using GenericScriptableArchitecture;
using UnityEngine;

public class AirPump : MonoBehaviour
{
    [SerializeField] private Variable<float> _balloonSize;
    [SerializeField] private float _force = 0.001f;

    private void Update()
    {
        _balloonSize.Value += _force;
    }
}
Another class will react to the change:
using GenericScriptableArchitecture; using UnityEngine; public class Balloon : MonoBehaviour { [SerializeField] private Variable<float> _size; private void Update() { transform.localScale = new Vector3(_size, _size, _size); } } -
Now, if we assign the created variable to the fields and create the Balloon game object as a 3D sphere, it will start inflating in play mode:
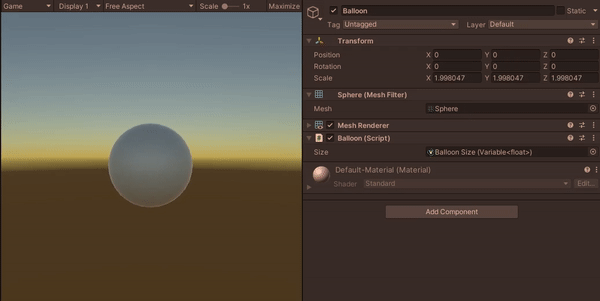
Of course, variables don't always change every frame. If you want to listen for a variable change instead of getting it in
Update(), check out the section on Variables. -
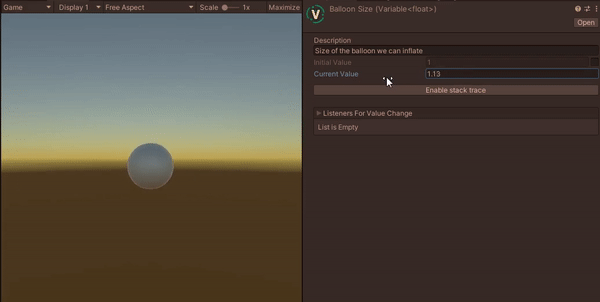
We can also change the balloon size in inspector, and the balloon will react. Don't forget to disable AirPump component so that it stops inflating the balloon.
Scriptable Event
-
We can create a scriptable event with the same Create context menu
-
Let's choose an event with one generic argument which will also be float, and name it "Balloon popped"
-
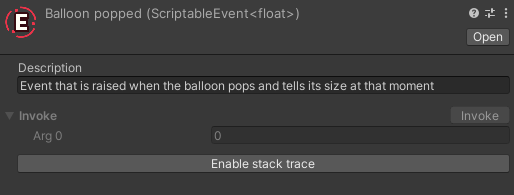
We can also create a description for the event. The invoke button is grayed out, but we will be able to invoke it in play mode. Stack trace is covered in a separate section
-
Let's create a needle that will pop a balloon:
using EasyButtons;
using GenericScriptableArchitecture;
using UnityEngine;

public class Needle : MonoBehaviour
{
    [SerializeField] private Variable<float> _balloonSize;
    [SerializeField] private ScriptableEvent<float> _balloonPopped;

    [Button]
    public void PopBalloon()
    {
        _balloonPopped.Invoke(_balloonSize);
    }
}
I'm using the EasyButtons package here to create a button in the inspector.
-
We will also need the balloon and air pump to react to the popping balloon:
using GenericScriptableArchitecture;
using UnityEngine;

public class Balloon : MonoBehaviour
{
    [SerializeField] private Variable<float> _size;

    private bool _popped;

    private void Update()
    {
        if (!_popped)
            transform.localScale = new Vector3(_size, _size, _size);
    }

    public void Pop()
    {
        _popped = true;
        transform.localScale = Vector3.zero;
    }
}
using GenericScriptableArchitecture; using UnityEngine; public class AirPump : MonoBehaviour { [SerializeField] private Variable<float> _balloonSize; [SerializeField] private float _force = 0.001f; private bool _balloonPopped; private void Update() { if (!_balloonPopped) _balloonSize.Value += _force; } public void OnBalloonPopped(float size) { _balloonPopped = true; Debug.Log($"Balloon popped at size {size}. The air pump stops working."); } } -
In this example, we wil
