Gwitter
Turn GitHub Issues into your personal microblog platform
Install / Use
/learn @SimonAKing/GwitterREADME
Gwitter
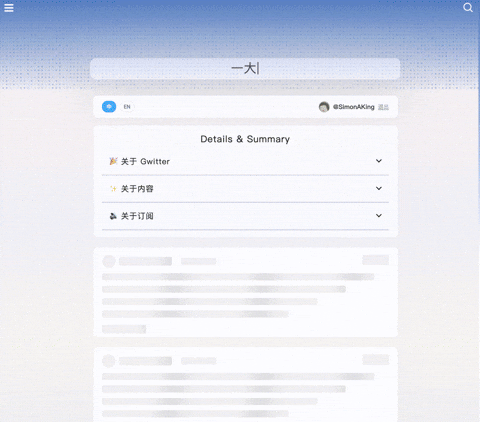
🎮 Playground
- 🌐 Live Demo: https://simonaking.com/Gwitter - Experience Gwitter in action
- 💭 Share Your Thoughts: Create an Issue to join the conversation
- 📚 Browse Discussions: Explore existing thoughts and insights on the demo site
✨ Project Introduction
✨ The Story Behind "Gwitter"
Ever wondered what happens when you combine the world's most powerful issue tracker with the globe's favorite microblogging platform? 🤔
GitHub Issues 📝 = The unsung hero of note-taking (seriously, it's brilliant!)
Twitter 🐦 = Where thoughts become conversations worldwide
Gwitter 🚀 = Turn GitHub Issues into your personal microblog platform!
📱 Author's Gwitter: https://simonaking.com/blog/weibo/ - See how Gwitter is used in practice
Gwitter is a lightweight microblogging application built on GitHub Issues. It records my thoughts on technology, life insights, and interesting discoveries. Welcome to join the discussion!
🚀 Key Features
- 📝 GitHub Issues Based
- Utilizes GitHub Issues as content storage, supporting GitHub's label system for content categorization
- 👍 Social Interaction
- Like Feature: Supports GitHub Reactions (👍 ❤️ 😄 😮 😢 😡 🚀 👀)
- Comment System: Complete commenting functionality with nested replies support
- ✨ Visual Experience
- Beautiful Animations: Smooth page animations using Framer Motion
- Responsive Design: Perfect adaptation for desktop, tablet, and mobile devices
- Skeleton Screen: Elegant loading state display
- 🌐 User Experience
- Internationalization Support: Built-in Chinese and English bilingual support
- Infinite Scroll: Smart pagination loading for smooth browsing experience
- 🤖 Automated Synchronization
- Multi-platform Sync: Automatically sync newly published Issues to other platforms via GitHub Actions
📝 Usage Instructions
Publishing Content
- Create a new Issue in the configured GitHub repository
- Write content using Markdown format
- Add appropriate labels for categorization
- Content will automatically sync to the gwitter application after publishing <img src="./docs/issue.png" alt="Create issue example" width="500">
Content Management
- Edit: Edit directly in GitHub Issues
- Delete: Close the corresponding Issue
- Categorize: Use GitHub Labels for content categorization
- Pin: Control display order through Issue creation sequence
🤖 Automated Synchronization Configuration
Gwitter supports automatically syncing newly published Issues to Telegram and GitHub Gist via GitHub Actions.
-
Create Sync Script
- Refer to sync.js implementation
- Create
.github/workflows/sync.ymlin the repository
-
Configure Environment Variables In GitHub repository Settings > Secrets and variables
-
Telegram Configuration
- Create Telegram Bot (via @BotFather)
- Get Bot Token and target channel/group Chat ID
- Add Bot to target channel and grant admin permissions
🛠️ Tech Stack
- Frontend Framework: React 18 + TypeScript
- Build Tool: Rsbuild (Fast build tool based on Rspack)
- Styling Solution: Emotion (CSS-in-JS)
- Animation Library: Framer Motion + React Flip Move
- State Management: React Hooks
- Network Requests: Axios + GitHub GraphQL API
- Internationalization: i18next
- Code Standards: ESLint + Prettier
Gwitter/
├── src/                  # Main source code
│   ├── components/       # React components
│   │   ├── common/      # Shared UI components
│   │   ├── About.tsx    # About page component
│   │   ├── CommentInput.tsx # Comment input component
│   │   └── ...
│   ├── hooks/           # Custom React hooks
│   │   └── useAuth.tsx  # Authentication hook
│   ├── utils/           # Utility functions
│   │   ├── cache.ts     # Caching utilities
│   │   ├── request.ts   # API request utilities
│   │   └── index.ts     # Common utilities
│   ├── config/          # Configuration files
│   │   └── index.ts     # Main configuration
│   ├── i18n/            # Internationalization
│   │   ├── index.ts     # i18n setup
│   │   └── locales/     # Language files
│   ├── types/           # TypeScript type definitions
│   │   └── global.d.ts  # Global types
│   └── lib/             # External libraries
│       └── collapse.js  # UI collapse functionality
├── demo/                # Demo examples
│   ├── npm-demo/        # NPM/React demo
│   │   ├── src/         # React source files
│   │   │   ├── App.tsx  # Main demo component
│   │   │   ├── config/  # Demo configuration
│   │   │   └── ...
│   │   ├── package.json # Dependencies
│   │   └── vite.config.ts # Build config
│   ├── umd-demo/        # UMD/Browser demo
│   │   └── index.html   # Complete HTML demo
│   └── README.md        # Demo documentation
├── docs/                # Documentation assets
│   └── *.png           # Setup screenshots
└── dist/               # Built files for distribution
    ├── gwitter.min.js  # UMD bundle
    └── gwitter.min.css # Styles
📦 Installation & Usage
🎯 Quick Start: Check out our live demos to see Gwitter in action!
📖 Demo Examples
Two demo examples to get you started:
🔧 NPM Demo - React Development
For modern React applications with build tools.
cd demo/npm-demo
npm install
npm run dev
🌐 UMD Demo - Browser Integration
For existing websites without build tools.
<!-- Just open index.html in your browser -->
<script src="https://unpkg.com/gwitter/dist/gwitter.min.js"></script>
<link rel="stylesheet" href="https://unpkg.com/gwitter/dist/gwitter.min.css">
📋 Setup Requirements
Both demos need GitHub configuration:
- Create a GitHub repository for your content
- Generate a Personal Access Token with
repoandread:userpermissions - Create a GitHub OAuth Application
- Update demo config files with your details
See Configuration Setup for detailed instructions.
Method 1: NPM Installation (Recommended)
For modern JavaScript projects using module bundlers:
Requirements
- React: ^18.0.0 or higher
- React DOM: ^18.0.0 or higher
Installation
npm install gwitter react react-dom
# or
yarn add gwitter react react-dom
Usage
import gwitter from 'gwitter';
import 'gwitter/dist/gwitter.min.css';

gwitter({
  container: document.getElementById('comments'),
  config: {
    request: {
      // GitHub Personal Access Token
      token: ['your_token_part1', 'your_token_part2'],

      // OAuth configuration
      clientID: 'your_github_oauth_client_id',
      clientSecret: 'your_github_oauth_client_secret',

      // GitHub repository configuration
      owner: 'your_github_username',
      repo: 'your_repo_name',

      // Pagination configuration
      pageSize: 6,

      // CORS proxy (optional)
      autoProxy: 'https://cors-anywhere.azm.workers.dev/https://github.com/login/oauth/access_token',
    },
    app: {
      // Application feature toggles
      onlyShowOwner: false,
      enableRepoSwitcher: false,
      enableAbout: false,
      enableEgg: false,
    },
  }
});
Method 2: UMD (Browser)
For direct browser usage without build tools:
<!-- Include React and ReactDOM -->
<script crossorigin src="https://unpkg.com/react@18/umd/react.production.min.js"></script>
<script crossorigin src="https://unpkg.com/react-dom@18/umd/react-dom.production.min.js"></script>

<!-- Include Gwitter -->
<script src="https://unpkg.com/gwitter/dist/gwitter.min.js"></script>
<link rel="stylesheet" href="https://unpkg.com/gwitter/dist/gwitter.min.css">

<script>
  gwitter({
    container: document.getElementById('comments'),
    config: {
      request: {
        // GitHub Personal Access Token
        token: ['your_token_part1', 'your_token_part2'],

        // OAuth configuration
        clientID: 'your_github_oauth_client_id',
        clientSecret: 'your_github_oauth_client_secret',

        // GitHub repository configuration
        owner: 'your_github_username',
        repo: 'your_repo_name',

        // Pagination configuration
        pageSize: 6,

        // CORS proxy (optional)
        autoProxy: 'https://cors-anywhere.azm.workers.dev/https://github.com/login/oauth/access_token',
      },
      app: {
        // Application feature toggles
        onlyShowOwner: false,
        enableRepoSwitcher: false,
        enableAbout: false,
        enableEgg: false,
      },
    }
  });
</script>
3. Configuration Setup
Before using Gwitter, you need to set up GitHub configuration:
3.1 Create GitHub Repository
- Create a new repository on GitHub to store your microblog content
- Record the repository's
owner(username) andrepo(repository name)
Similar to https://github.com/SimonAKing/weibo/issues
<img src="./docs/repo.png" alt="GitHub repository example" width="500">
3.2 Apply for GitHub Personal Access Token
-
Visit GitHub Settings > Developer settings > Personal access tokens
-
Click "Generate new token (classic)"
<img src="./docs/token.png" alt="Generate new token" width="500"> -
Select the following permissions:
repo(Full repository access)read:user(Read user information)
-
Generate and save the token
<img src="./docs/token_premission.png" alt="Token permissions" width="500">
3.3 Create GitHub OAuth Application
Related Skills
apple-reminders
334.1kManage Apple Reminders via remindctl CLI (list, add, edit, complete, delete). Supports lists, date filters, and JSON/plain output.
gh-issues
334.1kFetch GitHub issues, spawn sub-agents to implement fixes and open PRs, then monitor and address PR review comments. Usage: /gh-issues [owner/repo] [--label bug] [--limit 5] [--milestone v1.0] [--assignee @me] [--fork user/repo] [--watch] [--interval 5] [--reviews-only] [--cron] [--dry-run] [--model glm-5] [--notify-channel -1002381931352]
node-connect
334.1kDiagnose OpenClaw node connection and pairing failures for Android, iOS, and macOS companion apps
oracle
334.1kBest practices for using the oracle CLI (prompt + file bundling, engines, sessions, and file attachment patterns).
