UnityHFSM
A fast, tried-and-tested hierarchical finite state machine library for Unity, designed to be easy to use yet powerful without compromising performance.
Install / Use
/learn @Inspiaaa/UnityHFSMREADME

A simple yet powerful hierarchical finite state machine for the Unity game engine. It is scalable and customisable by being class-based, but also supports functions (lambdas) for rapid prototyping.
Thanks to overloading, it minimises boilerplate code while still supporting generics.
It has a special focus on the temporal aspects of state transitions, making it ideal for timing and synchronisation sensitive problems.
Why use UnityHFSM?
-
State machines are an amazingly easy way to write and organise game logic. (As soon as you have states, e.g. Walk, Run, Sneak, Jump, you can use a state machine)
-
It's easy and straightforward to use
-
It helps you tame complex behaviour (e.g. weapon handling -> cooling, ammo, reload, fire) or write AI for NPCs
-
Helps you write self documenting code, that is maintainable and readable
-
Reduces the boilerplate code required to write a state machine
-
UnityHFSM is lightweight and efficient, making it perfect for solving small and big problems
-
It is especially designed for Unity, and supports coroutines, which would otherwise be difficult to integrate in a state machine
-
No GC Allocations for state changes / updates / ... after setting up the state machine (-> No unwanted GC related lag spikes because of the state machine)
-
The code is well documented
-
It is not a component (MonoBehaviour) and therefore has a low overhead
-
By being hierarchical, it can reduce the amount of duplicate code between states
In the wiki:
Table of contents:
Installation
Unity Package
To get started, download the latest version of UnityHFSM from the Releases page. Simply extract the zip file and put the folder anywhere in your Assets folder. Et voilà, you're ready to go!
UPM Package
<details> <summary>Add from OpenUPM <em>| via scoped registry</em></summary>To add OpenUPM to your project:
-
Open
Edit/Project Settings/Package Manager -
Add a new Scoped Registry:
Name: OpenUPM URL: https://package.openupm.com/ Scope(s): com.inspiaaa.unityhfsm -
Click <kbd>Save</kbd>
-
Open Package Manager
-
Select
My Registriesin dropdown top left -
Select
</details>UnityHFSMand clickInstall
You can also add it directly from GitHub on Unity 2019.4+. Note that you won't be able to receive updates through Package Manager this way, you'll have to update manually.
- Open Package Manager (<kbd>Window</kbd> > <kbd>Package Manager</kbd>)
- Click <kbd>+</kbd>
- Select <kbd>Add from Git URL</kbd>
- Paste
https://github.com/Inspiaaa/UnityHFSM.git#upmfor the latest stable release (recommended)https://github.com/Inspiaaa/UnityHFSM.git#releasefor the development versionhttps://github.com/Inspiaaa/UnityHFSM.git#v1.8.0for a specific version (v1.8.0here)
- Click <kbd>Add</kbd>
- Tip: If you're using VSCode, and you're not getting any IntelliSense, you may have to regenerate the
.csprojproject files (<kbd>Edit</kbd> > <kbd>Preferences</kbd> > <kbd>External Tools</kbd> > <kbd>Regenerate project files</kbd>)
Example
Simple State Machine
Here's a simple state machine for an enemy spy in a game.
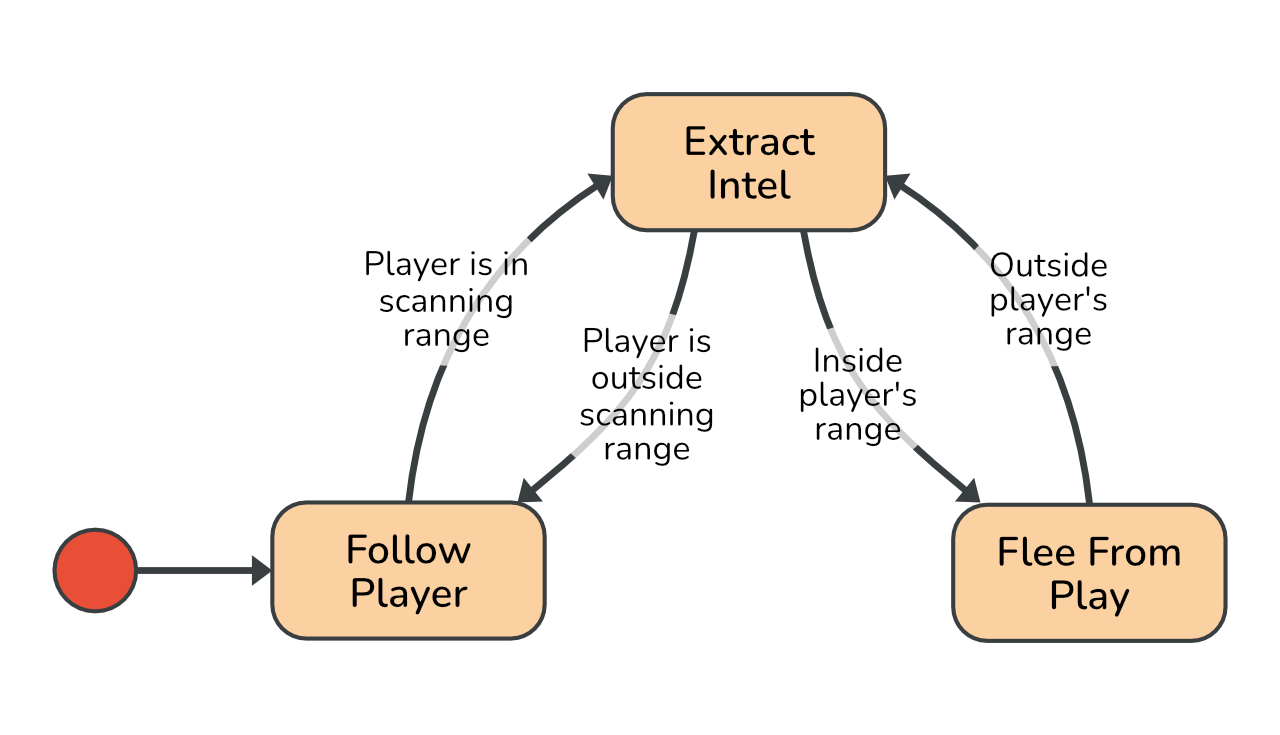
As you can see, the enemy will try to stay outside of the player's viewing range while extracting intel. When the player goes too far away, it will follow the player again.
The Idea
-
Create the state machine:
fsm = new StateMachine(); -
Add states: Each state is represented by a
StateBaseobject. You can either use one of the built-in state classes (e.g. theStateclass) to define the state's logic or write a custom class that inherits fromStateBase.fsm.AddState( name, new State( onEnter, onLogic, onExit ) ); -
Add transitions: Transitions can be defined using
TransitionBaseobjects. They determine when and under which conditions the state machine should switch to another state. As with the states, the simplest option is to use one of the builtin transition types (e.g. theTransitionclass). If you instead choose to create a custom transition class by inheriting fromTransitionBase, see the class-based architecture section for more information.fsm.AddTransition( new Transition( from, to, condition )); -
Initialize the state machine
fsm.SetStartState(id); fsm.Init(); -
Run the state machine:
void Update() {
    fsm.OnLogic()
}
The Implementation
Creating the state machine
using System.Collections;
using System.Collections.Generic;
using UnityEngine;
using UnityHFSM;  // Import the required classes for the state machine.

public class EnemyController : MonoBehaviour
{
    private StateMachine fsm;

    public float playerScanningRange = 4f;
    public float ownScanningRange = 6f;

    void Start()
    {
        fsm = new StateMachine();
    }
}
Adding states
To be able to define the states' logic concisely, we'll need to create some helper methods and properties first. Their implementation is just an example and may differ for your scene setup.
Vector2 PlayerPosition => PlayerController.Instance.transform.position;

float DistanceToPlayer => Vector2.Distance(PlayerPosition, transform.position);

void MoveTowardsPlayer(float speed) {
    transform.position = Vector2.MoveTowards(
        transform.position,
        PlayerPosition,
        speed * Time.deltaTime
    );
}
Next, we can define the states in the Start method:
void Start()
{
    fsm = new StateMachine();

    // Empty state without any logic.
    fsm.AddState("ExtractIntel");

    fsm.AddState("FollowPlayer", new State(
        onLogic: state => MoveTowardsPlayer(1)
    ));

    fsm.AddState("FleeFromPlayer", new State(
        onLogic: state => MoveTowardsPlayer(-1)
    ));

    // This configures the entry point of the state machine.
    fsm.SetStartState("FollowPlayer");
}
Notice the fsm.AddState("ExtractIntel") call. Interestingly, we don't need to pass in a state object here. This is due to one of the many "shortcut" methods that UnityHFSM provides. These are meant to reduce the amount of boilerplate code required for common operations, such as adding blank states. The above line is equivalent to writing:
fsm.AddState("ExtractIntel", new StateBase<string>(needsExitTime: false));
Furthermore, we can actually shorten the other state definitions even more by using shortcut methods. We can for example write the FollowPlayer state in a more concise way:
fsm.AddState("FollowPlayer", onLogic: state => MoveTowardsPlayer(1));
Although this example is using lambda expressions for the states' logic, you can of course also just pass normal functions.
Side note: To keep things simple, we're using strings for the state identifiers. Just keep in mind that UnityHFSM is not limited to this, as it allows you to use any custom type (e.g. enums) for the state identifiers. See the generics chapter for more information.
Adding transitions
void Start()
{
    // ...

    fsm.AddTransition(new Transition(
        "ExtractIntel",
        "FollowPlayer",
        transition => DistanceToPlayer > ownScanningRange
    ));

    fsm.AddTransition(new Transition(
        "FollowPlayer",
        "ExtractIntel",
        transition => DistanceToPlayer < ownScanningRange
    ));

    fsm.AddTransition(new Transition(
        "ExtractIntel",
        "FleeFromPlayer",
        transition => DistanceToPlayer < playerScanningRange
    ));

    fsm.AddTransition(new Transition(
        "FleeFromPlayer",
        "ExtractIntel",
        transition => DistanceToPlayer > playerScanningRange
    ));
}
Although the above code snippet is definitely functional, you may notice that it seems a bit overly verbose and repetitive. That's because it is. We can do better!
Firstly, as creating transitions with the Transition c
