Cherri
Coder Academy Final Project using Node.js and React.
Install / Use
/learn @GoldenLuckyDragon/CherriREADME
![]()
Coder Academy Node / React.js Project By Golden Lucky Dragon (Carmen Chung, Jon Ablondi and James Marotta).

TABLE OF CONTENTS
<a name="installation"/>
1. Installation Instructions
</a>View the project online here [currently with deployment issues].
To use this project locally:
$ git clone https://github.com/GoldenLuckyDragon/Cherri.git
Move into the directory:
$ cd Cherri
The project consists of both a front and back end.
Back End
To begin with, you will need a stripe account. Go to https://dashboard.stripe.com/register and register an account. In the Stripe dashboard, sign up for Stripe Connect (which allows the platform to be a middleman in a transaction between two clients).
Once you have a Stripe account, register your platform here: https://dashboard.stripe.com/account/applications/settings
Important Note: you must verify your identity on Stripe for Stripe Connect to accept payments.
In Terminal, move into the backend folder and create a dotenv file that will host your environment variables.
$ cd backend && touch .env
Copy and paste the following inside the dotenv file:
STRIPE_DEV_SECRET=
CLIENT_ID=
Fill in your Client ID from your Stripe dashboard under Settings (and keep your dashboard open, as it will be used again).
Update your modules with the following command in Terminal:
$ yarn install
Stripe requires a handshake verification process which must be done over https and cannot be done on localhost. As such, download and install ngrok from https://ngrok.com/download (which will facilitate the handshake verification).
Move to the download directory with the following Terminal command:
cd [PATH TO NGROK - likely to be "/downloads"]
and run the following command to create a secure public connection to your localhost:
$ ngrok http 8080

Then copy the https url and go back to your Stripe dashboard. There will be a new redirect_URI on the bottom left of the dashboard. Select "Viewing test data" as per below:

Go to your dashboard - when you add your redirect_URI, make sure to add the following to the end of your ngrok https url:
/users/auth/stripe_connect
It might look something like this:
https://2221ajecb.ngrok.io/users/auth/stripe_connect
Then click on "API" on the left of the dashboard and save both your stripe secret key to your new .env file. The dashboard should look like this:

Keep Terminal open inside the /backend folder and run:
$ yarn start
You should see:
Server running on port: 8080
Successful connection to MongoDB
If you do not already have MongoDb, you will need to install it with the following steps.
MongoDb
Open a new Terminal window with <kbd>CMD</kbd> + <kbd>T</kbd>
We use MongoDb - with this project you can install it using Homebrew.
You can find the MongoDb docs here.
First update your homebrew with the following:
$ brew update
Then run:
$ brew install mongodb
Once the installation is complete, run:
$ mongod --dbpath /usr/local/var/mongodb
A successful connection will display as follows:
waiting for connections on port 27017
Cloudinary
Our team used Cloudinary for image upload and retrieval. We created two presets to allow images to be uploaded directly from the platform without requiring the user to be authorised (the Cloudinary API and Cloudinary Secret Key are stored within the .env file).
If you wish to establish your own Cloudinary account and presets (so that you can access the images uploaded to the website), then follow these steps:
-
Sign up for a Cloudinary account here. Under settings, set the Cloudinary cloud name to Cherri.
-
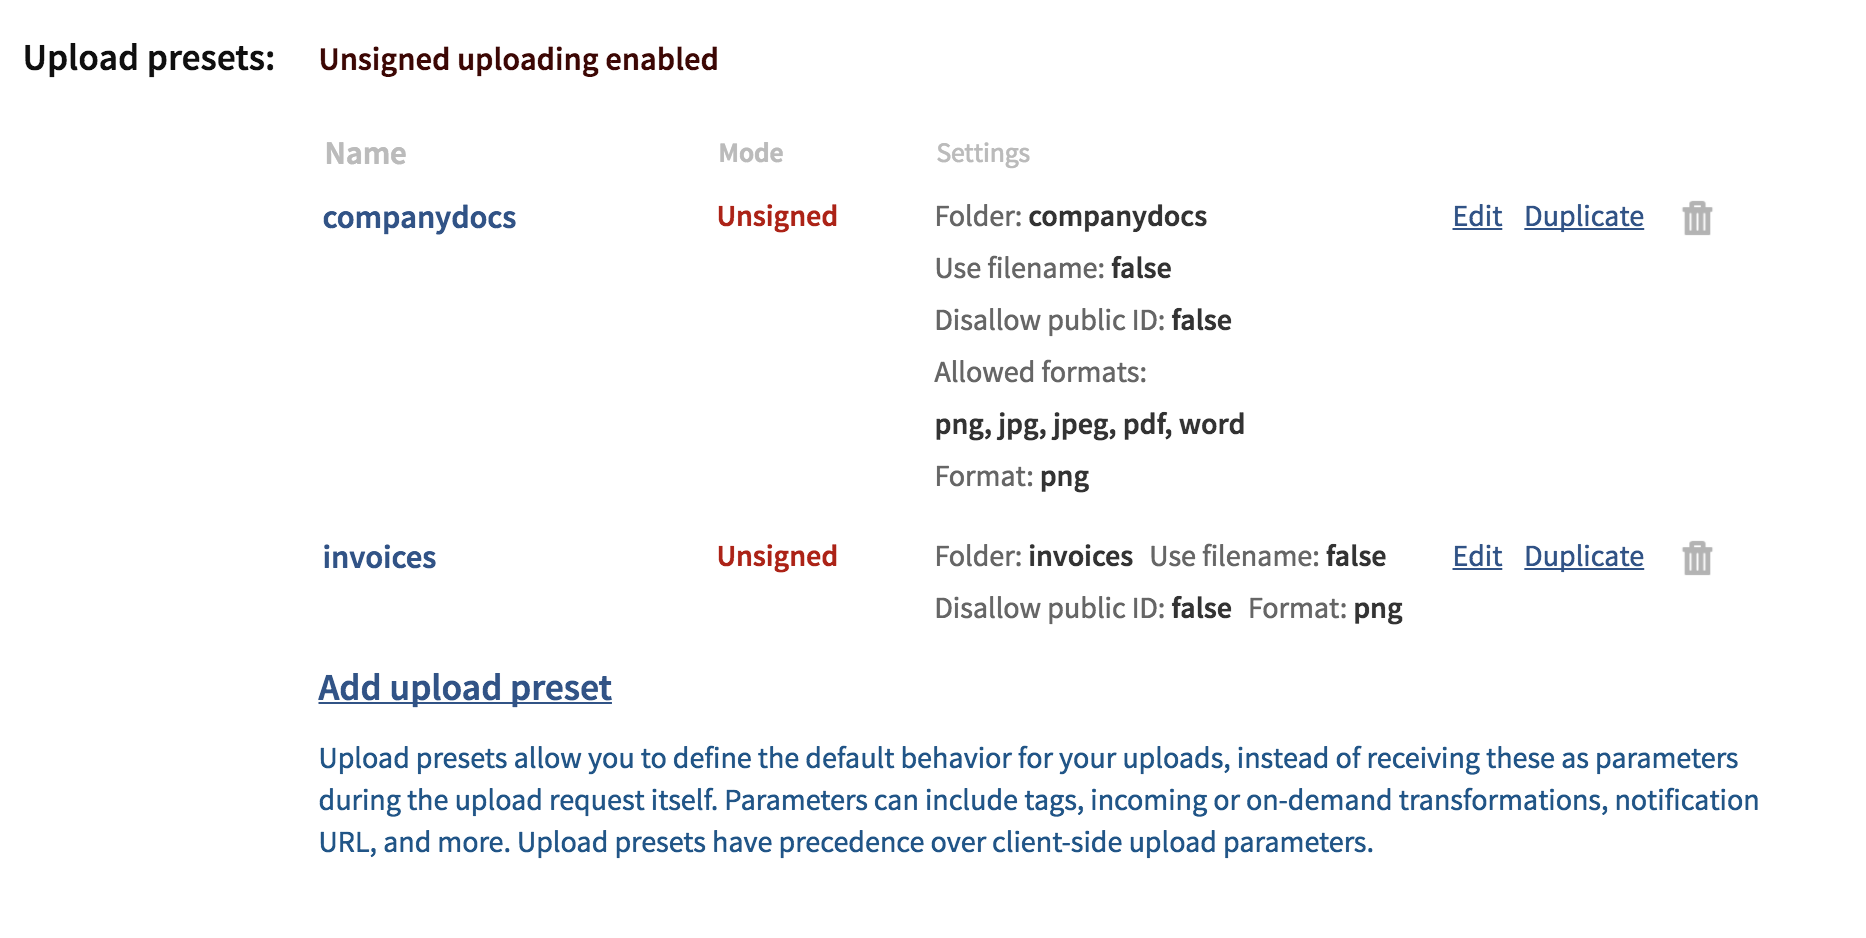
Create two folders: one called invoices and the other called companydocs.
-
Create two upload presets with the following settings:
Front End
Open a new Terminal window (keep the other windows open) by pressing <kbd>CMD</kbd> + <kbd>T</kbd>
Now type:
$ cd ..
to go back a folder and then:
$ cd frontend
to move to the front end folder.
Make a new .env file by entering in Terminal:
$ touch .env
and copy the following inside:
REACT_APP_STRIPE_DEV_PUBLISH=
REACT_APP_SERVER_URL=http://localhost:8080
Fill in the STRIPE_DEV_PUBLISH with your test publishable key from your stripe dashboard; then run:
$ yarn install
You should have 3 terminal windows running:
-
Cherri/backend.
-
Mongodb.
-
Cherri/frontend.
Type into Terminal:
$ yarn start
to start the website.
<a name="tools"/>
2. TOOLS & METHODOLOGIES
</a>Linter 
We chose to use the following Linter: https://standardjs.com/
It is well documented, it has auto enforcement on save and it works with es6. Controversially, it removes semicolons, but this appears to be becoming standard practice in the industry. As a result, you can never start a line with (, [, or `
Technologies Used
(Marked in bold)
This project was built with: node.js and Mongodb with mongoose for the server and create-react-app for the frontend.
We discussed among the team early in development about using Firebase as our database, but after consulting several other developers, we found that it didn't really add any value to our application (and indeed, increased the learning curve).
Some other dependencies we used include Bootstrap-React for our frontend design elements and React-router-dom for all our routing, which allows for a seamless flow between pages.
Image Uploads
For image upload, we used the Cloudinary upload widget, which allows for quick and easy access to your Cloudinary account (and allows third party users to upload direct to your Cloudinary account without requiring authorisation) and with some skillful tinkering, we were able to manipulate the uploaded file names to suit our needs.
Authentication
Passport combined with JWT tokens were used for authenticating the user on the frontend.
Stripe
It was decided early on in development to use Stripe as the payment mechanism, as it would provide a platform for easy transfers between our client and the factories using the application. Stripe Connect allows payments to be made between the client and others via the website.
There were some serious errors encountered with this, which began because we added authentication late in the game. Stripe Connect is designed to be the initial Oauth flow where the factory would sign in via Stripe, and then you would add their details from Stripe back into your database. Unfortunately, because our users have access to direct deposits (and Stripe is non-compulsory), this caused problems for us.
The Stripe connect performs a handshake with stripe servers where we send a GET request to stripe(via and approved link associated with our website), then they send back an authorization code, which must be send back to stripe on a POST, and after that they return a stripe_id associated with a user, which is essentially a bank account number for the client.
As we based the entire application on React-Router, once we clicked on the link to goto stripe, we refresh the page and lost our state, and we were also not able to pass any information about the current_user after going away from our site and essentially coming back without any data.
We were able to save state of the current user email, only to have the entire process uprooted by stripe changing params on the requests to their endpoint.
In the end we were able to make payments via our customised invoice dashboard, but the recipients had to be hardcoded, as we could not dynamically update the database to have our stripe id, because the connect code was on our backend server, and the authentication token made from our email, is on the front end.
<a name="businessproblem"/>
3. BUSINESS PROBLEM
</a>Our client, Winsome Stock, seeks to create an online web application platform where manufacturers can create an account to upload their unpaid invoices (up to a limit of US$3 million), proof of delivery documents (signed by their end customer) and a signed Account Receivables Sale & Purchase Agreement. These documents can then be reviewed by Winsome Stock, which can immediately purchase the unpaid invoices at a specified percentage of the invoice value. While we understand that in the future, Winsome Stock would prefer to set the percentage based on the risk profile of the manufacturer and its end customer, it is agreed that the current iteration of the platform will set the purchase amount at 90% of the invoice value.
Ideally, verification of both the manufacturer and the invoice authenticity would be done online through automated systems implemented on the platform (for example, through document recognition soft
