EmberGL
EmberGL - 2D/3D graphics library featuring a tiled software rasterizer.
Install / Use
/learn @EmberGL-org/EmberGLREADME
![]()
Overview
EmberGL (Ember Graphics Library) is a low-level open source graphics library, similar to OpenGL/DirectX/Vulkan, designed for real-time 2D/3D rendering on MCUs and other memory constrained non-GPU systems. The graphics API has been specifically designed for such systems, utilizing modern techniques to be able to maximize rendering performance within tight memory budgets, while providing a lot of flexibility and customizability. The library can be also useful on other targets with more generous budgets, for projects which benefit from software rasterization, and can be compiled for example with Visual Studio and GCC. Because EmberGL is a low-level library, it provides only the core rendering functionality of flexible and efficient triangle rasterization, along with supporting components and a set of display drivers. These low-level features can be used either for direct application development or development of efficient higher level graphics libraries, such as GUI libraries or 3D engines.
The library features a tile-based software rasterizer, which enables flicker-free rendering without requiring RAM for the entire display frame & depth buffers, thus expands the applicability of the library to a wider set of devices & projects. Tile-Base Rendering (TBR) architectures are commonly used on mobile devices and also on some desktop GPUs mainly due to the memory bandwidth benefits (more info on Arm Developer website). The TBR engine of EmberGL can be customized for wide range of memory and performance requirements by configuring the rasterizer properties such as the tile size, depth buffer format, intermediate tile pixel format, etc.
EmberGL supports various fixed-function pipeline features, such as a set of depth tests, triangle culling modes, triangle interpolation modes, etc. In addition to the fixed-function features, the library also supports C++ programmable blending and vertex & pixel shading stages for custom geometry and lighting effects. To obtain high performance while supporting a flexible set of features, the rasterizer extensively utilizes C++ templates to generate optimized rasterizers for each set of utilized features during program compilation time. This eliminates any unused feature branching and tightly embeds shader code to the rasterizer, resulting in optimized rasterizers for each used combination of features & shaders.
In addition to the rasterizer, EmberGL provides a growing set of optimized display drivers to efficiently deliver the rasterized pixels to the display. For example, the library contains optimized display driver for popular ILI9341 display with DMA support. The set of drivers can be extended by implementing a narrow device interface, which hooks new drivers to the rasterizer, where the main implementation focus is the device initialization and pixel data transfer without having to worry about the rasterizer complexities.
Getting Started
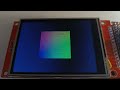
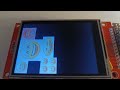
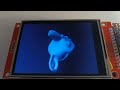
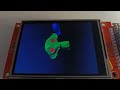
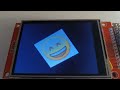
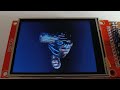
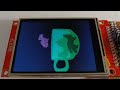
The easiest way to get started with EmberGL is to check out examples. The examples are provided as verbosely commented Arduino .ino files, and for anyone not familiar with Arduino, the .ino files are just C++ code where setup() function is executed once in the beginning of the program and loop() function is executing in an infinite loop once per frame. The first example shows how to setup display hardware and initialize the accompanying graphics device, and then proceed with increasing complexity in the further examples. Even though some examples may appear boring, it's good to check them in order, because they progressively explain more concepts that are not necessarily explained again in the latter examples. You can find videos of each example in EmberGL Examples playlist to know what to expect, or click video thumbnails below:


Geometry and Rasterization Pipeline
The EmberGL rasterizer processes the geometry in triangle clusters (a.k.a. meshlets) where each cluster contains some small number of vertices and triangles (e.g. <=64 vertices and <=128 triangles). This is important to optimize both performance and RAM usage of the rasterizer, and to minimize vertex and pixel processing. For 3D geometry, EmberGL supports P3G file format that can be generated with Meshlete tool, which splits 3D models in OBJ/FBX/DAE/etc. format to clusters and exports the clustered models as P3G file that can be used with the provided p3g_mesh class. The tool also calculates cluster bounding volumes and visibility cones that are used by the rasterizer to optimize rendering. The P3G format has been designed so that the data can be loaded as a binary blob to memory and requires no post-load processing for rendering. On MCU's this enables storing and rendering the geometry straight from the flash memory without RAM usage, thus enables rendering complex 3D models with a small RAM budget. On other platforms the file can be simply loaded to a dynamically allocated memory block and initialized in place making the loading very efficient.
Objects are dispatched for rasterization using graphics_device::dispatch_pso() function (more details about PSCs and PSOs in a chapter below). When the function is called, the object clusters go through a programmable cluster setup stage where they can be culled (e.g. with visibility cones) and then binned to screen tiles (e.g. 64x64px tiles) based on their bounding volumes. Once all the geometry for a frame has been dispatched to the device, calling graphics_device::commit() (with an optional tile shader) triggers the rasterization of the tiles. The tiles are rasterized one by one to the tile buffer containing up to 4 render targets, a depth buffer and Hi-Z buffer, and after completing each tile the results are transferred to the display frame buffer. This means that the rasterizer requires render target and depth buffer memory only for a single tile and not for the entire frame buffer. Upon the transfer, the tile pixels are converted from the intermediate tile pixel format to the native display frame buffer format, or alternatively the tile shader is executed to perform custom pixel processing and format conversion. During tile rasterization, the clusters that are binned to the tile are rasterized in the dispatch order and the bounding volume of each cluster is first tested against tile Hi-Z for occlusion. Hi-Z is a low-resolution representation of the depth buffer that can be used for fast region depth test. Clusters that fail the test are rejected and thus skip both vertex transform and rasterization, while the passing clusters go through cluster vertex transform with the associated vertex shader, or previously cached transformed vertices are fetched from the post-transform vertex cache (v-cache). The result of the vertex transform is then potentially stored to v-cache for reuse by other tiles that have the same cluster binned, thus reducing the vertex transform cost. After this the passing cluster triangles go through the rasterization with the associated pixel shader.
The rasterizer complies to top-left rasterization rule to ensure that pixels at the shared edges of adjacent triangles are rasterized exactly once. This is particularly important for proper render target blending (e.g. additive or alpha blending) so the triangle edges don't suffer from pixel overdraw artifacts. Upon triangle rasterization, the rasterized pixels are tested against depth buffer with the selected depth test. Pixels that pass the test execute a programmable pixel shader function which takes the three transformed vertices of the triangle along with barycentric coordinates of the pixel as arguments. The pixel shader can be used to implement custom lighting effects and the barycentric coordinates are used to interpolate post-transform vertex attributes exported from the vertex shader (e.g. texture coordinates or colors). Finally the pixel shader exports the result, potential to Multiple Render Targets (MRT), and the result goes through the programmable blending stage (e.g. opaque, alpha, additive blending).
To minimize vertex and pixel processing with EmberGL it's a good strategy to render opaque objects in increasing distance from the camera, i.e. sort PSOs by camera distance before dispatching. This way clusters are more likely occlusion culled by previously rasterized clusters in the frame and thus eliminate vertex transform and triangle rasterization cost. The pixels of rasterized clusters are also more likely culled by the depth test thus eliminating the pixel processing cost. It's also recommended to apply visibility cone culling during cluster rasterization setup stage, because that will potentially skip the tile binning and the occlusion testing cost for a small cul
