Fyi
Map & Explore your organization's System Architecture
Install / Use
/learn @CondeNast/FyiREADME
Archiving: Abandoned
💁 FYI
Map and Explore your organization's System Architecture
![]()
Proudly built by:
<a href="https://technology.condenast.com"><img src="https://user-images.githubusercontent.com/1215971/35070721-3f136cdc-fbac-11e7-81b4-e3aa5cc70a17.png" title="Conde Nast Technology" width=350/></a>
🤔 Introduction
The FYI application was built by the Architecture Team at Condé Nast to stay on top of their growing technology portfolio of systems (sites, apps, apis) distributed across hundreds of repositories in multiple GitHub organizations.
This application has two parts:
- a Github App to discover code repositories and request FYIs from developers
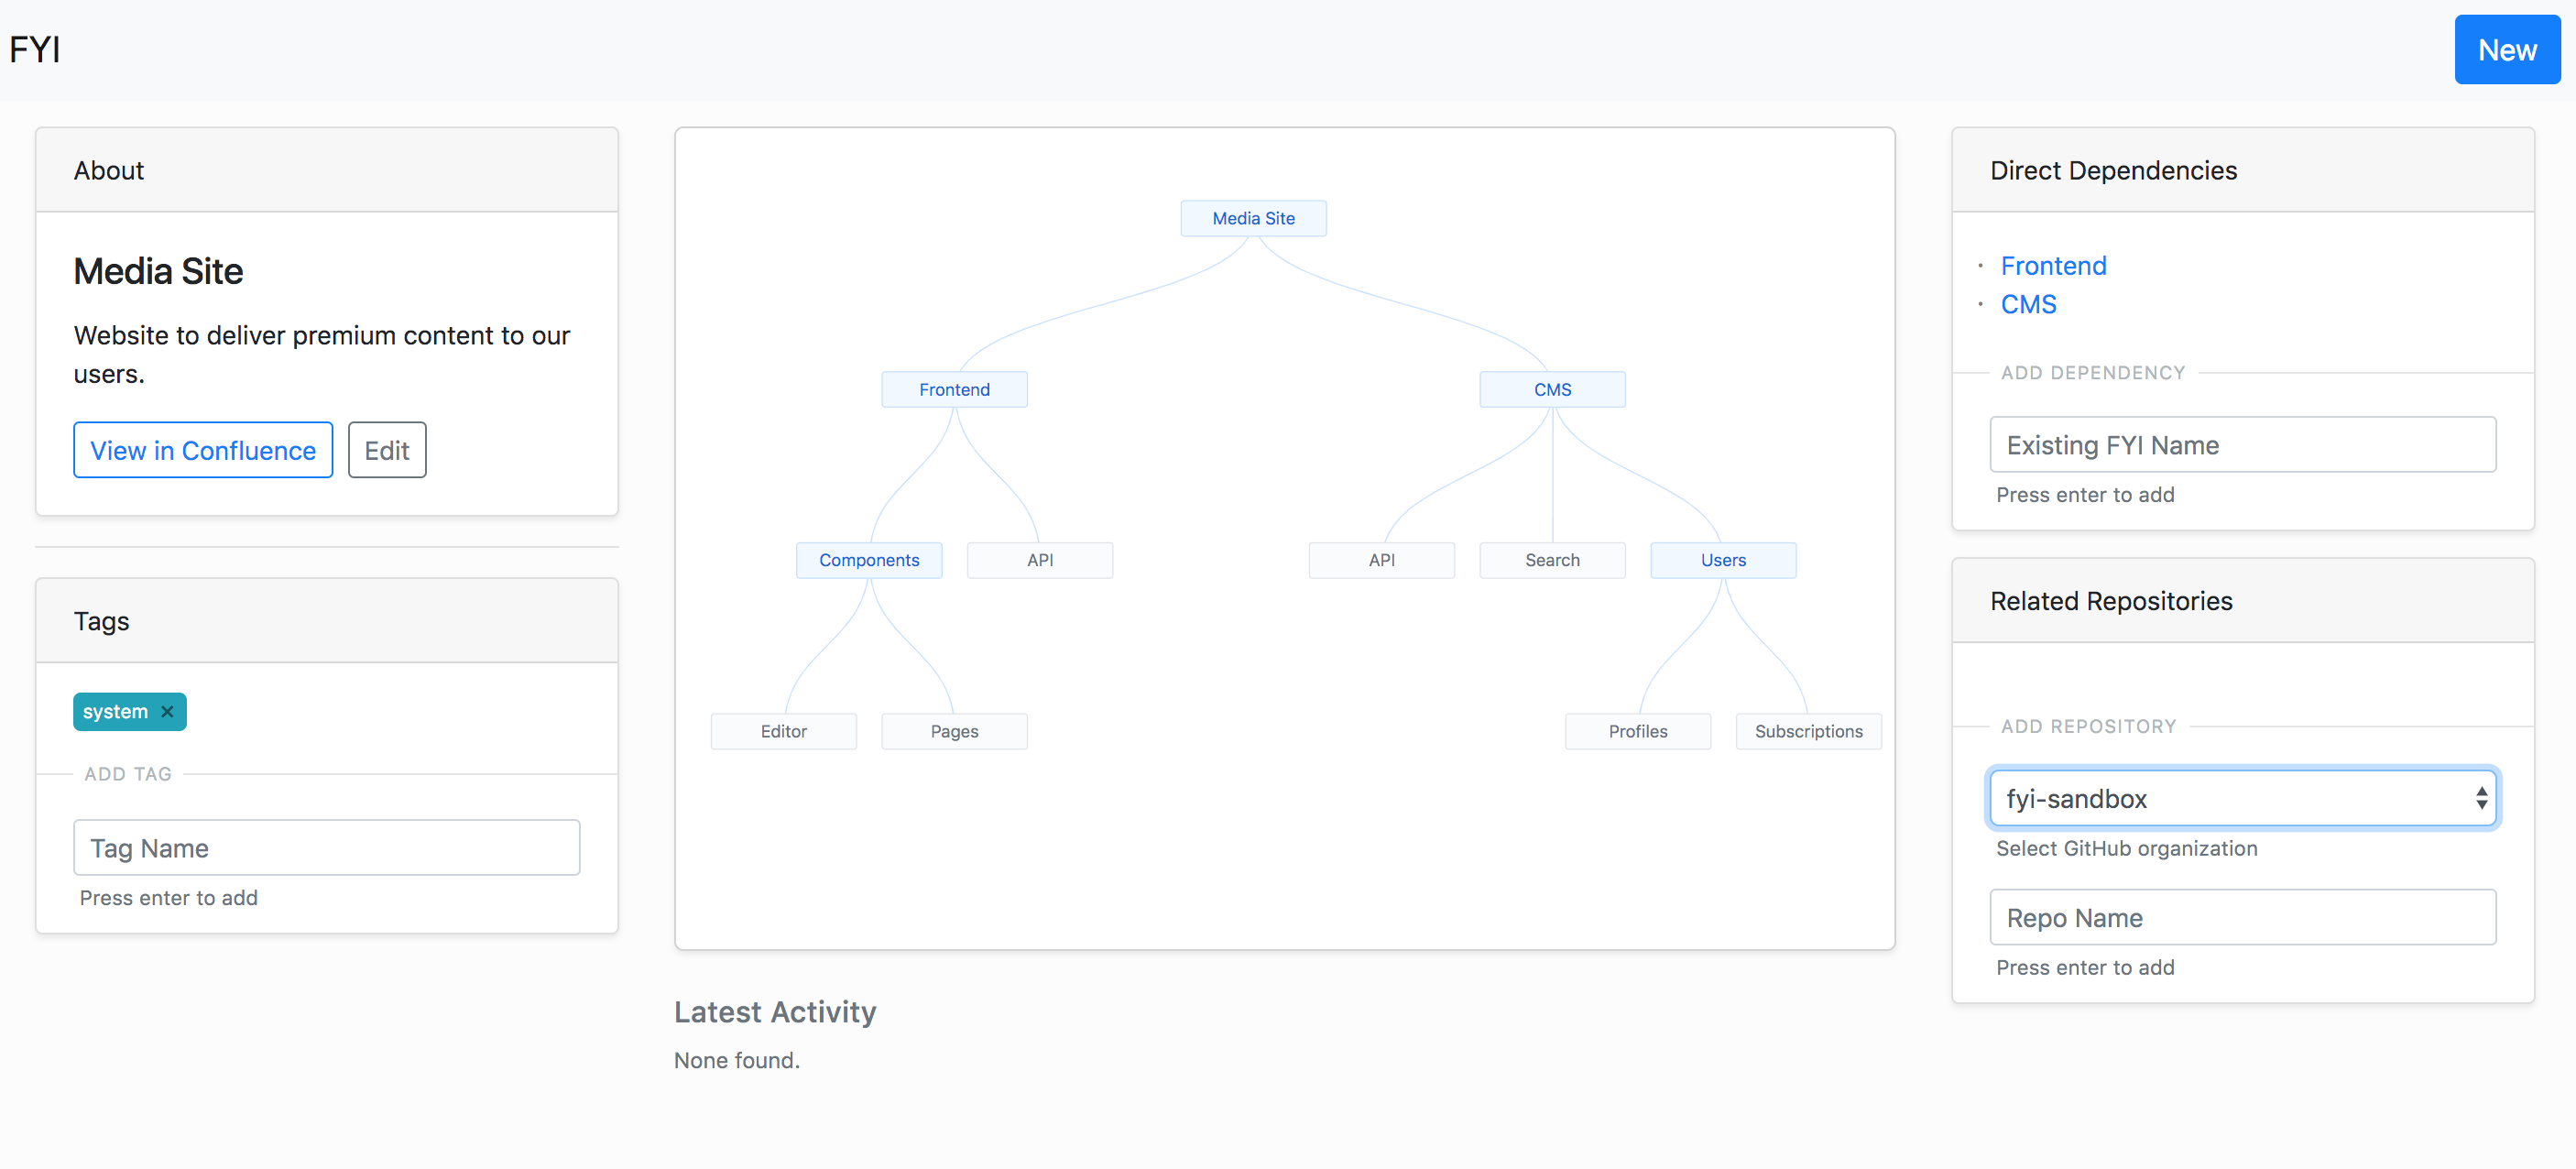
- a Web App to view interactive architecture diagrams with system dependencies and metrics
🔨 Built Using
- Probot (Github App Framework)
- Create React App
- Postgres SQL
- Vault
- Integrations with: Confluence, Slack, Datadog
👨🔧 Install
🔧 Step 1: Setting Up Services
The goal of this step is to setup the required services for the FYI application, and populate the files in the config directory.
A note about configurations
The configuration is split across 2 files: default.js and secrets.json.
default.js stores non-sensitive configuration settings and feature flags. Since we use node-config, these defaults can be overidden by the environment specific files: staging.json and production.json.
secrets.json stores sensitive account information like app keys and api tokens. The application first tries to use node-vault to connect to a Vault instance and get the secrets, incase it fails to do so, it uses the secrets.json. The instructions below guide you towards creating your own secrets.json to start the application. If you later want to move it to a secure and shareable location, consider setting up Vault and moving the secrets there.
Lets get started...
- Create a secrets file
- Run
cp config/secrets.json.example config/secrets.json
- Run
- Create a web proxy url
- Go to
https://smee.io/new - In
secrets.json, copy this smee channel url as the value forwebhook-proxy-url
- Go to
- Create a Github Org
- If you do not have a GiHub organization, go to
https://github.com/organizations/newto start a new one - In
default.js, add your organization name to thegithub.subscribedOrgslist &github.adminOrg
- If you do not have a GiHub organization, go to
- Create & Install a Github App
- Go to
https://github.com/settings/apps/newand create a new Github App - Set
Application Nameas per your choice, can be something likearchbot-test-<random number> - Set
Homepage URLas per your choice, this will not be required for the application to work - Set
Webhook URLto the webhook proxy url from above - Set
Webhook secretas per your choice and then insecrets.jsoncopy this as the value forwebhook-secret - Update your Github App's permissions:
- Read Only permission for: Repo Administration, Repo Metadata, Repo Webhooks, Commit Statuses, Org Members
- Read and Write permission for: Checks, Repository Contents, Issues, Pull Requests,
- Updates your Github Apps' event subscriptions:
- Subscribe to events for: Repository, Issues, Issue Comments
- For "Where can this GitHub App be installed?", choose "Any Account"
- After the App is created, the ID will be listed in the About section. In
.envfile, copy this ID as the value forAPP_ID - Generate a private key and download it. In order to use this key in our code, we will need to replace the carriage returns with
\n. Run this command on your key file:sed -E ':a;N;$!ba;s/\r{0,1}\n/\\n/g' <your-key-file>.pem. Insecrets.jsoncopy the output of thesedcommand as the value forgithub-private-key - Head over to
https://github.com/settings/apps/<your github app name>/installationsand install this application to your organization
- Go to
- Create a FYI Admin GitHub repository
- Go to
https://github.com/organizations/<your github org name>/repositories/newand create a new repository calledfyi-admin
- Go to
- Create a Confluence Account, Space and Page
- If you do not have a Confluence account, sign up for a free account here: https://www.atlassian.com/software/confluence/try
- After account creation, you will be prompted to create a space (you can name it Arch)
- After space creation, you will be prompted to create a page (you can name it FYIs). On this page, using "Insert More Content" dropdown, select "Other Macros" and add "Children Display".
- In
default.js, add your Confluence Site name (only the part before .attlassian.net) ashostname, your Confluence Space name asspaceKey, and your Confluence Page id asfyiPageId. - Now create a Confluence API token here: https://id.atlassian.com/manage/api-tokens
- In
secrets.json, add you Confluence account email asconfluence-usernameand API token asconfluence-access-token
- Configure Slack channel (optional)
- If you want to disable slack, update
default.jsforslack.enabledto befalse - Install "Incoming Webhooks" for your Slack instance
- Add a configuration for new incoming webhook for posting to your Slack channel
- In
secrets.json, copy the Slack webhook url as the value forslack-webhook-url - In
default.js, set the channel name as value forslack.channel
- If you want to disable slack, update
- Configure Datadog events (optional)
- This integration is a WIP. For now, disable this integration, update
default.jsfordatadog.enabledto befalse
- This integration is a WIP. For now, disable this integration, update
🏃 Step 2: Running With Docker (recommended)
- Pre-requisites: Docker and Docker Compose
- Build Docker Image:
docker build -t fyi-image . - Run Application:
docker-compose up - Open your browser and go to
http://localhost:3001
🚶 Running Without Docker
- Pre-requisites: Node v9+, Postgres SQL v10+
- Create database called
easy-fyi-development npm inpm run install:clientnpm start- Open your browser and go to
http://localhost:3001
🚀 Usage
🆕 Creating a new FYI
There are 2 ways to create a new FYI:
- On the FYI homepage, click on the
Newbutton, add the FYI name and clickSubmit. This will create a FYI page for you to add dependencies, repositories and tags. - If a new repository is created or identified, then the
Request FYIcommand by Admins will create a new FYI.
🔀 Adding a Dependency to FYI
A dependency for a FYI can only be from a set of other existing FYIs. A new dependency can be added through that FYI's detail page in the toolbar.
ℹ️ Adding a New Repository to FYI
When a new repository is created in the GitHub organization, the bot automatically detects it and sends a notification to the Admins who can choose to Request a new FYI or Request to link to FYI from the repository owner directly through Github issues.
🈁 Adding a Existing Repository to FYI
A request to add an existing repository can be submitted through the FYI's detail page in the toolbar. This triggers a notification to the Admins who can choose to pass the request to the repository owner or skip it.
⏹ Adding a Tag to FYI
A new tag can be added through the FYI's detail page in the toolbar.
🙏 Thanks
We would like to thank the Probot team and community for giving us a solid foundation of code and inspiration on top of which we could build this application.
👨🏭 Contributors
See the list of contributors who participated in writing this tool.
Related Skills
feishu-drive
335.8k|
things-mac
335.8kManage Things 3 via the `things` CLI on macOS (add/update projects+todos via URL scheme; read/search/list from the local Things database)
clawhub
335.8kUse the ClawHub CLI to search, install, update, and publish agent skills from clawhub.com
yu-ai-agent
1.9k编程导航 2025 年 AI 开发实战新项目,基于 Spring Boot 3 + Java 21 + Spring AI 构建 AI 恋爱大师应用和 ReAct 模式自主规划智能体YuManus,覆盖 AI 大模型接入、Spring AI 核心特性、Prompt 工程和优化、RAG 检索增强、向量数据库、Tool Calling 工具调用、MCP 模型上下文协议、AI Agent 开发(Manas Java 实现)、Cursor AI 工具等核心知识。用一套教程将程序员必知必会的 AI 技术一网打尽,帮你成为 AI 时代企业的香饽饽,给你的简历和求职大幅增加竞争力。
