MixedRealityStarterKit
Children's Research Institute's Mixed Reality Starter Kit is a reusable collection of C# scripts and Unity prefab assets that can be used to publish HoloLens apps that display interactive 3D holograms with little to no programming or scripting knowledge.
Install / Use
/learn @ChildrensMercyResearchInstitute/MixedRealityStarterKitREADME
Introduction
The Mixed Reality Starter Kit is a reusable collection of C# scripts and Unity prefabricated assets (prefabs) that can be used to quickly develop and publish HoloLens apps that display interactive 3D holograms with little to no programming or scripting knowledge. The kit's user interfaces include visual buttons, hand gestures, and voice commands for model rotation, resizing, hiding, and showing portions of a model.
If you're new to Unity and HoloLens, try our MixedRealityStarterKitDemo project for Unity 2018, available at the link below. The demo project will familiarize you with the basic workflow of publishing a HoloLens app without going into the details of building a project, scene, and app from scratch.
- https://github.com/ChildrensResearchInstitute/MixedRealityStarterKitDemo
Working App Demo Videos:
- https://www.youtube.com/watch?v=O6x1AsDEqno
- https://www.youtube.com/watch?v=CEtRWAKekWA
- https://www.youtube.com/watch?v=0jjTI3yN78w
Software Dependencies
-
Microsoft Windows 10 with Fall Creator's Update installed.
-
HoloLens Developer Mode enabled. Read how to enable Developer Mode here: https://docs.microsoft.com/en-us/windows/mixed-reality/using-visual-studio
-
Unity 2018.2.16f1, available here: https://unity3d.com/get-unity/download/archive
- Developing for HoloLens usually requires a specific version of Unity. We've found Unity 2018.2.16f1, available at the link above, to work best with this project.
- Unity is offered in a variety of paid and free (also referred to as Unity Personal) licensing scenarios.
- It's best to check with your IT administrators in regards to whether you need a paid license before downloading at your organization.
- You are allowed download and run past versions of Unity from the Unity Download Archive with either a paid or a free license.
- Additional Unity licensing information is available here: https://store.unity.com/
- To get started with a free Unity Personal license:
- Visit this link https://store.unity.com/download?ref=personal
- Accept the Terms of Service.
- Scroll down and click the "Older Versions of Unity" link near the bottom of the page.
- In the Unity Download Archive, scroll down to Unity 2018.2.16 (15 Nov, 2018), click the Downloads (Win) dropdown, and select Unity Installer.
- If needed, you or your IT administrator can install multiple versions of Unity on your PC by customizing the installation path during the initial install by adjusting the "Unity install folder." We tend to have 2 or 3 versions of Unity installed at any given time while we test out newer versions of Unity with our existing source code, so our standard is to name the install folder after the specific Unity version it will contain.
- This screenshot shows a custom install path for Unity 2018.2.16f1:
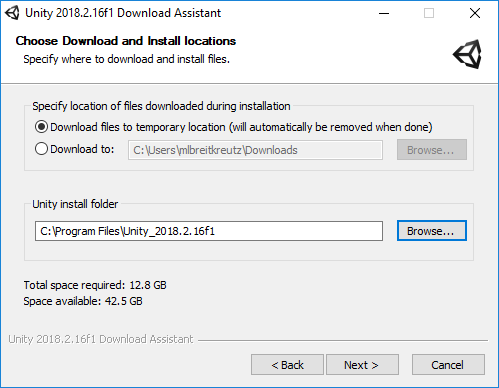
- Developing for HoloLens usually requires a specific version of Unity. We've found Unity 2018.2.16f1, available at the link above, to work best with this project.
-
Visual Studio 2017 or higher, available here: https://www.visualstudio.com/downloads/
- Select the option to install Universal Windows Platform development tools when prompted by Visual Studio installer.
-
Microsoft Mixed Reality Toolkit for Unity version 2017.4.2.0, available here: https://github.com/Microsoft/MixedRealityToolkit-Unity/archive/2017.4.2.0.zip
Hardware Requirements
- Windows 10-compatible PC with sufficient resources for software dependencies above.
- Microsoft HoloLens - you can also use the HoloLens Emulator, available for Visual Studio 2017 here: https://docs.microsoft.com/en-us/windows/mixed-reality/using-the-hololens-emulator
Getting Started
In this guide, we will step through building a HoloLens app from start to finish in Unity 2018 and Visual Studio 2017. These steps include:
- Setting up Unity for HoloLens development by creating a new project, installing Microsoft's HoloToolKit, and installing Children's Research Institute's Mixed Reality Starter Kit
- Configuring a new Unity project for HoloLens
- Configuring a new Unity scene for HoloLens
- Adding the Mixed Reality Starter Kit's prefab UI assets to the scene
- Adding a 3D model to the scene
- Wiring up button, gesture, and voice commands
- Building and deploying your project to HoloLens
-
How to set up MixedRealityStarterKit with a new Unity project
- Clone or download this repository from GitHub.
- Download Microsoft's Mixed Reality Toolkit for Unity version 2017.4.2.0 from https://github.com/Microsoft/MixedRealityToolkit-Unity/archive/2017.4.2.0.zip
- Open Unity and create a new project:
- Ensure that the 3D option is selected next to the project's name.
- Tip: Keep folder paths and project names short and do not include spaces in your project's name. Unity struggles with long file paths and file names as well as spaces in those paths.
- Example Project Name: MixedRealityStarterKitDemo
- Example Location: c:\u\
- Unity will create a folder based on your project name and build a folder structure and standard files for your new project inside the project's folder.
- For the example project name and location above, the folder hierarchy will look like this:
C:\u\MixedRealityStarterKitDemo\ ├───Assets ├───Library ├───Packages ├───ProjectSettings ├───Temp MixedRealityStarterKitDemo.sln-
Use Windows Explorer to copy the HoloToolkit folder from the Microsoft Mixed Reality Toolkit's Assets folder into your new project's Assets folder:
- In Windows Explorer, navigate to the extracted location of Microsoft's Mixed Reality Toolkit.
- Open the Assets folder at the root of the Mixed Reality Toolkit folder hierarchy.
- Copy the HoloToolkit folder.
- Navigate to the the location of your new Unity project.
- Double-click on the project's folder.
- Double-click on the Assets folder inside the project's folder.
- Paste the copied HoloToolkit folder into the project's Assets folder.
-
Use Windows Explorer to copy the MixedRealityStarterKit folder from this git repo into your new project's Assets folder:
- In Windows Explorer, navigate to the extracted location of this git repo.
- Copy the MixedRealityStarterKit folder.
- Navigate to the location of your new Unity project.
- Double-click on the project's folder.
- Double-click on the Assets folder inside the project's folder.
- Paste the copied MixedRealityStarterKit folder into the project's Assets folder.
-
Switch back to Unity, where you may see a progress bar, indicating you need to wait for Unity to complete processing the files within the HoloToolKit and MixedRealityStarterKit folders. Once all progress bars complete, you can proceed to project configuration.
-
Configuring a new Unity project for HoloLens
-
In Unity, remove the TextMeshPro software package from the project:
- Click the Window menu at the top of the screen and select Package Manager
- In the Packages window, click the "In Project" tab
- Click once on TextMesh Pro
- Click the Remove button near the top right corner of the window
- Once the progress bar completes, close the Packages window
- Click File -> Save Project
-
In Unity, apply Mixed Reality Settings to the project:
- Click the Mixed Reality Toolkit menu at the top of the screen and select Configure -> Apply Mixed Reality Project Settings.
- In the Apply Mixed Reality Settings window, click the Apply button to apply these settings to your project. This readies the project to be built into a Visual Studio solution that can then be built and deployed to the HoloLens.
- Click on Unity's file menu and select Save Project.
-
-
Configuring a new Unity scene for HoloLens
- In Unity's Hierarchy panel, located on the left side of the screen, delete Main Camera and Directional Light:
- Right click on the words Main Camera and select Delete from the menu that appears.
- Right click on the words Directional Light and select Delete from the menu that appears.
- Apply Mixed Reality Scene Settings to your scene:
- Click the Mixed Reality Toolkit menu at the top of the screen and select Configure -> Apply Mixed Reality Scene Settings.
- In the Apply Mixed Reality Scene Settings window, click the Apply button to apply these settings to your scene. This step adds HoloLens-specific objects to the scene's hierarchy: MixedRealityCameraParent, DefaultCursor, and InputManager.
- Add UWP (Universal Windows Platform) capabilities to your scene:
- Click the Mixed Reality Toolkit menu at the top of the screen and select Configure -> Apply UWP Capability Settings.
- Check the box next to Microphone, this enables your app to hear voice commands via the HoloLens' microphone.
- Uncheck the box next to Spatial Perception. We don't use that capability in this app.
- Click on Unity's File menu and select Save Scene.
- In Unity's Hierarchy panel, located on the left side of the screen, delete Main Camera and Directional Light:
-
Adding Mixed Reality Starter Kit's prefab UI assets to your scene
- In Unity's Project panel, located in the bottom left of the screen, click the Assets folder
- In the Assets list that appears to the right of the Project panel, double click MixedRealityStarterKit.
- In the list that appears, double click the Prefabs folder.
- In the list that appears, click and drag the "MixedRealityStarterKit Lighting" item into the Hierarchy panel in the top left corner of the screen and drop it into the list below InputManager.
- Click and drag the MixedRealityStarterKitUI item into the Hierarchy panel and drop it into the list below MixedRealityStarterKit Lighting.
- The Hierarchy panel should now have the following elements listed, and you will likely see the visible Mixe

Languages
Security Score
Audited on Feb 5, 2026