ByteBuffer
ByteBuffer with C++.
Install / Use
/learn @CPythoner/ByteBufferREADME
[TOC]
ByteBuffer 介绍及 C++ 实现
之前的工作中遇到过需要打包数据然后通过 USB 发送的功能,当时写了一个简单的类用来存入各种类型的数据,然后将其 Buffer 内的数据发送,接收到数据后通过它的方法再取出各种类型的数据。后来接触到了 Java 的 ByteBuffer,发现两者功能大致相同。本文会用 C++ 实现 ByteBuffer 的大部分功能。
1. ByteBuffer 介绍
ByteBuffer类位于java.nio包下,它是一个字节缓存区,提供了一些 put 和 get 方法,可以方便的将一些数据放到缓存区或者从缓存区里读取某种类型的数据。ByteBuffer 的底层存储结构是数组,所有的操作都是基于该数组的操作。
以下内容结合 Java 版本 ByteBuffer 的原理以及 C++ 实现进行讲解。
2. ByteBuffer 的成员变量
2.1 几个位置变量
| 变量名称 | 含义 | | -------- | ------------------------------------------------------------ | | position | 表示从写入或者读取的位置。 | | limit | 处于写入状态时,limit 和 capacity 相等;处于读取状态时,表示数据索引的上限,也就是实际存放了多少数据。 | | mark | 标记读取数据的起始位置,便于后续回退到该位置。 | | capacity | 表示 ByteBuffer 的容量,也就是可以存放的最大字节数。 |
这四个变量之间的关系可以表示为:mark <= position <= limit <= capacity。
数据的存入和读取只会影响 position,不会影响 limit。
在 C++ 实现中,设置如下成员变量:
int32_t  mark_;
uint32_t limit_;
uint32_t position_;
uint32_t capacity_;
提供如下三个方法分别获取 capacity、position、limit:
uint32_t capacity() const;
uint32_t position() const;
uint32_t limit() const;
提供如下两个方法可以重新设置 limit 和 position:
ByteBuffer& limit(uint32_t newLimit);
ByteBuffer& position(uint32_t newPosition);
2.2 缓存区
前面已经提到,ByteBuffer 提供一个缓存区来存储数据,在 C++ 实现中,使用一个 uint8_t 类型的数组进行数据的存储。在 ByteBuffer 类创建时申请空间,在 ByteBuffer 类销毁时释放空间。
uint8_t* p_buffer_;
2.3 ByteBuffer 名称
为了打印时的美观,为每一个 ByteBuffer 设置一个名称,该名称为 ByteBuffer 类的一个成员变量,在类创建时设置,默认为空:
std::string name_;
3. 创建 ByteBuffer
java.nio.Buffer 类是一个抽象类,不能被实例化。Buffer类的直接子类,如ByteBuffer等也是抽象类,所以也不能被实例化。但是 ByteBuffer 类提供了4个静态工厂方法来获得 ByteBuffer 的实例:
allocate(int capacity)allocateDirect(int capacity)wrap(byte[] array)wrap(byte[] array, int offset, int length)
C++ 版本做了一下简化,提供两个构造方法进行创建。
3.1 创建指定大小的空的 ByteBuffer
// Default size of the buffer
#define DEFAULT_BUFFER_SIZE 2048

ByteBuffer(uint32_t capacity = DEFAULT_BUFFER_SIZE, const char* name = "")
    : mark_(-1),
    limit_(capacity),
    position_(0),
    capacity_(capacity),
    name_(name)
{
    p_buffer_ = NULL;
    p_buffer_ = (uint8_t*)calloc(capacity_, sizeof(uint8_t));
}
如果创建时未指定 capacity ,默认大小为 2048 字节。
3.2 从一个数组创建指定大小的 ByteBuffer
ByteBuffer(uint8_t* arr, uint32_t length, const char* name = "")
    : mark_(-1),
    limit_(length),
    position_(0),
    capacity_(length),
    name_(name)
{
    p_buffer_ = NULL;
    p_buffer_ = (uint8_t*)calloc(capacity_, sizeof(uint8_t));

    putBytes(arr, capacity_);
    clear();
}
putBytes() 方法负责将一个现有数组的指定长度存到 ByteBuffer 中,后面会对该方法做介绍。
3.3 析构方法
析构方法主要作用是释放已经申请的内存:
~ByteBuffer()
{
    if (p_buffer_)
    {
        free(p_buffer_);
        p_buffer_ = NULL;
    }
}
4. 状态相关
申请一个容量为 10 的 ByteBuffer bf,以下演示都基于 bf。
4.1 初始状态
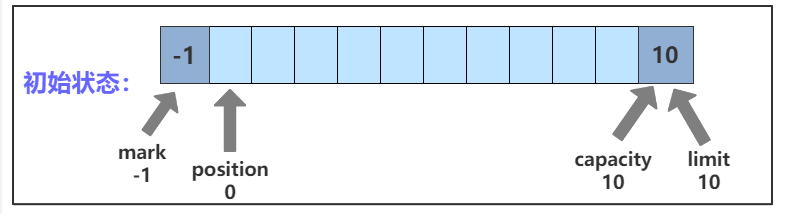
初始状态下,四个变量的值分别为:
- mark:-1
- position:0
- limit:10
- capacity:10
将 ByteBuffer 置为初始状态的方法:
- ByteBuffer 创建之后调用其它方法之前就是初始状态
- 调用
clear()方法可以重置到初始状态。
clear() 方法的 C++ 实现如下:
ByteBuffer& clear()
{
    position_ = 0;
    mark_     = -1;
    limit_    = capacity_;
    return *this;
}
4.2 写入状态
假设向 bf 写入 hello 几个字符,此时四个变量的状态如图所示:
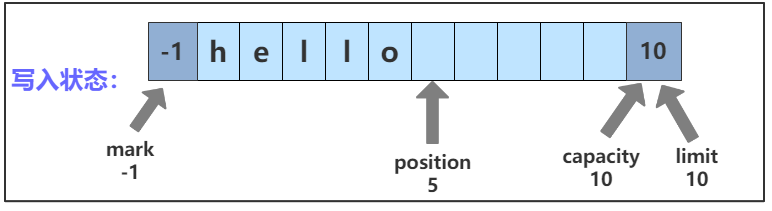
position 会随着数据的写入而后移。
将 ByteBuffer 置为写入状态的方法:
- ByteBuffer 创建之后就是写入状态,可以调用一系列
put方法写入数据;
4.3 读取状态
bf 进入读取状态时四个变量的状态如图所示:
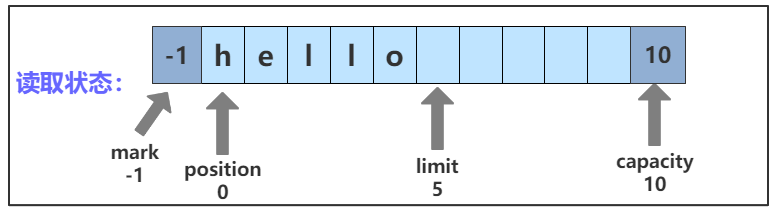
调用一系列 get 方法从 bf 中读取数据,position 随着数据的读取会向后移动,但不会超过 limit。
bf 从写入状态进入读取状态需要调用 flip() 方法,调用 flip() 方法后,limit 被设置为原 position 的值,表示已经存储数据的位置;position 被置为 0。
flip() 方法的 C++ 实现如下:
ByteBuffer& flip()
{
    limit_    = position_;
    position_ = 0;
    mark_     = -1;
    return *this;
}
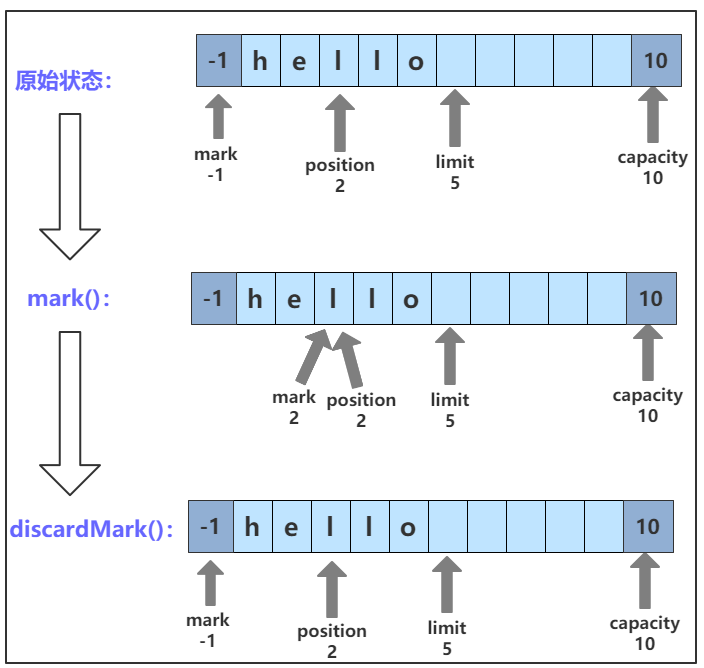
4.4 mark() && discardMark()
这两个方法比较简单,mark() 方法将 mark 值设置为当前的 position ;discardMark() 方法将 mark 重置为 -1。调用 mark() 和 discardMark() 方法后 mark 位置的变化如图所示:
这两个方法的 C++ 代码实现如下:
ByteBuffer& mark()
{
    mark_ = position_;
    return *this;
}

ByteBuffer& discardMark()
{
    mark_ = -1;
    return *this;
}
4.5 reset()
reset() 方法将 position 恢复到 mark 的位置。调用 reset() 方法后的 position 变化如图所示:

reset() 方法的 C++ 实现如下:
ByteBuffer& reset()
{
    if (mark_ >= 0)
        position_ = mark_;

    return *this;
}
4.6 rewind()
rewind() 方法负责将 position 置为 0,将 mark 置为 -1,数据的内容不会改变,一般在把数据重写入Buffer前调用。调用 rewind() 方法后 mark 和 position 的变化如图所示:
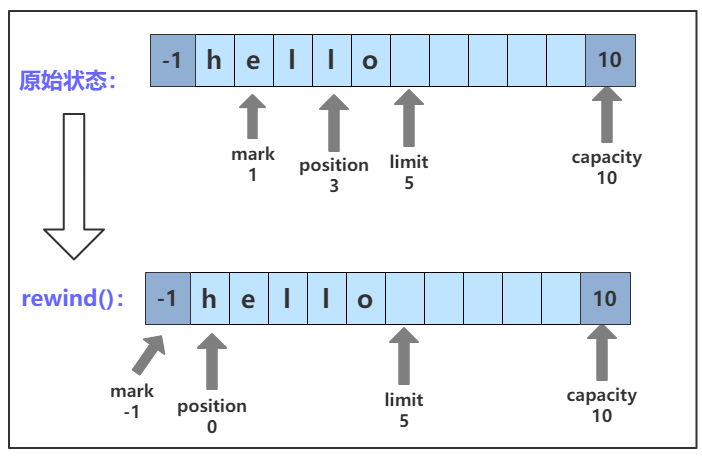
rewind() 方法的 C++ 实现如下:
ByteBuffer& rewind()
{
    mark_ = -1;
    position_ = 0;

    return *this;
}
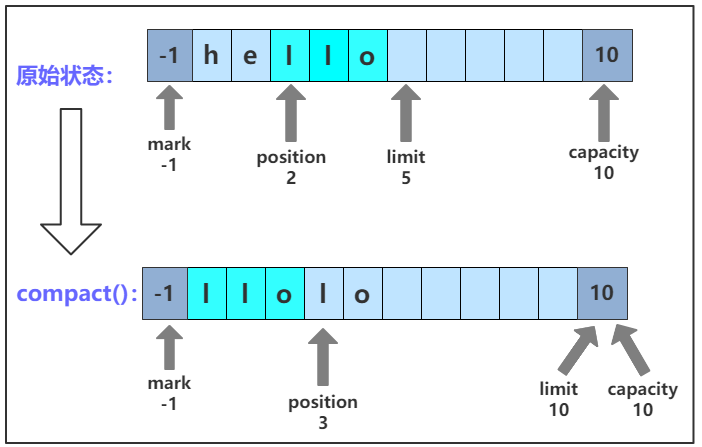
4.7 compact()
压缩缓存区。把缓存区当前 position 到 limit 之间的数据移动到缓存区的开头。也就是说,将索引 p=position() 处的字节复制到索引 0 处,将索引 p+1 处的字节复制到索引 1 处。以此类推,直到 limit - 1 处的字节复制到索引 n=limit-1-p 处。然后将缓存区的 position 设置为 n+1(也就是不能再读取数据了,但是可以写入数据),并将 limit 的值设置为 capacity。
调用 compact() 方法后,几个变量的位置以及数据的变化如图所示:
compact() 方法的 C++ 实现如下:
ByteBuffer& compact()
{
    do
    {
        if (position_ >= limit_)
        {
            position_ = 0;
            break;
        }

        for (uint32_t i = 0; i < limit_ - position_; i++)
        {
            p_buffer_[i] = p_buffer_[position_ + i];
        }
        position_ = limit_ - position_;
    } while (0);

    limit_ = capacity_;
    return *this;
}
4.8 状态相关方法总结
| 函数名 | 描述 | | ------------- | ------------------------------------------------------------ | | flip() | 把 limit 设置为当前 position,把 position 置为 0 | | clear() | 重置ByteBuffer的 position = 0; limit = capacity; mark = -1,数据内容无变化 | | reset() | 将position恢复到mark处的位置 | | rewind() | 执行后position = 0, mark = -1,数据内容不变 | | mark() | 将mark值设置为当前的position | | discardMark() | 将mark的位置重置为-1 | | compact() | 删除已读过的数据,将position到limit之间的数据移动到0和limit-position处,并将mark重置为-1,position放到数据结尾,总结一下,就是可以继续写数据了,但是不能读数据 |
5. put 数据
ByteBuffer 提供一系列的 put 方法将各种类型的数据放到 buffer 中,具体的类型有 char、short、int、long、float、double、char 数组以及 Bytebuffer。
5.1 扩容机制
Java 的 ByteBuffer 在创建时容量就固定了,如果存放的数据超出容量,会抛出异常。C++ 版本的 ByteBuffer 增加了扩容机制。理论上,每次向 buffer 中写入数据都要检查空间是否足够,如果空间不够,则扩大容量。
ByteBuffer 定义成员变量 BUFFER_SIZE_INCREASE 表示扩容的步长,即每次扩大的容量都为 BUFFER_SIZE_INCREASE 的整数倍,其值为 2048 :
const uint32_t BUFFER_SIZE_INCREASE = 2048;
定义 checkSize() 方法检查容量是否足够,如果足够,不做处理;如果不够,则计算需要多少容量并扩容:
void ByteBuffer::checkSize(uint32_t index, uint32_t increase)
{
    if (index + increase <= capacity_)
            return;

    uint32_t newSize = capacity_ + (increase + BUFFER_SIZE_INCREASE - 1) /
        BUFFER_SIZE_INCREASE * BUFFER_SIZE_INCREASE;
    uint8_t* pBuf = (uint8_t*)realloc(p_buffer_, newSize);
    if (!pBuf)
    {
        std::cout << "relloc failed!" << std::endl;
        exit(1);
    }

    p_buffer_ = pBuf;
    capacity_ = newSize;
}

void ByteBuffer::checkSize(uint32_t increase)
{
    checkSize(position_, increase);
}
在每个 put() 方法里首先调用 checkSize() 检查容量,然后再放入数据。
5.2 模板方法
为了简化存放数据的过程,用一个模板方法去适配各种类型:
template<typename T>
void append(T data)
{
    if (!p_buffer_)
        return;

    uint32_t s = sizeof(data);
    checkSize(s);

    memcpy(&p_buffer_[position_], (uint8_t*)&data, s);
    position_ += s;
}

template<typename T>
void insert(T data, uint32_t index)
{
    uint32_t s = sizeof(data);
    checkSize(index, s);

    position_ = index;
    append<T>(data);
}
append() 方法将数据写入到当前的 position_ 处,并相应增加 position_。
insert() 方法将数据写入到指定的位置,首先要将 position_ 设置为 index 然后调用 append() 方法写入数据。
5.3 put 方法
ByteBuffer 提供的所有 put 方法返回值类型都为 ByteBuffer& 便于链式操作,比如 bf.put(1).put("hello", 5).put(3.1415926),所有方法如下所示:
ByteBuffer& put(ByteBuffer* bb);
ByteBuffer& put(uint8_t value);
ByteBuffer& put(uint8_t value, uint32_t index);
ByteBuffer& putBytes(const uint8_t* buf, uint32_t len);
ByteBuffer& putBytes(const uint8_t* buf, uint32_t len, uint32_t index);
ByteBuffer& putChar(char value);
ByteBuffer& putChar(char value, uint32_t index);
ByteBuffer& putShort(uint16_t value);
ByteBuffer& putShort(uint16_t value, uint32_t index);
ByteBuffer& putInt(uint32_t value);
ByteBuffer& putInt(uint32_t value, uint32_t index);
ByteBuffer& putLong(uint64_t value);
ByteBuffer& putLong(uint64_t value, uint32_t index);
ByteBuffer& putFloat(float value);
ByteBuffer& putFloat(float value, uint32_t index);
ByteBuffer& putDouble(double value);
ByteBuffer& putDouble(double value, uint32_t index);
注意:由于 Java 采用 Unicode 编码,一个 Char 类型占两个字节,但是在 C++ 中 char 类型占一个字节,所以两个版本的 putChar() 方法
Related Skills
node-connect
344.4kDiagnose OpenClaw node connection and pairing failures for Android, iOS, and macOS companion apps
frontend-design
99.2kCreate distinctive, production-grade frontend interfaces with high design quality. Use this skill when the user asks to build web components, pages, or applications. Generates creative, polished code that avoids generic AI aesthetics.
openai-whisper-api
344.4kTranscribe audio via OpenAI Audio Transcriptions API (Whisper).
qqbot-media
344.4kQQBot 富媒体收发能力。使用 <qqmedia> 标签,系统根据文件扩展名自动识别类型(图片/语音/视频/文件)。
