Nxbt
Control your Nintendo Switch through a website, terminal, or macro.
Install / Use
/learn @Brikwerk/NxbtREADME


![]()
Key Features
- Use your favourite web browser to control a Nintendo Switch with any keyboard or gamepad.
- Use your terminal to control a Nintendo Switch with a keyboard.
- Use a macro from your terminal, browser, or Python script
- Use the NXBT Python API to write programs to control your Nintendo Switch.
- Primitive loop support in macros.
- In-depth command line interface.
- Support for emulating multiple controllers at once.
- Support for fast connection or reconnection to a Nintendo Switch.
- Emulated ontrollers support thread-safe access.
Installation
Linux
sudo pip3 install nxbt
Please Note: NXBT needs root privileges to toggle the BlueZ Input plugin. If you're not comfortable running this program as root, you can disable the Input plugin manually, and install NXBT as a regular user.
Windows and macOS
See the installation guide here.
Getting Started
Note: If you installed NXBT as a non-root user, please omit the use of sudo from any of the following commands.
Running the demo
The demo is meant to gauge whether or not NXBT is working. To do so, the demo will create a Pro Controller and run through a small loop of commands.
NOTE: If this is your first time connecting to an NXBT emulated controller on the specific host computer, you MUST have the "Change Grip/Order Menu" open on your Nintendo Switch. You can see how to navigate to the "Change Grip/Order Menu" HERE.
To start the demo, run the following command in your terminal:
sudo nxbt demo
If all is working correctly, the controller should connect, navigate to the settings, test the stick calibration, and navigate back to the "Change Grip/Order Menu".
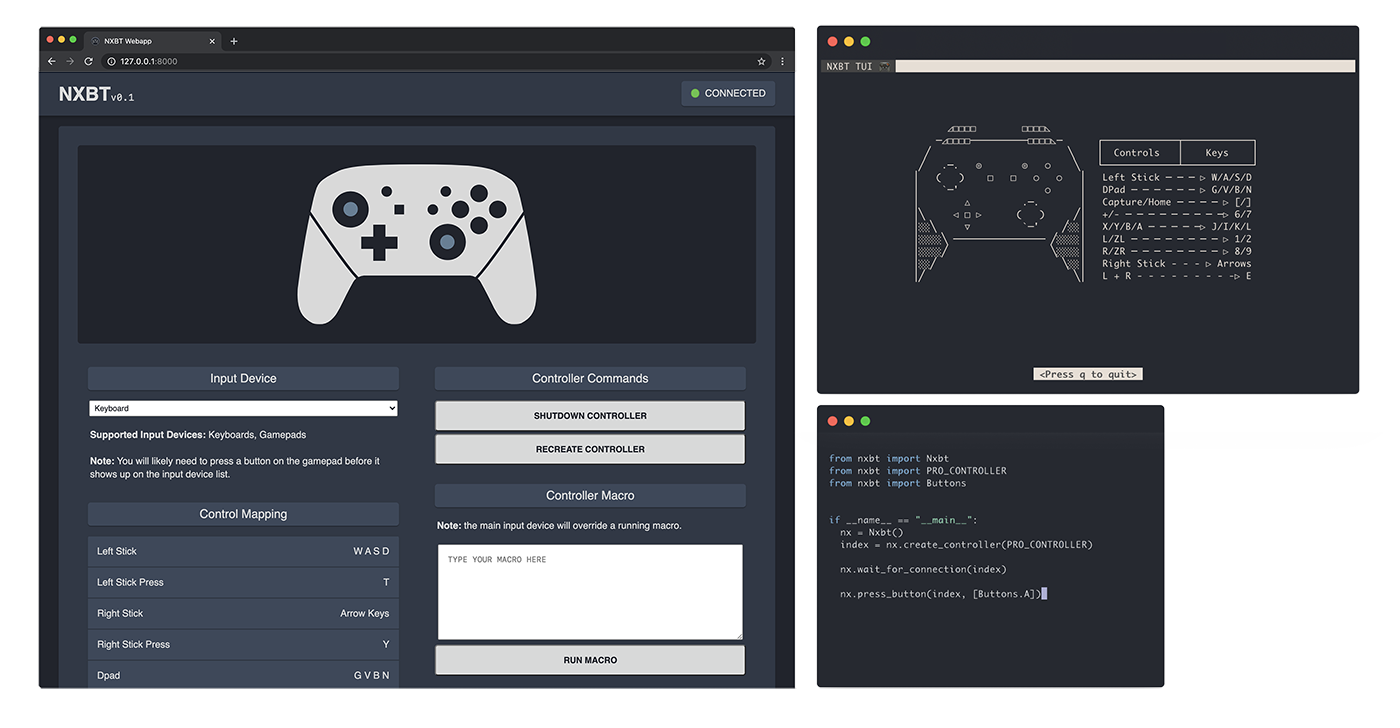
Using the Webapp
The NXBT webapp provides a web interface that allows for quick creation of a Nintendo Switch controller and use of a keyboard or gamepad to control the Nintendo Switch. This lets anyone who can access the website control a Nintendo Switch with their favourite keyboard or gamepad.
The webapp server can be started with the following command:
sudo nxbt webapp
The above command boots NXBT and an accompanying web server that allows for controller creation and use over your web browser.
The webapp itself will be locally accessible at http://127.0.0.1:8000 or, if you're on the same network as the host computer, http://HOST_COMPUTER_IP:8000. It's also possible to expose your NXBT webapp to the internet, however, you'll need to configure a reverse proxy, which is out of the scope of this readme.
You should see a webpage similar to the following image:
<div align="center"> <img src="https://raw.githubusercontent.com/Brikwerk/nxbt/master/docs/img/nxbt-webapp-start.png" alt="NXBT Webapp Start Screen" width="600"> </div>To create and start a Pro Controller, click the Pro controller graphic. If creation/boot is successful, the website will switch to a loading screen. During this time, you should have the Nintendo Switch you wish to connect to powered on and within range of the host computer.
NOTE: If this is your first time connecting to your Nintendo Switch with the specific host computer, make sure you're on the "Change Grip/Order Menu". If you're still unable to connect, try running the demo (in the above section) or refer to the troubleshooting documentation.
Once you've successfully connected to the Nintendo Switch, you should see a webpage similar to below:
<div align="center"> <img src="https://raw.githubusercontent.com/Brikwerk/nxbt/master/docs/img/nxbt-webapp-connected.png" alt="NXBT Webapp Connected Screen" width="600"> </div>Here, you can change your input method, shutdown or restart the controller, and run an NXBT macro.
A few other functions to note:
- If you exit the webpage, the controller will shutdown.
- Once you've connected over the "Change Grip/Order Menu", NXBT will automatically reconnect. This applies on a per-Bluetooth-adapter basis.
- Most gamepads should be usable over the browser. To get started with a gamepad, click a button and it should show up under the input dropdown list. If it doesn't show up, try another browser. Chrome is the recommended standard as it seems to have the best gamepad support currently (as of September 2020)
Using the TUI
The TUI (Terminal User Interface) allows for local or remote (SSH/Mosh) terminal sessions to control a Nintendo Switch with a keyboard.
The TUI can be started with:
sudo nxbt tui
NOTE: If this is your first time connecting to your Nintendo Switch with the specific host computer, make sure you're on the "Change Grip/Order Menu". If you're still unable to connect, try running the demo (in the above section) or refer to the troubleshooting documentation.
A loading screen should open and, once connected, the main TUI control screen should load. This should look something like below:
<div align="center"> <img src="https://raw.githubusercontent.com/Brikwerk/nxbt/master/docs/img/nxbt-tui.png" alt="NXBT TUI Connected" width="600"> </div>There are two types of NXBT TUI sessions:
- Remote Mode (pictured above): When connecting over an SSH (or Mosh) connection, "Remote Mode" is used to compensate for keyup events not being sent over remote terminal sessions. This functionally means that "Remote Mode" is a bit less responsive than "Direct Mode".
- Direct Mode: When running the NXBT TUI directly on the host computer, keyboard key presses are taken directly from any keyboard plugged in.
Once you've successfully connected to a Nintendo Switch over the "Change Grip/Order Menu", you can reconnect quickly to the same Switch with the following command:
sudo nxbt tui -r
A couple other funcionality notes:
- Press 'q' to exit the TUI.
- In Direct Mode, press Escape to toggle input to the Nintendo Switch.
- NXBT looks for SSH and Mosh connections before deciding whether or note Remote Mode should be used. If you use another method for creating a remote terminal instance, NXBT likely won't detect it. Please open an issue if this happens to you!
Running Macros
NXBT provides three ways to run macros on your Nintendo Switch:
- The NXBT Webapp (easiest)
- The CLI
- The Python API
For the first method, refer to the "Using the Webapp" section for more info.
For info on writing macros, check out the documentation here.
Running Macros with the Command Line Interface
To run a simple, inline macro, you can use the following command:
sudo nxbt macro -c "B 0.1s\n 0.1s"
The above command will press the B button for 0.1 seconds and release all buttons for 0.1 seconds. The -c flag specifies the commands you would like to run. You'll need to be on the "Change Grip/Order Menu" for the above command to work. If you've already connected to the Switch on the host computer, you can reconnect and run the macro by adding the -r or --reconnect flag:
sudo nxbt macro -c "B 0.1s\n 0.1s" -r
Since it can be a little cumbersome typing out a large macro in the terminal, the macro command also supports reading from text files instead!
commands.txt file:
B 0.1s
0.1s
sudo nxbt macro -c "commands.txt" -r
If you want more information on NXBT's CLI arguments:
sudo nxbt -h
Running Macros with the Python API
Macros are supported with the macro function in the Python API. All macros are expected as strings (multiline strings are accepted).
Minimal working example:
import nxbt

macro = """
B 0.1s
0.1s
"""

# Start the NXBT service
nx = nxbt.Nxbt()

# Create a Pro Controller and wait for it to connect
controller_index = nx.create_controller(nxbt.PRO_CONTROLLER)
nx.wait_for_connection(controller_index)

# Run a macro on the Pro Controller
nx.macro(controller_index, macro)
The above example uses a blocking macro call, however, multiple macros can be queued (or other actions taken) with the non-blocking syntax. Queued macros are processed in FIFO (First-In-First-Out) order.
# Run a macro on the Pro Controller but don't block.
# In this instance, we record the macro ID so we can keep track of its status later on.
macro_id = nx.macro(controller_index, macro, block=False)

from time import sleep
while macro_id not in nx.state[controller_index]["finished_macros"]:
    print("Macro hasn't finished")
    sleep(1/10)

print("Macro has finished")
Using the API
NXBT provides a Python API for use in Python applications or code.
If you're someone that learns by example, check out the demo.py file located at the root of this project.
For a more in-depth look at all the functionality provided by the API, checkout the nxbt/nxbt.py file.
For those looking to get started with a few simple examples: Read on!
Creating a Controller and Waiting for it to Connect
Related Skills
node-connect
350.1kDiagnose OpenClaw node connection and pairing failures for Android, iOS, and macOS companion apps
claude-opus-4-5-migration
109.9kMigrate prompts and code from Claude Sonnet 4.0, Sonnet 4.5, or Opus 4.1 to Opus 4.5
frontend-design
109.9kCreate distinctive, production-grade frontend interfaces with high design quality. Use this skill when the user asks to build web components, pages, or applications. Generates creative, polished code that avoids generic AI aesthetics.
model-usage
350.1kUse CodexBar CLI local cost usage to summarize per-model usage for Codex or Claude, including the current (most recent) model or a full model breakdown. Trigger when asked for model-level usage/cost data from codexbar, or when you need a scriptable per-model summary from codexbar cost JSON.
