BehringerXTouchExtender
🎚️ MIDI controller client for Behringer X-Touch Extender DAW control surface.
Install / Use
/learn @Aldaviva/BehringerXTouchExtenderREADME
🎚️ BehringerXTouchExtender


Send and receive events with a Behringer X-Touch Extender DAW MIDI control surface over USB.
<!-- MarkdownTOC autolink="true" bracket="round" autoanchor="false" levels="1,2,3" bullets="1.,-,-" -->- Quick Start
- Prerequisites
- Installation
- Connection
- Track identifiers
- Reactive data
- Usage
- References
- Acknowledgements
Quick Start
dotnet new console
dotnet add package BehringerXTouchExtender
// Program.cs
using BehringerXTouchExtender;
using var device = BehringerXTouchExtenderFactory.CreateWithRelativeMode();
device.Open();
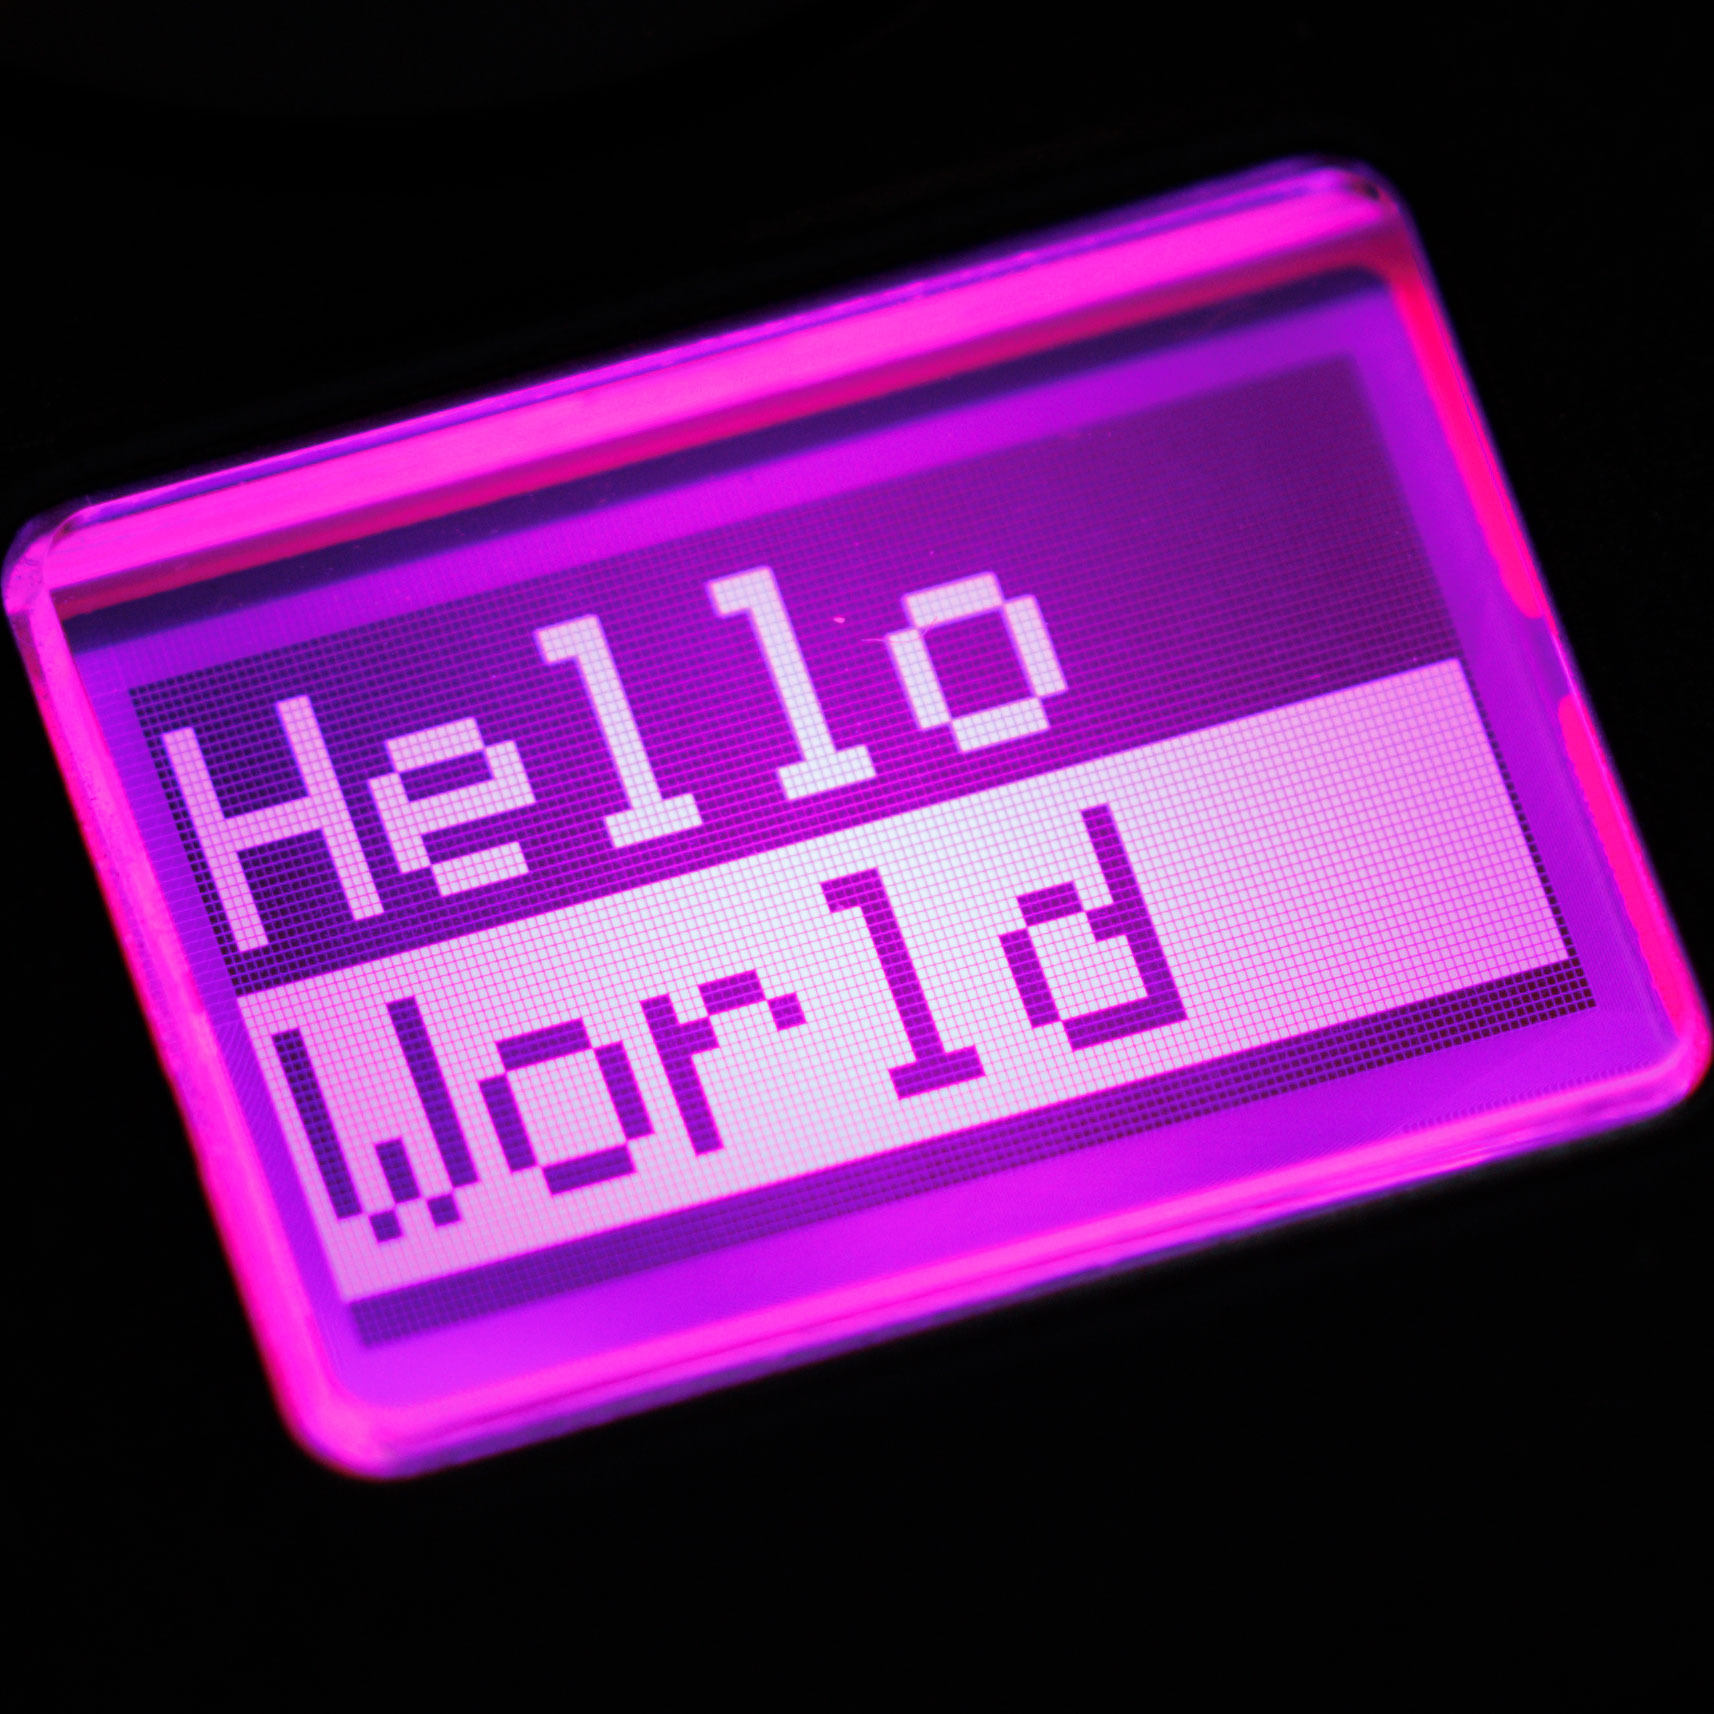
var scribbleStrip = device.GetScribbleStrip(0);
scribbleStrip.TopText.Connect("Hello");
scribbleStrip.BottomText.Connect("World");
scribbleStrip.TopTextColor.Connect(ScribbleStripTextColor.Light);
scribbleStrip.BottomTextColor.Connect(ScribbleStripTextColor.Dark);
scribbleStrip.BackgroundColor.Connect(ScribbleStripBackgroundColor.Magenta);
dotnet run
Prerequisites
- A Behringer X-Touch Extender
- A Microsoft .NET runtime that supports .NET Standard 2.0 or later:
MIDI control mode
You must manually set the X-Touch Extender to use absolute or relative MIDI control mode. The other two modes, HUI and MC, are not supported by this library.
- Turn on the X-Touch Extender while holding the leftmost Select button
- Turn the leftmost rotary encoder knob until the LCD shows
Ctrl(absolute MIDI control mode) orCtrlRel(relative MIDI control mode) - Press the leftmost Select button
- Remember which mode you chose when you connect to the device
Once configured, the X-Touch Extender will persist this control mode setting until you change it again, even after being turned off or unplugged. You don't have to set it every time you turn the device on.
Firmware upgrade
If your computer has an AMD Zen2 (Ryzen 3000 series) or later CPU, then you must install X-Touch Extender firmware 1.21 or later to fix the broken USB connection.
- Download the firmware
- Extract the
.syxfile from the.zipfile - Turn on the X-Touch Extender while holding the rightmost Record button
- Download and run MIDI-OX on an unaffected (e.g. Intel) computer connected to the X-Touch Extender over USB
- Select Options › MIDI Devices and highlight the
X-Touch-Extentries - Select Actions › Send › SysEx File and choose the
.syxfile from step 2 - Wait for the upgrade to finish
- Reboot the X-Touch Extender using its power switch
Installation
You can install this library into your project from NuGet Gallery:
dotnet add package BehringerXTouchExtenderInstall-Package BehringerXTouchExtender- Go to Project › Manage NuGet Packages in Visual Studio and search for
BehringerXTouchExtender
Connection
- Use
BehringerXTouchExtenderFactoryto create a device instance you can use. The choice of which factory method to call depends on the device's configured MIDI control mode.- If you set your X-Touch Extender to
Ctrlmode:using BehringerXTouchExtender; using var device = BehringerXTouchExtenderFactory.CreateWithAbsoluteMode(); - If you set your X-Touch Extender to
CtrlRelmode:using BehringerXTouchExtender; using var device = BehringerXTouchExtenderFactory.CreateWithRelativeMode();
- If you set your X-Touch Extender to
- Once the X-Touch Extender is powered on and connected over USB, open the connection.
device.Open();
Track identifiers
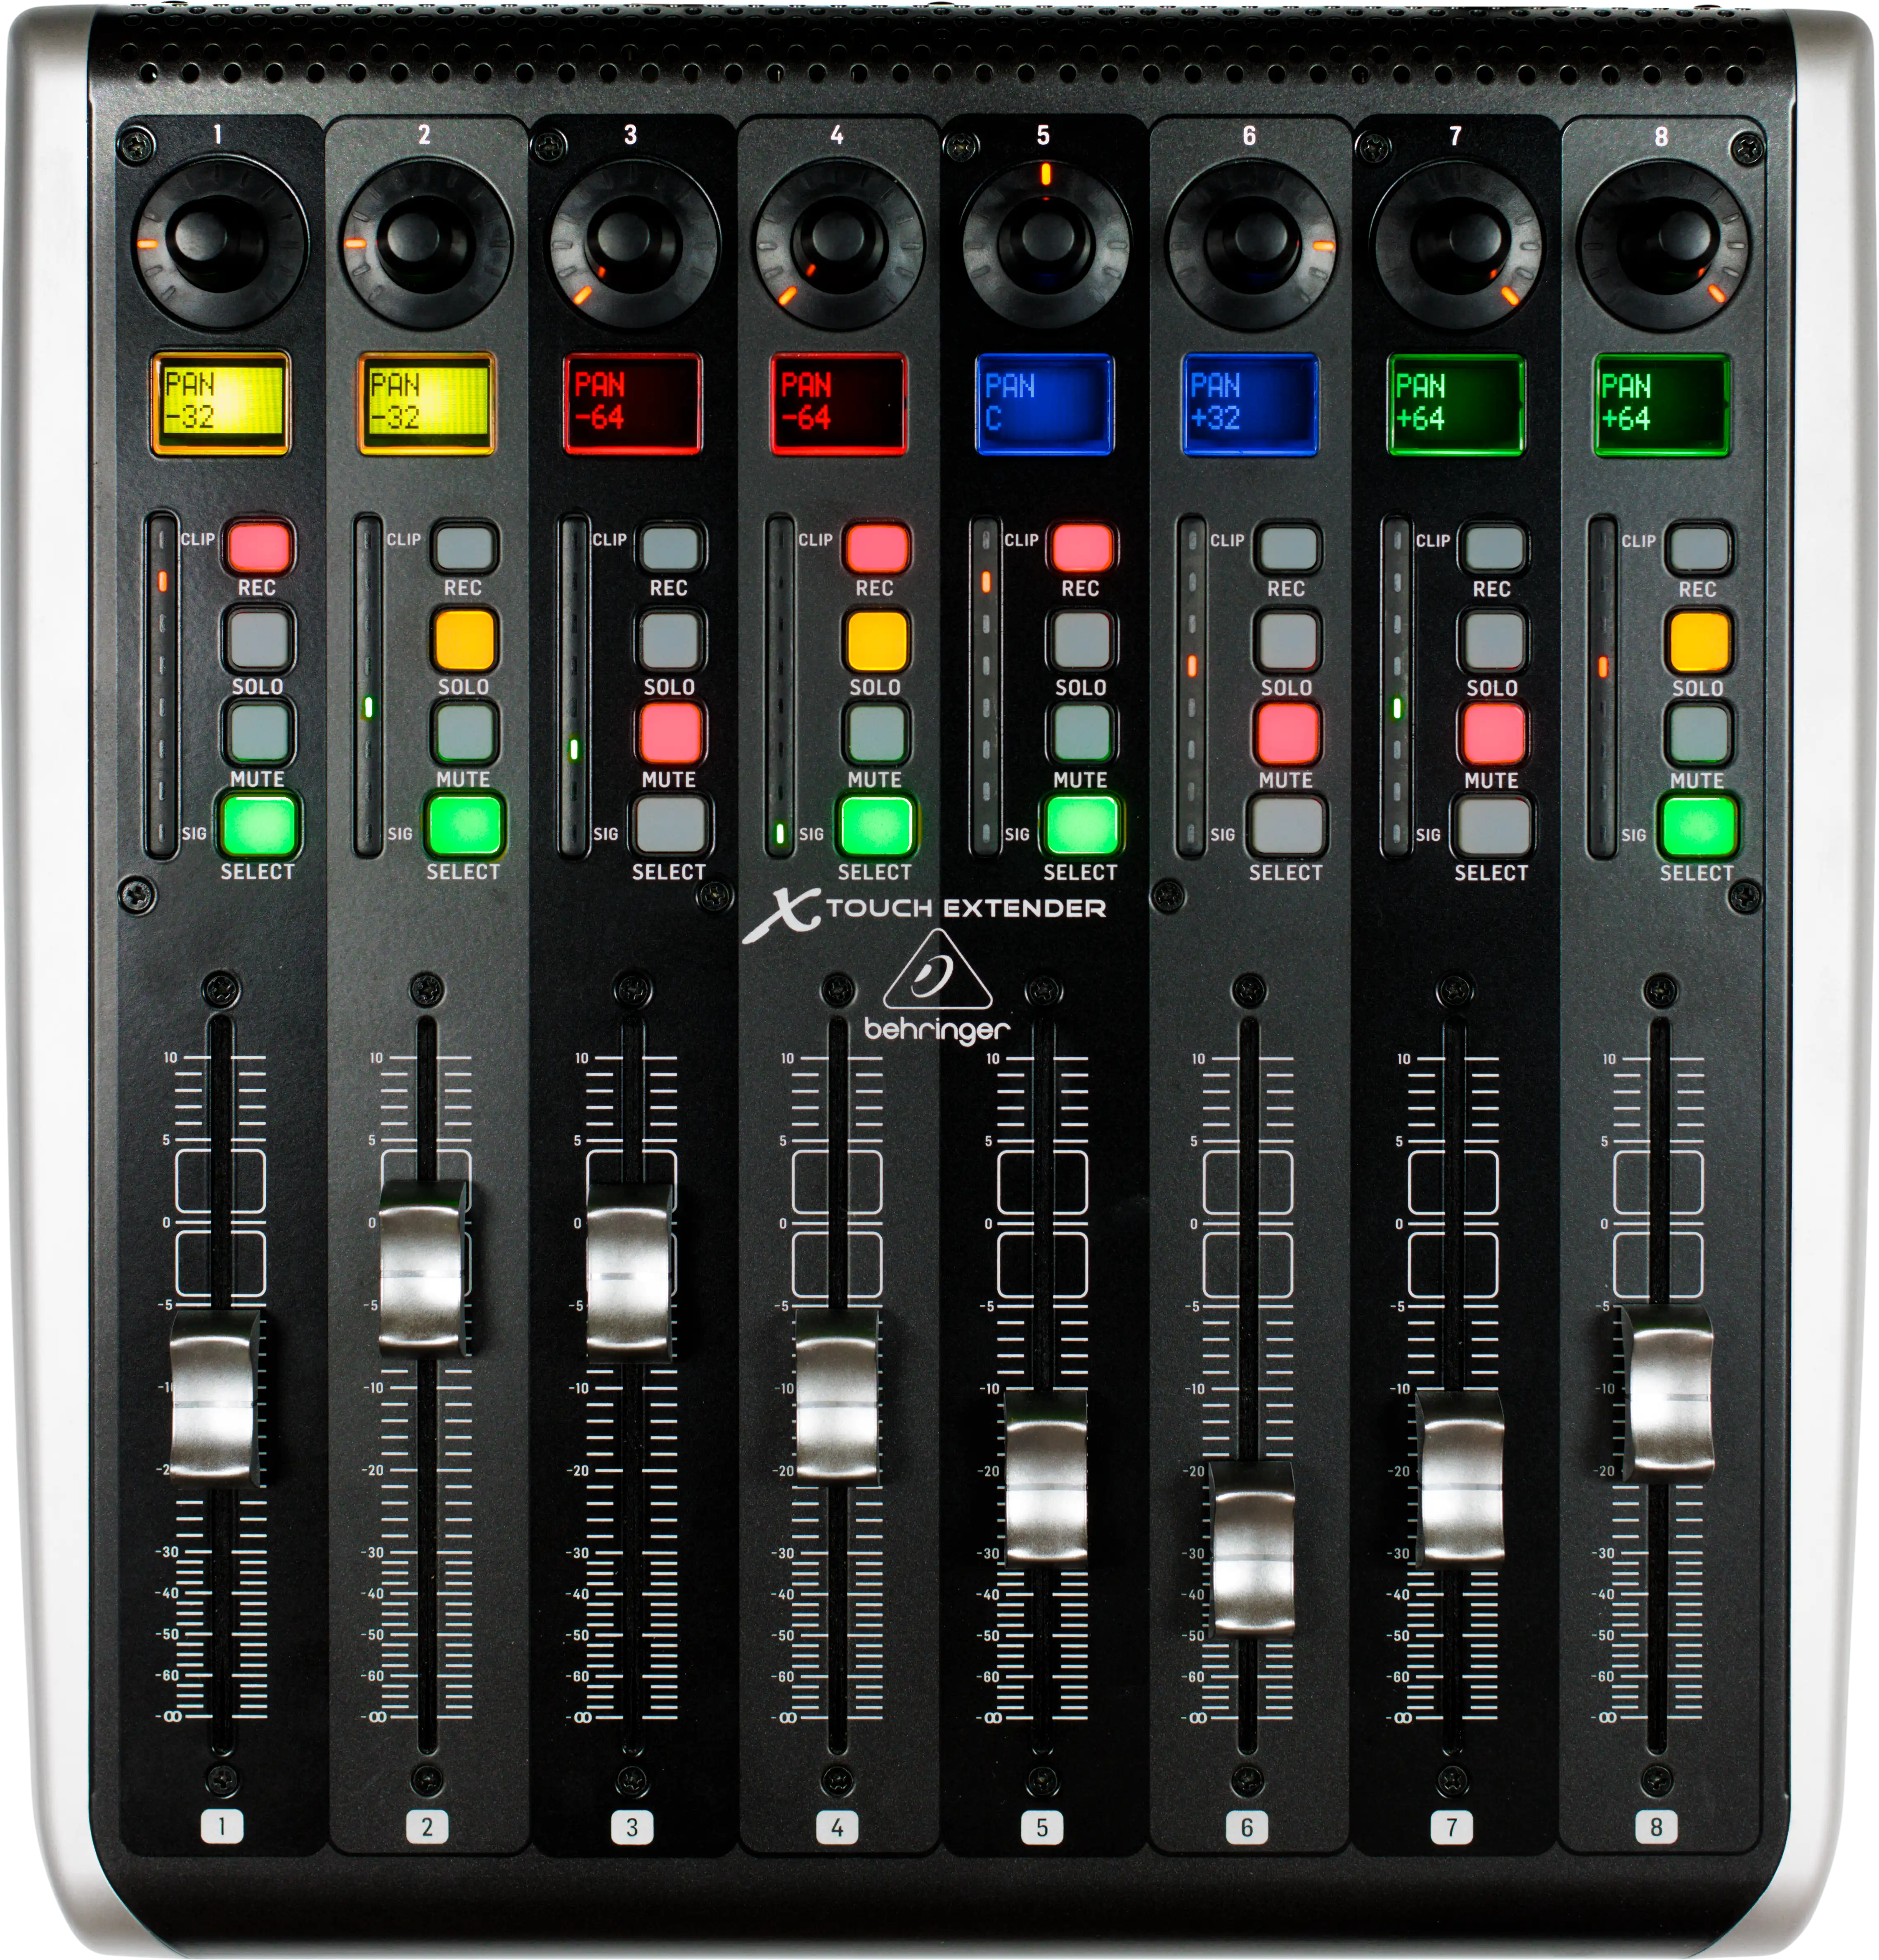
The X-Touch Extender is divided into eight vertical banks of controls, called tracks or channels. In this library, they are numbered from 0 on the left to 7 on the right (0-indexed).
On the physical device, the painted legends are 1-indexed, but 0-indexing is easier and less confusing to use in software.
Any time this library takes or provides a track ID, it's 0-indexed.
In most of the code examples below, the trackId argument used is 0.
Reactive data
This library handles data using KoKo Property objects. These encapsulate values that can change, including automatically in response to other Properties, and they automatically fire change events.
If you have your own Property that you want to drive a control on the X-Touch Extender, you can connect it to this library.
using KoKo;

var scribbleStrip = device.GetScribbleStrip(0);
var greeting = new StoredProperty<string>("Hello");
scribbleStrip.TopText.Connect(greeting);
// The device will show "Hello"

greeting.Value = "Hola";
// The device will automatically update to show "Hola"
KoKo Properties are used by all values on all controls in this library, not just scribble strips. This is useful if the desired value actually depends on other values, because they can all be automatically calculated without any manual change event firing or listening.
Property<CultureInfo> cultureInfo;
var greeting = DerivedProperty.Create<string>(cultureInfo, culture => culture.Name switch {
    "es" => "Hola",
    _ => "Hello"
});
scribbleStrip.TopText.Connect(greeting);
// The device will automatically update the greeting shown whenever the cultureInfo property changes
These Properties are used for reading changing data as well as writing it. You can read the immediate value, as well as registering for events whenever the Property changes in the future.
var button = device.GetRecordButton(0);

if(button.IsPressed.Value){
    Console.WriteLine("Button is pressed");
}

button.IsPressed.PropertyChanged += (sender, args) => {
    if(args.NewValue){
        Console.WriteLine("Button was pressed");
    }
};
If you don't want to create reactive properties, you can connect the device's properties to constant values whenever you want them to change.
scribbleStrip.BottomText.Connect("World");
Usage
Rotary encoders
IRotaryEncoder rotaryEncoder = device.GetRotaryEncoder(0);
Illuminating lights
There are thirteen orange lights on each rotary encoder. Exactly one of them is illuminated at any given time. You can't turn them all off at the same time. Set the LightPosition property to change which light is illuminated.
They are numbered from 0 (most counter-clockwise) to 12 (most clockwise). Va
Related Skills
node-connect
347.0kDiagnose OpenClaw node connection and pairing failures for Android, iOS, and macOS companion apps
frontend-design
107.8kCreate distinctive, production-grade frontend interfaces with high design quality. Use this skill when the user asks to build web components, pages, or applications. Generates creative, polished code that avoids generic AI aesthetics.
openai-whisper-api
347.0kTranscribe audio via OpenAI Audio Transcriptions API (Whisper).
qqbot-media
347.0kQQBot 富媒体收发能力。使用 <qqmedia> 标签,系统根据文件扩展名自动识别类型(图片/语音/视频/文件)。
